Handling User Authentication with NodeJS, Express and JSONwebtoken
Repository
https://github.com/nodejs/node
What Will I Learn?
- User authentication and authorization using
jsonwebtokenin aNode/Expressapplication.
Requirements
- NodeJS/Express
- Nedb for database storage.
- Postman
Difficulty
- Intermediate
Tutorial Contents
Introduction to jsonwebtoken
jsonwebtoken is a json based library that can be used to verify claims between two parties in an application.
When called in an application, jsonwebtoken will generate a unique token which can be used in future requests to verify claims.
We will be using this library to create a user authentication system in this tutorial.
The features we will create include
- User registration
- Get list of users
- Get one user from the database
- User login
Asides NodeJS/Express we will need to install nedb package. nedb is a lightweight version of MongoDB that can be used to manage databases in a web application.
It is very easy to use and uses MongoDB syntax.
Initializing the Application
This application would be using the Express application generator module to initialize our Nodejs/Express application.
First, to install the express generator globally use the following command
npm install express-generator -g
Once the installation is complete, navigate to the desired project directory and run the command express which will generate the application with the following structure.
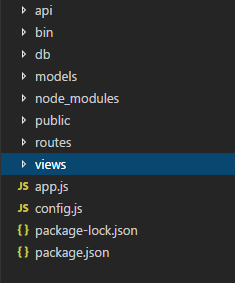
Don't worry if you don't see some of the directories in the image above in your generated application. Any missing directory will be added during the course of this tutorial.
Run npm install in the terminal to install all initialized dependencies in package.json.
Create routes
We still need to install three dependencies to make the application work. In the terminal run the three following commands.
npm install jsonwebtoken --save

npm install bcryptjs --save

npm install nedb --save
The three installations above will install jsonwebtoken, bcryptjs and nedb separately .
After which we can now start working on the code for the application.
bcryptjs is used for encrypting password so unauthorized parties will not be able to gain access to it.
nedb is the database module that will be used in storing the data.
The application we are building requires four routes. The routes include
'/register'which will handle all user registrations.'/users'which will return a list of all available users injsonformat.'/user'which will return a single specified user.'/login'which handles user authentication upon login.
The Register Route
To create the route for the registration module we first have to go to the app.js file.
In app.js look for the line that says
app.use('/', indexRouter);
Below this line add the following route
app.post('/register', usersRouter);
In the line above we are sending a post request to the register endpoint.
Upon calling the post request the callback usersRouter will execute. usersRouter is a variable that sets theusers main routing file as a required dependency for the app.js file.
The full code for setting the users main routing file as a dependency
var usersRouter = require('./routes/users');
The express generator has generated a users routing file by default so we will use that.
In the users routing file which can be found in the routes directory, the first we need to do is to set some dependencies as a requirement.
Paste the following code directly below the line var router = express.Router();.
var  Datastore  =  require('nedb');

var  users  =  new  Datastore({ filename:  '/bin/users.db', autoload:  true });

var  jwt  =  require('jsonwebtoken');

var  bcrypt  =  require('bcryptjs');

var  config  =  require('../config');
In the block above, nedb was set as a requirement inside a variable Datastore through the line var Datastore = require('nedb');.
The variable users creates a new Datastore object which will help to store the application data.
The Datastore object has two properties, the first property filename: '/bin/users.db' is the path to the file that will store the user data for our application.
If the file has not been created don't worry the nedb package will create one automatically.
The second property in the Datastore object autoload: true will help in automatically loading the database whenever the server runs.
jsonwebtoken and bcryptjs are also set as requirements sequentially followed by a file located at ../config which points to the config.js file located at the root directory of the application.
In config.js we store a json object that will be used as a token by jsonwebtoken during authentication.
config.js code
module.exports  = {
    'secret':  'oursecret'
}
After handling the importation of all required dependencies we can now add the actual code for the '/register' endpoint.
The '/register' endpoint will handle all requests relating to user registration on our application.
router.post('/register', function(req, res) {
    var  hashedPassword  =  bcrypt.hashSync(req.body.password, 8);
    users.insert({
        username:  req.body.username,
        password:  hashedPassword,
        role:  req.body.role
    }, function(err, user) {
        if(err) {
            return  res.status(500).send('Problem during registration');
        }
        var  token  =  jwt.sign({ id:  user._id }, config.secret, {expiresIn:  86400});

        res.status(200).send({
            auth:  true, token:  token
        });
    })
});
In the router.post() method we have two parameters.
The first parameter '/register' is a string containing the endpoint route indicating that any requests associated to that endpoint should be handled here.
The second parameter is an anonymous callback function that works on the data sent in through individual requests and returns the desired result.
The function takes two parameters req and res. The first parameter req is an object containing all data provided by during the request while the second parameter res is also an object containing the appropriate response to that request.
In the function, we firstly encrypt the password supplied in the request using the bcrypt dependency.
var hashedPassword = bcrypt.hashSync(req.body.password, 8);
The variable hashedPassword above holds the encrypted password from the request body. The method bcrypt.hashSync() is responsible for the encryption.
After hashing the password the entire request body is then inserted into a database by using the users.insert() method.
users.insert() takes two parameters, the first is an object containing the data to be inserted which are username, password and role.
role is used to store the user role in the application.
The second parameter is a function that also accepts two parameters, one is err which is used when the insert method encounters an error while the second user is used when the insert method runs successfully.
In the function we create a conditional for handling errors.
The following block will return a 500 status upon encountering an error
if(err) {
    return  res.status(500).send('Problem during registration');
}
If no error was found, then the next block of code will execute, this block will help create a unique token for this user to use during authentication in future requests.
var token = jwt.sign({ id: user._id }, config.secret, {expiresIn: 86400});
Using the jwt.sign() method which grabs the unique id for the just registered user along with the value of the secret property in config.js a unique token is created for this particular user.
Finally a response is sent through the following code
res.status(200).send({
    auth:  true,
    token:  token
});
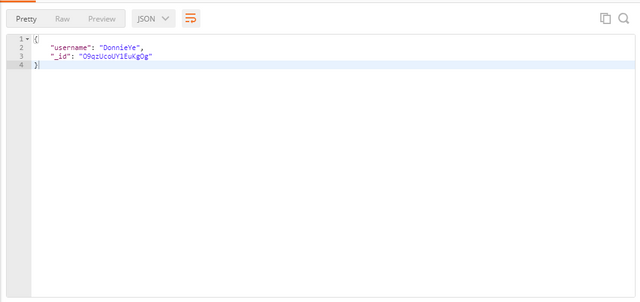
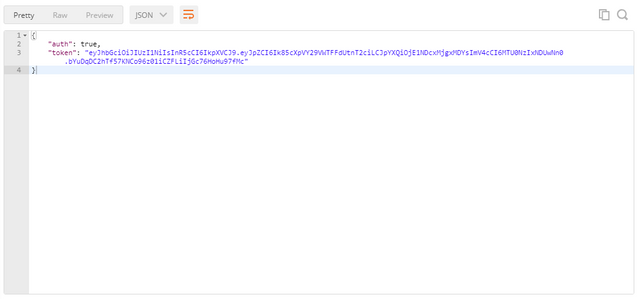
The block above responds with 200 status and sends an object with two properties
auth: true to show that the registration is complete and successful and token: token to return the unique token created for the user.
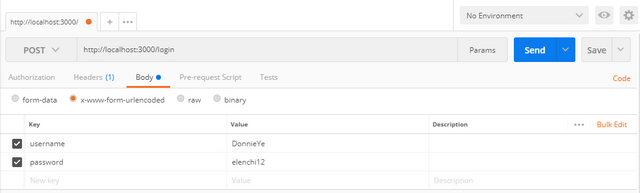
We can use Postman to test the api we just created. In Postman we can make a request to create a new user by using the url localhost:3000/register.
Before using Postman we need to navigate the project directory in the command line and run set DEBUG=your-project-name:* & npm start to start the project server.
In Postman we can now make a post request to the server to register a user.
When making the request make sure you select x-www-form-urlencoded in the Body section of the interface.
Use the following image as a guideline
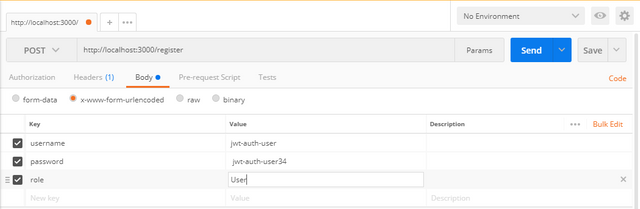
After setting the parameters for registration we click on the blue Send button at the to right corner.
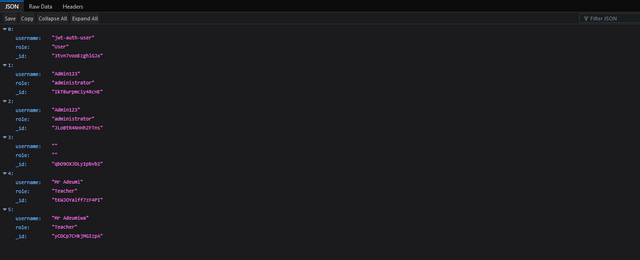
If everything goes right we'll get a response identical to the image below

The Users Route
We are going to create a route for our users. The users route when queried would return a list of all users stored on the database.
Before creating the actual route we need to make a reference to it in the app.js file.
Paste the code app.get('/users', usersRouter); in your app.js file directly under the line app.post('/register', usersRouter);.
The url for the api endpoint is '/register' while usersRouter references the module that will handle the request.
In the routes/users.js file paste the following code
router.get('/users', function(req, res) {
    users.find(req.query, {password:  0}, function(err, users) {
        res.json(users)
    })
})
The block above will accept any request going to the '/users' endpoint and store the data being passed as an object in the function argument req.
In the callback function we instruct the server to look through the users database by the users.find() method.
The method will return data for all users from the database. This data is then sent back as a response in json format .
To test our newly created route we can navigate to localhost:3000/users in our browser. If the code is works correctly we'll get a page that looks like the image
The User Route
In the user route we will be fetching the data one particular user.
The said user will be identified by the unique token created during registration. This token will be sent in as a request header.
The token will be verified by passing it to a function verifyToken and then passed to the callback for response.
In app.js add the code app.get('/user', usersRouter); directly below the line app.get('/users', usersRouter);.
In routes/users.js add the following code
router.get('/user', verfiyToken, function(req, res, next){
    users.findOne({ _id:  req.userId },{ password:  0 }, function(err, user) {
        if(err) {
            return  res.status(500).send('There was a problem finding the user');
        }

        if(!user) {
            return  res.status(404).send('No user found')
        }

        res.status(200).send(user)
    });
});
Any request made to the '/user' route will be handled by the block above.
Upon making the request the request data is passed through verifyToken.
verifyToken is a function defined in another file. To create verifyToken in your project go to the project root directory and create a new directory api.
in the api directory add a new file verifytoken.js and paste the code below.
var  jwt  =  require('jsonwebtoken');
var  config  =  require('../config');

function  verifyToken(req, res, next) {
    var  token  =  req.headers['x-access-token'];

    if(!token) {
        return  res.status(403).send({
            auth:  false,
            message:  'No token provided'
        })
    }

    jwt.verify(token, config.secret, function(err, decoded) {
        if(err) {
            return  res.status(500).send({
                auth:  false,
                message:  'Failed to authenticate token'
            })
        }
        req.userId  =  decoded.id
        next()
    })
}

module.exports  =  verifyToken;
In the file we import jsonwebtoken and the config file on the first two lines.
The function verfiyToken() accepts a request object through req, sends a response object through res and uses next to pass the response to the next function.
In the function we set the value of a variable token to the value of the token stored in the request header in the x-access-token' field.
The line responsible for this is var token = req.headers['x-access-token'];.
Below the token reference we have a conditional statement that's being used to verify the token for its authenticity.
The following block is an if statement that checks if the value begin sent from token is not null.
If the token is null the function returns a response status 403 sends a response object indicating that the authentication was not successful and no token was provided.
If the value in token is not null the next block will execute.
In the next block we will be using jsonwebtoken to verify if the unique token provided is the correct one.
Also we'll be verifying the value of config.secret. If both verification goes through the callback function will execute.
In the callback function, we first of all check if any errors were resulting from the first two operation.
If an error is caught a 500 status is returned along with an object with a message Failed to authenticate token.
If no error is caught the req.userId is stored as decoded.id where the decoded object is the second argument of the callback function.
We use the next() method to pass the result data to the next function in the router/users.js file.
Finally we export verifyToken using module.exports = verifyToken;.
In routes/users.js we need to set verifyToken as a dependency. To do that you can paste var verfiyToken = require('../api/verifytoken') directly below the line var config = require('../config'); in routes/users.js
After running the request data through verifyToken the last callback function will execute the request data.
This function will look through the users database and find one user whose id matches req.userId using the users.findOne syntax.
If the method catches an error it returns the status 500 including a message 'There was a problem finding the user'.
If the specified user cannot be found on the database the method returns a 404 status and a message 'No user found'.
If the user is found the method returns a 200 status and an object containing the single user details.
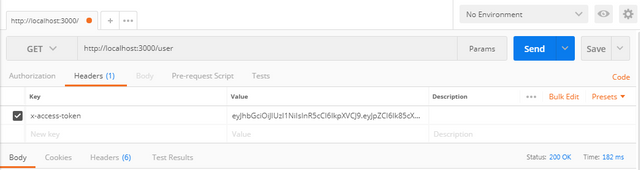
We can test our api url using Postman by sending a get request to localhost:3000/user with the token of the user being queried as a parameter.
In the image below the token for a registered user is being sent in as a request header using Postman
And the response is shown in the image below.
The Login Route
The login route will execute all login request from the users.
In app.js add the code app.post('/login', usersRouter); below the line app.get('/user', usersRouter); .
In routes.users.js add the following code
router.post('/login', function(req, res) {
    users.findOne({ username:  req.body.username }, function(err, user) {
        if(err) {
            return  res.status(200).send('Server error encountered');
        }

        if(!user) {
            return  res.status(404).send('User not found');
        }

        var  passwordisValid  =  bcrypt.compareSync(req.body.password, user.password);

        if (!passwordisValid) {
            return  res.status(401).send({
                auth:  false,
                token:  null
            })
        }

        var  token  =  jwt.sign({ id:  user._id }, config.secret, {
            expiresIn:  86400
        });

        res.status(200).send({
            auth:  true,
            token:  token
        })
    })
})
Any post request directed to '/login' will be handled by the block above.
The callback function will accept the request data and store it in req.
users.findOne() then attempts to locate a user with username matching the username supplied in req.body.username.
The callback function will firstly check if the method did not catch any errors through the block
if(err) {
    return  res.status(200).send('Server error encountered');
}
If an error is detected the function returns a response with a 200 status and the message Server error encountered.
The following block will run if the user being requested could not be found on the database.
if(!user) {
    return  res.status(404).send('User not found');
}
The above block with return a response object with the 404 status and the message User not found.
If the user does exist the code below will compare the password` provided during the request with one stored for that user in the database.
var passwordisValid = bcrypt.compareSync(req.body.password, user.password);
If the password are not the same the following block runs
if (!passwordisValid) {
    return  res.status(401).send({
        auth:  false,
        token:  null
    })
}
The block above will return a 401 status response and and object that indicates that the authentication was not successful.
If the passwords are the same then the following line runs
var  token  =  jwt.sign({ id:  user._id }, config.secret, {
    expiresIn:  86400
});
The block above creates a unique token using jsonwebtoken and the sign method for the user with the provided user id.
Finally the function returns with a response of 200 status and an object showing that the authentication was successful.
Testing the login route is shown in the image below.
The request
The response
Proof of Work Done
https://github.com/olatundeee/jsonwebtoken-api-auth
Sponsored ( Powered by dclick )
Introducing DCLICK: An Incentivized Ad platform by Proof of Click. - Steem based AdSense.
Hello, Steemians. Let us introduce you a new Steem B...

This posting was written via
dclick the Ads platform based on Steem Blockchain.
Thank you for your contribution @gotgame.
After reviewing your tutorial, we suggest the following points:
We suggest using paragraphs. Separating each sentence with a blank line makes it very difficult to read.
There are several online tutorials that talk about this subject, as you can check here in this tutorial.
In the next tutorial try to bring something innovative to the open source community.
Need help? Write a ticket on https://support.utopian.io/.
Chat with us on Discord.
[utopian-moderator]
Thank you for your review, @portugalcoin! Keep up the good work!
Hi, @gotgame!
You just got a 0.3% upvote from SteemPlus!
To get higher upvotes, earn more SteemPlus Points (SPP). On your Steemit wallet, check your SPP balance and click on "How to earn SPP?" to find out all the ways to earn.
If you're not using SteemPlus yet, please check our last posts in here to see the many ways in which SteemPlus can improve your Steem experience on Steemit and Busy.
Hello, as a member of @steemdunk you have received a free courtesy boost! Steemdunk is an automated curation platform that is easy to use and built for the community. Join us at https://steemdunk.xyz
Upvote this comment to support the bot and increase your future rewards!
Congratulations @gotgame! You have completed the following achievement on the Steem blockchain and have been rewarded with new badge(s) :
Click here to view your Board
If you no longer want to receive notifications, reply to this comment with the word
STOP