Create Custom Views for GLM mathematics with .natvis file
What Will I Learn?
- Learn Custom Views of Native Objects.
- Learn how to write a *.nativs file.
- Understand the steps of using the nativs file.
Requirements
- Basic C++
- The basic format of a xml file.
- Basic understanding of the matrix.
Difficulty
- Intermediate
Tutorial Contents
1.issue raised
Some time ago, I wanted to do something related to extension for Visual Studio. Some math libraries were needed when I started this work. So I thought there should be some mathematical functions that have been written in GLM that can be used directly.
Some time ago, I wanted to do something related to extension for Visual Studio. Some math libraries were needed when I started this work. So I thought there should be some mathematical functions that have been written in GLM that can be used directly.
Some time ago, I wanted to do something related to extension for Visual Studio. Some math libraries were needed when I started this work. So I thought there should be some mathematical functions that have been written in GLM that can be used directly.
Some time ago, I wanted to do something related to extension for Visual Studio. Some math libraries were needed when I started this work. So I thought there should be some mathematical functions that have been written in GLM that can be used directly.
Some time ago, I wanted to do something related to extension for Visual Studio. Some math libraries were needed when I started this work. So I thought there should be some mathematical functions that have been written in GLM that can be used directly.
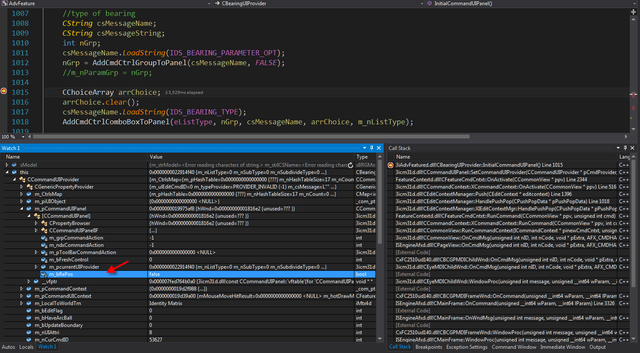
When I write a program in Visual Studio, I often need to debug a piece of code, and often need to look at the data for a variable. But in large sofmy programs, a class is often derived from a base class more than once. When you view the values of one member variable of a class, you often need to expand many layers in the Watch window to see it, which causes a lot of inconvenience my programmers.
For example, I want to see the value of this m_brepos as shown in the following figure, and I need to expand the three layer to see the value of this variable (this-ccommanduiprovider-m_pcommanduipanel). Therefore, for some programmers, they want to be able to customize the display format of the class so that the variables they care about are displayed in the way they want. This is why the Nativs file exists.
2.The necessity of Nativs documents
You can use the Natvis framework to create visualization rules for the types you create so developers can see them easily during debugging. Some coordinate transformations are involved in my program, and I want to use the Math library GLM (GLM is an mathematics acronym, which is a library with only header files for mathematical calculations). I use matrix frequently in programs and need to expand it several times in the Watch window every time when I want to check its value . And it's impossible to tell what kind of matrix a matrix is at the first sight.
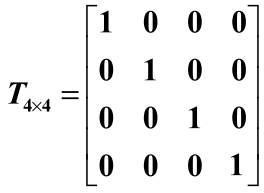
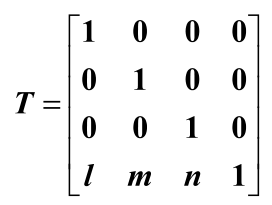
If you have a little basic understanding of the three-dimensional matrix, then you may know the following two common matrices.
matrix:Identity matrix
matrix:Translation matrix
My requirements: I want to show directly in the Watch window that whether the matrix is a unit matrix or a translation matrix. The solution is: I define a format file to show matrix directly in the Watch window as the unit matrix or the translation matrix if it satisfies a certain condition.
Coincidentally, Visual Studio 2015 provides the ability to create custom views of native objects based on their needs. The Visual Studio Natvis framework lets you customize the way Visual Studio displays native types in debugger variable windows (for example, the Watch, Locals, and Data Tips windows).
3.create nativs document for matrix
step1:create a file
Create a file named Glm.nativs and open it in Visual Studio. Then enter the following character, which is the basic structure of the nativs documents. "Version" represents the build number, generally set it to 1.0; "encoding" is a coded format, typically* Utf-8*; "Autovisualizer" node shoule be written in the following format.
    <AutoVisualizer xmlns="http://schemas.microsoft.com/vstudio/debugger/natvis/2010">
    </AutoVisualizer>
step2:Determining type
.natvis files are XML files with a .natvis extension. The schema is defined in %VSINSTALLDIR%\Xml\Schemas\natvis.xsd.
The basic structure of a .natvis file is one or more Type elements, where each Type element represents a visualization entry for a type whose fully qualified name is specified in the Name attribute.

You need to determine the type of format you want to customize. For now, I just want to define the format for GLM::MAT4 and GLM::MAT3. represents the type to be customized.
<?xml version="1.0" encoding="utf-8"?>
<AutoVisualizer xmlns="http://schemas.microsoft.com/vstudio/debugger/natvis/2010">
<Type Name="glm::tmat4x4<*>">
</Type>
<Type Name="glm::tmat3x3<*>">
</Type>
</AutoVisualizer>
Explanation 1: Why not use GLM::MAT4 to express the type directly? Because GLM::MAT4 is derived from a TypeDef, its actual type is glm::tmat4x4<float, highp>.
    typedef tmat4x4<float, highp>       highp_mat4x4;
    typedef highp_mat4x4            mat4x4;
    typedef mat4x4                  mat4;
Explanation 2: What is "<" and ">"? In order not to conflict with the symbols in the XML file, the symbol "<" should be be replaced with "<" and the symbol ">" should be be replaced with ">" . "glm::tmat4x4<float, highp>" shoule be written into "glm::tmat4x4<*>".
step3:Custom output format
Output the word "Identity matrix" after the unit matrix in the "value" column in watch window if it is a unit matrix. In the Nativs file, content is used to represent the word "content" to be displayed; "Condition="A"" indicates that "content" is output only if condition A is met; "&&" represents the operator "&&". Now I'll just add the following code.
<DisplayString Condition="value[0].x==1.0 && value[0].y==0.0 && value[0].z==0.0 && value[0].w==0.0 && value[1].x==0.0 && value[1].y==1.0 && value[1].z==0.0 && value[1].w==0.0 && value[2].x==0.0 && value[2].y==0.0 && value[2].z==1.0 && value[2].w==0.0 && value[3].x==0.0 && value[3].y==0.0 && value[3].z==0.0 && value[3].w==1.0">Identity Matrix</DisplayString>
Similarly, let the translation matrix output the word "translation matrix". But I hope that the translation matrix can simultaneously output the translation in x,y,z three directions. The format is as follows:
<DisplayString Condition="value[0].x==1.0 && value[0].y==0.0 && value[0].z==0.0 && value[0].w==0.0 && value[1].x==0.0 && value[1].y==1.0 && value[1].z==0.0 && value[1].w==0.0 && value[2].x==0.0 && value[2].y==0.0 && value[2].z==1.0 && value[2].w==0.0 && (value[3].x!=0.0 || value[3].y!=0.0 || value[3].z!=0.0) && value[3].w==1.0">Translation Matrix {{{value[3].x}, {value[3].y}, {value[3].z}}}</DisplayString>
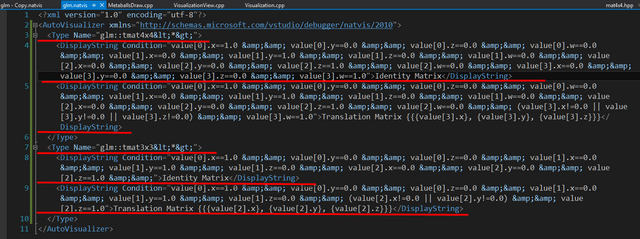
Similarly, GLM::MAT3 can be defined in this way. The final nativs document is defined as follows.
<?xml version="1.0" encoding="utf-8"?>
<AutoVisualizer xmlns="http://schemas.microsoft.com/vstudio/debugger/natvis/2010">
<Type Name="glm::tmat4x4<*>">
<DisplayString Condition="value[0].x==1.0 && value[0].y==0.0 && value[0].z==0.0 && value[0].w==0.0 && value[1].x==0.0 && value[1].y==1.0 && value[1].z==0.0 && value[1].w==0.0 && value[2].x==0.0 && value[2].y==0.0 && value[2].z==1.0 && value[2].w==0.0 && value[3].x==0.0 && value[3].y==0.0 && value[3].z==0.0 && value[3].w==1.0">Identity Matrix</DisplayString>
<DisplayString Condition="value[0].x==1.0 && value[0].y==0.0 && value[0].z==0.0 && value[0].w==0.0 && value[1].x==0.0 && value[1].y==1.0 && value[1].z==0.0 && value[1].w==0.0 && value[2].x==0.0 && value[2].y==0.0 && value[2].z==1.0 && value[2].w==0.0 && (value[3].x!=0.0 || value[3].y!=0.0 || value[3].z!=0.0) && value[3].w==1.0">Translation Matrix {{{value[3].x}, {value[3].y}, {value[3].z}}}</DisplayString>
</Type>
<Type Name="glm::tmat3x3<*>">
<DisplayString Condition="value[0].x==1.0 && value[0].y==0.0 && value[0].z==0.0 && value[1].x==0.0 && value[1].y==1.0 && value[1].z==0.0 && value[2].x==0.0 && value[2].y==0.0 && value[2].z==1.0 &&">Identity Matrix</DisplayString>
<DisplayString Condition="value[0].x==1.0 && value[0].y==0.0 && value[0].z==0.0 && value[1].x==0.0 && value[1].y==1.0 && value[1].z==0.0 && (value[2].x!=0.0 || value[2].y!=0.0) && value[2].z==1.0">Translation Matrix {{{value[2].x}, {value[2].y}, {value[2].z}}}</DisplayString>
</Type>
</AutoVisualizer>
4.use nativs document
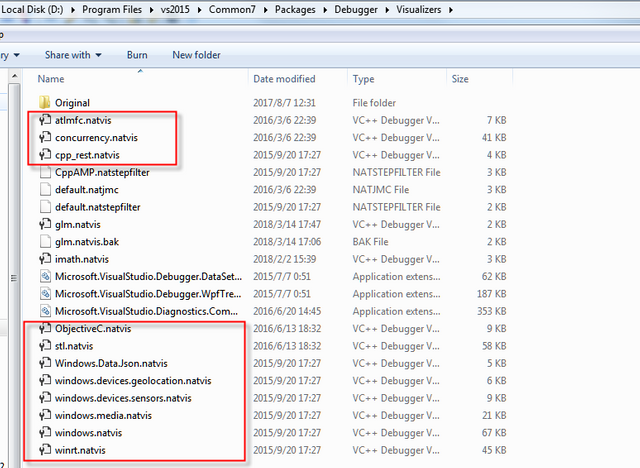
There are two ways to use Nativs: one is to place the nativs document in the specified directory of Visual Studio 2015 as a system setting; Another way is to put the nativs document into the current project, as a child file of it, to participate in the compilation.
Steps of the first way:
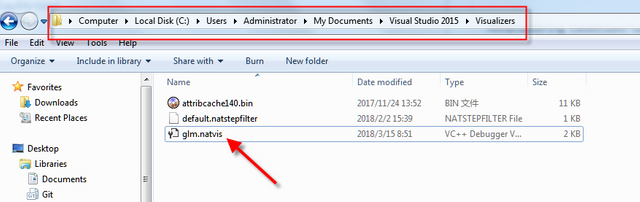
step1:put the folder to* C:\Users\XXX\Documents\Visual Studio 2015\Visualizers*
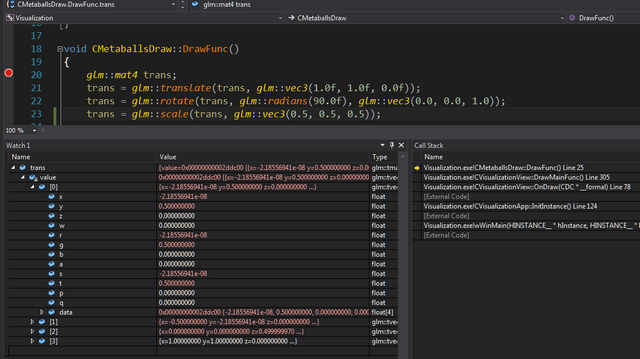
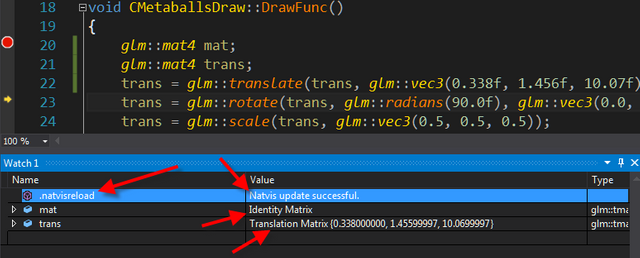
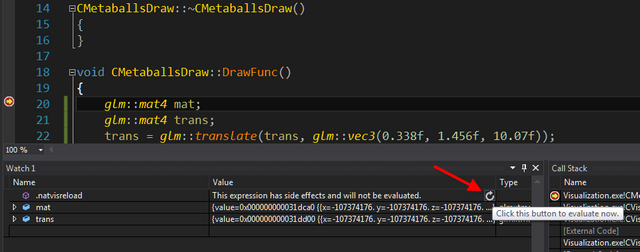
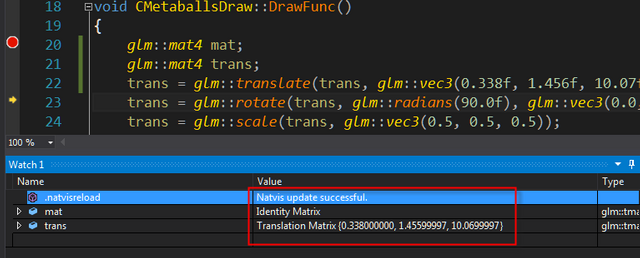
step2:runcommand* .natvisreload* in watch1, and then press ENTER. "Nativs update succesfully" indicates that the Nativs file has been successfully loaded. My first unit matrix is displayed as "Identity Matrix", and the second translation matrix is shown as "Translation Matrix {0.338, 1.455999, 10.069999}". That's the result I want.
If the Nativs file is updated, you do not need to RunCommand* ". natvisreload"* in the Watch1 window. Just click the button in the image below to refresh.
Steps of the second way:
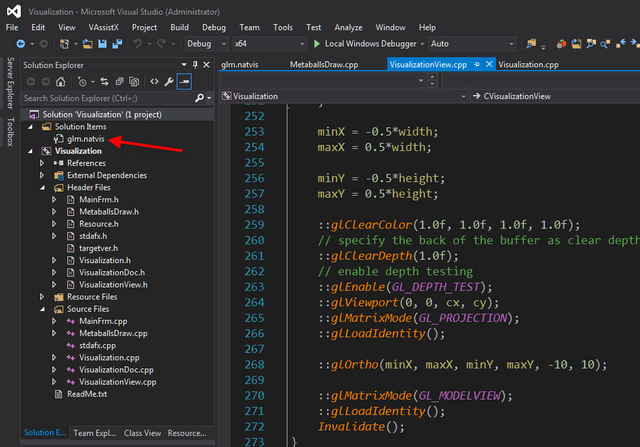
step1:To add a new .natvis file, with an open C++ project, select the project node in the Solution Explorer, and click Add / New item / Visual C++ / Utility / Debugger visualization file (.natvis). The debugger will load Natvis files from C++ projects automatically. By default, Natvis files in your project are also inserted into the .pdb file built by the project.
step2:The same effect can be achieved when you run the program.
Thank you for your attention.
@hushuilan
Posted on Utopian.io - Rewarding Open Source Contributors
This is very useful information ! I really liked this .......... Thank you so much
Thank you for the contribution. It has been approved.
You can contact us on Discord.
[utopian-moderator]
Hey @hushuilan I am @utopian-io. I have just upvoted you!
Achievements
Community-Driven Witness!
I am the first and only Steem Community-Driven Witness. Participate on Discord. Lets GROW TOGETHER!
Up-vote this comment to grow my power and help Open Source contributions like this one. Want to chat? Join me on Discord https://discord.gg/Pc8HG9x