(Part 13) Ethereum Solidity In Truffle - Testnet Environment Function Calls And Truffle Testing(PT 13)
Repository
https://github.com/igormuba/EthereumSolidityClasses/tree/master/class13
What Will I Learn?
- Truffle project organization
- Truffle testnet function calls
- Using JavaScript tests
Requirements
- Internet connection
- Code editor
- Truffle JS
- Node JS
- Ganache
Difficulty
- Intermediate
Tutorial Contents
On the previous tutorial, I taught how you can use 3 tools, Ganache, Truffle, and Zeppelin, to deploy contracts on a local testing environment. The advantages of deploying on a local testnet on Ganache versus on the Remix online IDE is that this allows you to build web applications that run on your browser, allowing you to create and test the frontend with more ease.
Interacting with a deployed contract on Remix IDE is simple, the menus on the right side of the screen allow you to visually test functions
But on Ganache and Truffle, before you build the frontend interface, you need to use the command line to interact with your contracts.
Let us get started by, first, understanding how the directory structure of Truffle works, and then, deploying a simple contract code to test its functions
Starting the development environment
After you cd to the directory where you want to start your project, assuming you already have truffle installed, if you don't have it, learn how to get it in the last tutorial, create a Truffle development environment with truffle init
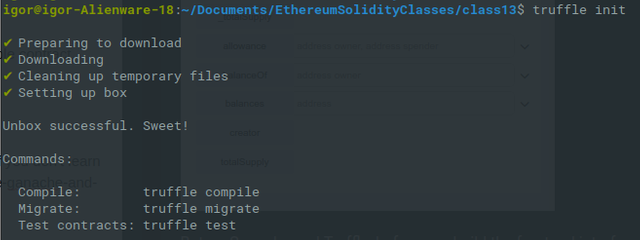
This will fill your directory with the Truffle skeleton
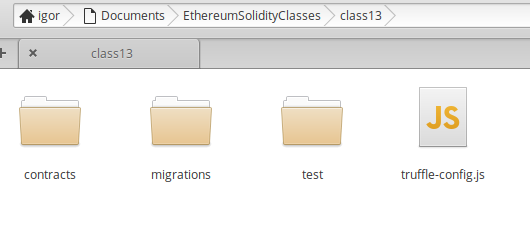
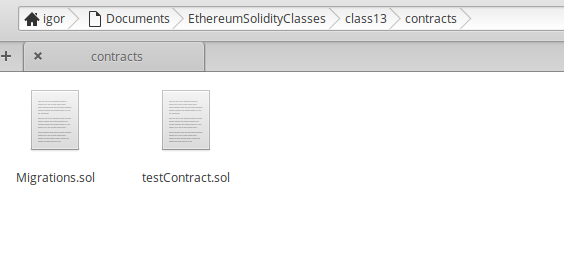
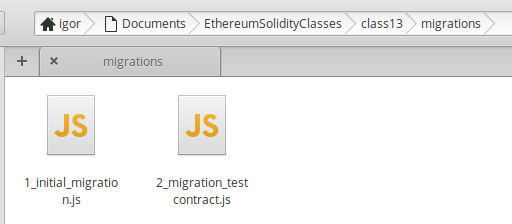
The truffle contracts folder
Inside the contracts folder is where you must store the contracts you want to deploy. Truffle will automatically search for your contracts here.
I have created the file testContract.sol here, this is the contract we will deploy to test its functions
The code is very simple so we can test calling its functions from the terminal later
pragma solidity ^0.5.0;

contract testContract{
    uint private _number;
    constructor(uint number) public{
        _number = number;
    }

    function number() public view returns (uint){
        return _number;
    }

    function setNumber(uint newNumber) public{
        _number = newNumber;
    }
}
The migrations directory'
This is the directory where the files responsible for fetching and deploying the contracts are stored.
The names must start with a number so the compiler knows at which order to deploy them (in case of the order matters, for example, in a mutable contract)
I have created the second migration file. Here is the code for it and the explanation
var testContract = artifacts.require("./testContract.sol"); //imports our contract

const number = 1; //sets the variable we will pass to the constructor

module.exports = function(deployer) {
  deployer.deploy(testContract, number); //deploy testContract with number as argument
};
Explanation:
var testContract = artifacts.require("./testContract.sol"); imports the contract we have built and stored it into the variable testContract, the variable will be used in the code below
const number = 1; We could directly pass the number on the deploy function, for example deployer.deploy(testContract, 1);, and the results would be the same, but it is a good practice to declare the variable outside of the deployer.deploy for easy debugging later
deployer.deploy(testContract, number); the first argument for this function is the variable that stored the contract we want to deploy. From the second argument onwards are the arguments we will pass into the contract on the first argument.
If testContract took 2 arguments instead of one it would be deployer.deploy(testContract, firstArgument, secondArgument); and so forth for each new argument
Starting Ganache, compiling and deploying
On the last tutorial I taught how to get Anache
But now we will use the local testnet native to truffle
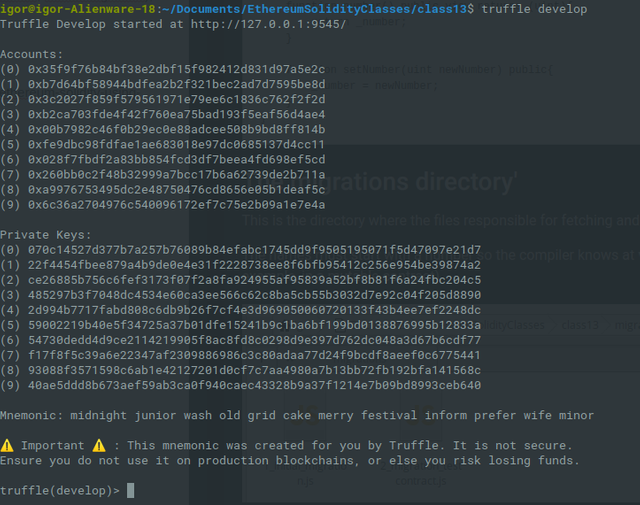
To do it execute the command truffle develop and it will start a local testnet very similar to Ganache, but this one is on port 9545
The last part is to edit the truffle-config.js and uncomment the code
networks: {
development: {
      host: "127.0.0.1",     // Localhost (default: none)
      port: 9545,            // Standard Ethereum port (default: none)
      network_id: "*",       // Any network (default: none)
     }
}
The default port above will be 8545, change it to the port you are using on your truffle develop in case it is different, in my case it is 9545
Now you can launch the contract on the testnet with the command migrate inside the truffle develop terminal
Interacting with a deployed contract
Inside the truffle develop terminal you can now interact with the deployed contract on the testnet.
When you have migrated the contract to the testnet, if everything went without any errors truffle should have printed the contract address on your screen
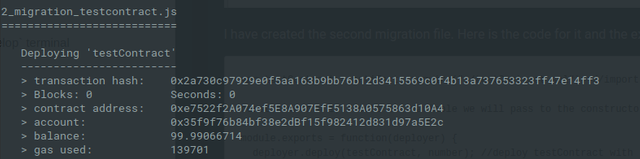
You will need this address, mine is 0xe7522f2A074ef5E8A907EfF5138A0575863d10A4
Then, instantiate an abstraction of your contract with
let instance = await testContract.deployed()
This promises to the interpreter that the contract is deployed, else it will throw errors at you saying that all functions do not exist, like the image below

Now you can call the functions from the contract as if you are working with a javascript object
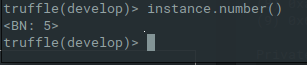
instance.setNumber(5) sets the number to 5
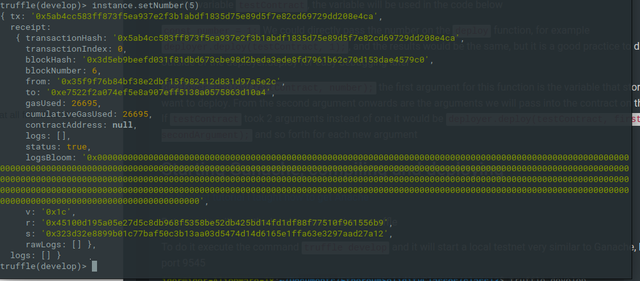
And instance.number() returns the number
Any other functions you deploy also follow the same pattern.
First, you promise the contract is deployed in an abstraction object, then you call the functions as if they were javascript objects.
This is where truffles empower developers, this layers of abstraction build up into a nice interaction interface between developers and contracts.
Testing the contract
There is a folder called test, there is where you can build, either in JavaScript or Solidity, the tests you want to do.
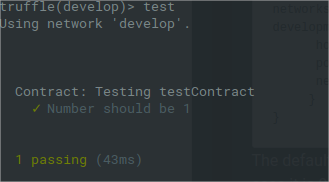
In our case, let us build a simple test to check if the contract is deployed with the number 1
For this, I have created the file tester.js that will execute the test cases

First, we import into it the contract, just like we did with the deployer
const testContract = artifacts.require("testContract");
Then inside
contract("Name of the test", async number =>{
   //tests come here
});
We add the first test case
contract("Testing testContract", async number =>{ //test
    it("Number should be 1", async () =>{ //check
        let instance = await testContract.deployed(); //instantiate
        let numberValue = await instance.number(); //calls function
        assert.equal(numberValue.valueOf(), 1); //compares result to 1
    });
});
We create the instance just like on the live test we did in the previous section, but this time we store the result from the function number() inside the variable numberValue
In this case, we are deploying the contract with the right value, which is one, and the output is
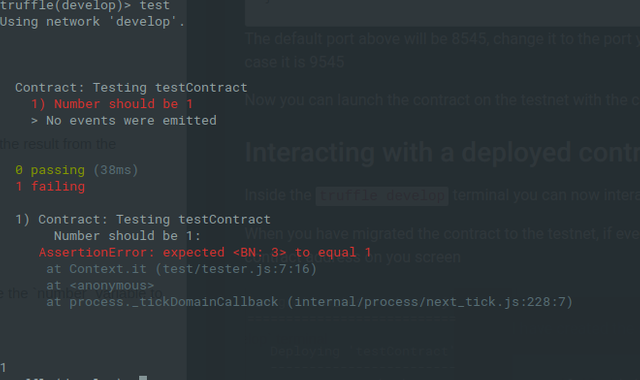
But if we go to the migration file 2_migration_testcontract.js inside the folder migrations and change the number variable to any other number, in my case, I changed to 3, we can see that the test is not successful
Curriculum
(Part 12) Ethereum Solidity - Using Truffle, Ganache And Zeppelin To Deploy(PT 12)
(Part 11) Ethereum Solidity - Multisig Contract As Bank,k Multiple Users, And Where To Implement App Logic(PT 11)
- (Part 10) Ethereum Solidity - Multiple inheritances, Diamond Problem And Function Polymorphism(PT 10)
- (Part 9) Ethereum Solidity Assembly - Return, Memory, Hexadecimal, Pointers, And Memory Addressing(PT 9)
- (Part 8) Ethereum Solidity - Assembly, Reducing Costs And Creation Your Low-Level Expression(PT 8)
- (Part 7) Ethereum Solidity - Fallback, Ethereum Fractions, And Collateral Backed Contract(PT 7)
- (Part 6) Ethereum Solidity - Custom Variable Functionalities, Libraries, Using Libraries For Security(PT 6)
- (Part 5) Ethereum Solidity - Custom Access Modifiers, Security Breach Alerts, Assert And Require(PT 5)
- (Part 4) Ethereum Solidity Development - Inheritance, Working With Multiple Contracts And Simple Mutability(PT 4)
- (Part 3) Ethereum Solidity Development - Contract Mutability, DelegateCall And Calling Functions By Address(PT 3)
- (Part 2) Ethereum Solidity Development - Deploying, Security And ERC20 Compliance(PT 2)
- (Part 1) Ethereum Solidity Development - Getting Started + Lower Level Explanation (PT 1)
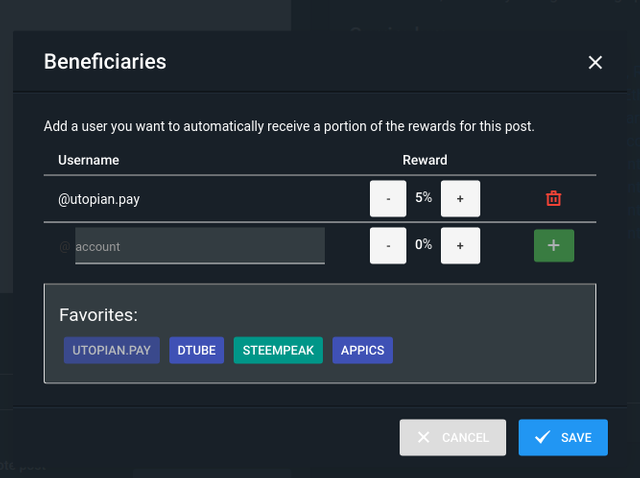
Beneficiaries
This post has as beneficiaries
@utopian.pay with 5%
using the SteemPeak beneficiary tool
Thank you for your contribution @igormuba.
After analyzing your tutorial we suggest the following:
In your tutorial you have some typos, we suggest that before publishing your contribution, make a small revision to your text.
It still has some problems with punctuation in the text. It's a bit minimal but it's important to have the most professional tutorial possible, so it has to be very well written.
Your Ethereum Solidity tutorial is very good. Keep up the good work you've done. Thank you!
Your contribution has been evaluated according to Utopian policies and guidelines, as well as a predefined set of questions pertaining to the category.
To view those questions and the relevant answers related to your post, click here.
Need help? Chat with us on Discord.
[utopian-moderator]
Thank you for your review, @portugalcoin! Keep up the good work!
Hi @igormuba!
Your post was upvoted by @steem-ua, new Steem dApp, using UserAuthority for algorithmic post curation!
Your post is eligible for our upvote, thanks to our collaboration with @utopian-io!
Feel free to join our @steem-ua Discord server
Hey, @igormuba!
Thanks for contributing on Utopian.
We’re already looking forward to your next contribution!
Get higher incentives and support Utopian.io!
Simply set @utopian.pay as a 5% (or higher) payout beneficiary on your contribution post (via SteemPlus or Steeditor).
Want to chat? Join us on Discord https://discord.gg/h52nFrV.
Vote for Utopian Witness!
Que beleza ver seu sucesso no utopian @igormuba!
Ainda é só o começo! Parabéns!!!
[]'s
...
ptgram
Sim, utopian esta ajudando muito cobrir os custos do servidor, apesar que na verdade eu ainda nao vendi uma steem sequer, o preco esta bom demais pra vender hehe
É verdade, está ótimo!
Quanto ao server, bora inventar algo top pra que passe a dar lucros! Botando a cabeça pra funcionar, conseguimos!
[]'s