Build A Application With Nodejs - ExpressJs and MongoDB To Share Social Network Images(Part 1)
Repository
Node.js
https://github.com/nodejs/node
Express
What Will I Learn?
We will learn to make a project in Nodejs using the express framework from scratch with the mongodb database.
We will also learn to manage images, store them and manipulate them using Nodejs modules.
Requirements
Node.js
Expressjs
Mongodb
Resources
Node.js - https://github.com/nodejs/node
Express- https://github.com/expressjs/express
Bootstrap 4 - https://getbootstrap.com/docs/4.0/getting-started/introduction/
Mongodb - https://github.com/mongodb/mongo
Difficulty
Basic
Tutorial Content
In this tutorial we will create our directory structure, install all the necessary modules to build our social network to share images and configure these modules for later use.
We will also create our configuration files and those that start the image upload application and we will create the connection with our database that will be used to upload and store the images.
This is a basic tutorial on how to upload and manage images and create a profile for each uploaded image, this can be a starting point for more complex projects, so we will be attentive to cover all the necessary details for your understanding in each one of your parts.
1.- Create the file structure and perform the installation of the modules that we will need in Node.js to carry out our project.
Previously we must have installed NODE.js and additionally we will use a text editor of our preference. the first thing is to create the working folder where our application will be hosted and from the Node.js console we will write the following command once we are inside the folder created for the application.
npm i --yes
This instruction will not create a package.json file that is the file where our project is described and the models that are used in it.
Then to install the necessary modules is written from the console:
npm i express ejs morgan mongose multer uuid
With this our modules are installed, then we will see what each module will do.
Express: it is a web framework hosted within the Node.js environment, it is one of the most used nowadays and one of the easiest to manage and learn.
EJS: will allow the integration of HTML code in our development, in addition to extend the php code, this will be our template engine used to make our views.
FS: it is a complement that is integrated in Node.js, it is a module that in previous versions was necessary to be installed but now it is not necessary because it is integrated, this will allow us to manipulate files and I mention it because we will be using it later in our development .
Morgan: this is a module that helps us in the console to see what our server receives, in reality it is not essential for development, but as this application is made for didactic purposes, this will be useful to know what happens in the console while we program, so I recommend its use at least during development.
mongose: this module is the one that works directly with our database, connects and models data for mogodb.
Multer: multer will allow us to upload and manipulate images in Node.js, it seems a little trivial since the images are simply files, but they do not behave as such and later in the development of the application they will understand better the reason of this module.
uuid: will generate a random identification for each image since we must take care that different users of the application can not get to upload images with the same name.
so this module will help generate a unique ID to each image. Having said all this, we will create our entire file and folder structure, which is very important in any development to facilitate the programming process when working with the Routers.
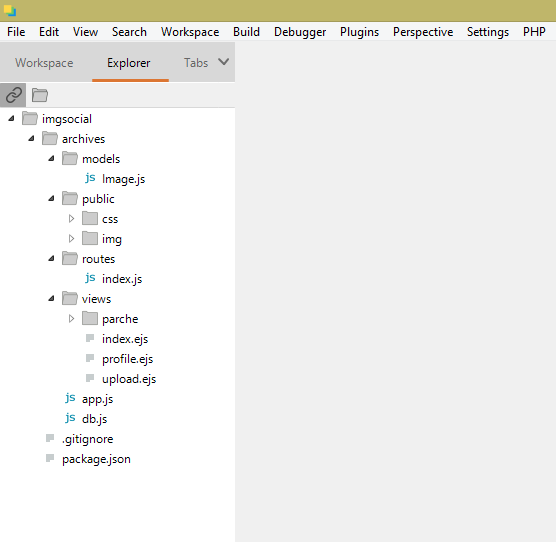
In every project it is fundamental to maintain an organized structure of our archives, since in this way the development will be easier as they advance and the project becomes bigger, our file structure is as follows.
Archives: this is the main folder where we will store our project and the subfolders.
Models: where the models will be stored.
Public: where will be stored the files that are generated from the use of our project as images among others.
Router: this folder stores the files that work with the routes to the server, to know where each file is to be executed, each function to be called and each file to be saved, it is generally used with the Path module in the code in the files of draft.
Views: in this folder are stored the files where we will create our views as forms, interfaces, templates, tracks, all these are done with the EJS module that is our Express template engine and it is stylized with boostrap, to make it easier, for that if some code is similar to the one used in boostrap on your home page, this code is property of Boostrap, and is used here to improve the appearance of the views.
in this image we can appreciate the structure of our folders
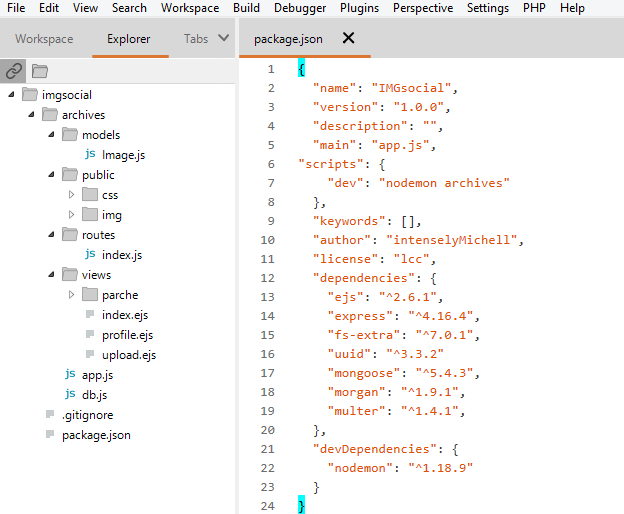
That said we will create our file pakage.json and our main file where we will make the initializations of our modules and services as our own web server among others, and we will call it app.js, we will explain it part by part and then start working on our views with what we need.
so will our package.json
And in the following image we can appreciate our app.js file in full development, there we fata only the part of initializing the server.
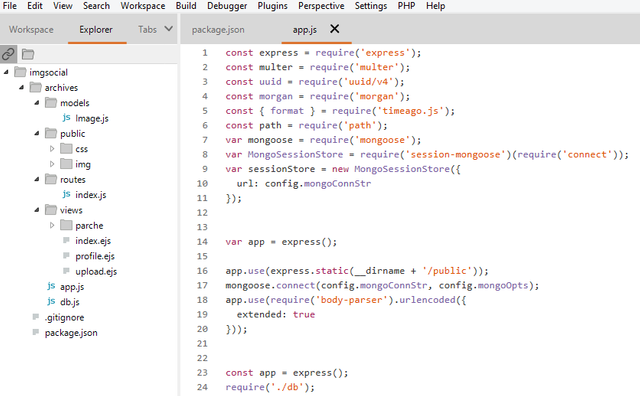
Finally our main file would be as follows.
//calling the modules and storing the answers in constants with //the same name

 const express = require('express');
const multer = require('multer');
const uuid = require('uuid/v4');
const morgan = require('morgan');
const path = require('path');


//conection
var mongoose = require('mongoose');
var MongoSessionStore = require('session-mongoose')(require('connect'));
var sessionStore = new MongoSessionStore({
  url: config.mongoConnStr
});


var app = express();

app.use(express.static(__dirname + '/public'));
mongoose.connect(config.mongoConnStr, config.mongoOpts);
app.use(require('body-parser').urlencoded({
  extended: true
}));


//config to allows to display images in port 3000


const app = express();
require('./db');

app.set('views', path.join(__dirname, 'views'));
app.set('view engine', 'ejs');
app.set('port', process.env.PORT || 3000);

//process the files handled before arriving at the routes


app.use(morgan('dev'));
app.use(express.urlencoded({extended: false}));
const storage = multer.diskStorage({
    dest: path.join(__dirname, 'public/img/uploads'),
    filename: (req, file, cb, filename) => {
        console.log(file);
        cb(null, uuid() + path.extname(file.originalname));
    }
})


//transform imagem format
app.use(multer({storage}).single('image'));

app.use((req, res, next) => {
    app.locals.format = format;
    next();
});


//listen server
app.use(require('./routes/app'));

app.use(express.static(path.join(__dirname, 'public')));

app.listen(3000, () => {
    console.log(`Server here - Port ${app.get('port')}`);

});
In our next presentation we will explain a plus the code and we will continue with the views of our application created with the module Ejs of Node.js and stylized with Boostrap.
I hope this tutorial is useful, thank you for reading it.
My Github Address
https://github.com/IntenselyMichell
Thank you for your contribution @intensely.
After reviewing your contribution, we suggest you following points:
In the next tutorial, improve the structure of your tutorial. The first part of the tutorial the introduction is very extensive.
Put titles when explaining different subjects.
Explain in greater detail the code you are teaching the reader. It's important that everything is well detailed so the reader can understand what you are teaching.
To teach your code the ideal is to separate in sections and explain each block of code in more detail. This way it will be easier for the reader to understand what you are explaining.
In your code you have large blank blocks. It's important that the code be indent.
Looking forward to your upcoming tutorials.
Your contribution has been evaluated according to Utopian policies and guidelines, as well as a predefined set of questions pertaining to the category.
To view those questions and the relevant answers related to your post, click here.
Need help? Chat with us on Discord.
[utopian-moderator]
Thank you for your review, @portugalcoin! Keep up the good work!
Hi @intensely!
Your post was upvoted by @steem-ua, new Steem dApp, using UserAuthority for algorithmic post curation!
Your post is eligible for our upvote, thanks to our collaboration with @utopian-io!
Feel free to join our @steem-ua Discord server
Hey, @intensely!
Thanks for contributing on Utopian.
We’re already looking forward to your next contribution!
Get higher incentives and support Utopian.io!
Simply set @utopian.pay as a 5% (or higher) payout beneficiary on your contribution post (via SteemPlus or Steeditor).
Want to chat? Join us on Discord https://discord.gg/h52nFrV.
Vote for Utopian Witness!
Congratulations @intensely! You have completed the following achievement on the Steem blockchain and have been rewarded with new badge(s) :
You can view your badges on your Steem Board and compare to others on the Steem Ranking
If you no longer want to receive notifications, reply to this comment with the word
STOPVote for @Steemitboard as a witness to get one more award and increased upvotes!