how to create dynamic website "school web portal" using PHP and MySql #Part 1 (login process)
Repository
https://github.com/php/php-src
What Will I Learn?
- You will learn how to create dynamic website.
- You will learn how to create MySQL database
- You will learn how to connet database on website
Requirements
State the requirements the user needs in order to follow this tutorial.
- you must know basic of PHP programming
- you must know about MySql database.
- you must know about CSS and boostrap.
- XAMPP.
Difficulty
Choose one of the following options:
- Intermediate
Tutorial Contents
good night steemit friend, today I will teach you how to create a dynamic website, but to make a website to complete it will take a lot of time, I will divide this tutorial into several parts so that it is easy to understand. we will start this tutorial from the login page first.
okay we just start the tutorial.
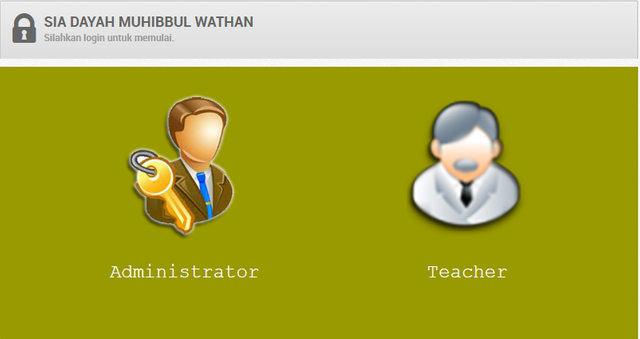
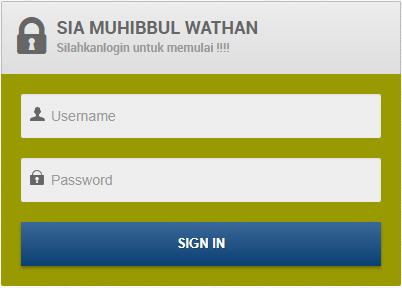
- The first step you have to do is create a GUI for the login page.
- here we will create a page for admin and user.
- make a folder in this directory.
- then open text editor, I use notepad ++.
- type the script below, then save it in php format.
<style type="text/css">
(html comment removed:
.style4 {color: #939393; font-family: Verdana, Arial, Helvetica, sans-serif; }
.style9 {color: #FFFFFF; font-family: "Courier New", Courier, monospace; }
)
</style>
<body style="">
<center>
<table width="709" height="262" border="" align="center">
<tr width="170"> </tr>
<tr>
<td width="170" height="194" ><a href="indexadmin.php">
<div align="center"><im src="img/admin.png" /></div></td>
<td width="170"><a href="indexguru.php">
<div align="center"><im src="img/guru.png" /></div></td>
</tr>
<tr>
<td><div align="center" class="style9">
<h3>Administrator</h3>
</div></td>
<td><div align="center" class="style9">
<h3>Teacher</h3>
</div></td>
</tr>
</table>
<p class="style4"> </p>
</center>
</body>
- I will explain a little about the script above.
- below is a CSS script for the GUI design section.
<style type="text/css">
(html comment removed:
.style4 {color: #939393; font-family: Verdana, Arial, Helvetica, sans-serif; }
.style9 {color: #FFFFFF; font-family: "Courier New", Courier, monospace; }
)
</style>
- The script above determines the color, and type of font used in the form.
- then we proceed to the layout and size of the form.
this section is located in the body tag<body style="">
this means the form to be created is in the center of pages<center>
and this determines the size of the form<table width="709" height="262" border="" align="center"> <tr width="170"> </tr>
- then this
<td width="170" height="194" ><a href="indexadmin.php">is the part to enter the destination page link. - and we will use emoji images for login options.
<div align="center"><im src="img/admin.png" /></div></td> - make sure you have images placed in the same directory.

- I use two pictures of the two images above.
- below is a script for writing under the image.
- the action of this page is in the image not in the word.
- Here's the login options page.
- then we will create two pages, namely for the login process administrator and teacher
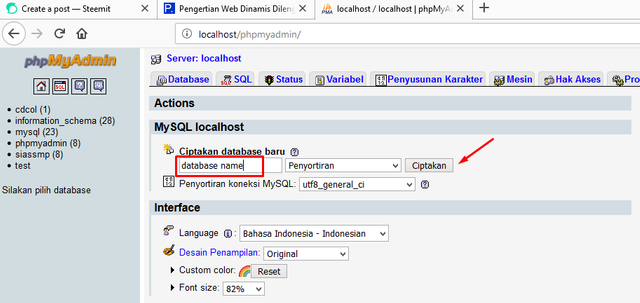
- we have to make the database first.
- run apache andMySql in XAMPP control panel.

- then type localhost in your browser's search field.

- select phpMyAdmin.
- write down the name of the database you want to make.
- then create a table and fill in the user data as shown below.
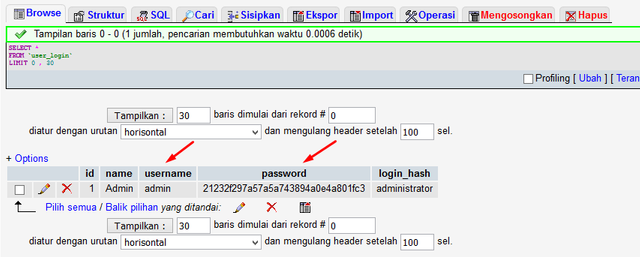
- The password in the table above has been encrypted, the original password is not displayed.
- OK, the database creation process is complete, then we will create a page for the login process.
- Create a new file in Notepad ++ then type the script.
<form id="loginform" action="indexadmin.php?login_attempt=1" method="post">
    <p class=""><input type="text" id="username" name="username" placeholder="Username" /></p>
    <p class=""><input type="password" id="password" name="password" placeholder="Password" /></p>
    <p class=""><button class="btn btn-default btn-block">Sing In</button></p>

</form>
<?php
if(isset($_GET['login_attempt']))
{
    $spf=sprintf("Select * from user_login where username='%s' and password='%s'",$_POST['username'],md5($_POST['password']));
    $rs=mysql_query($spf);
    $rw=mysql_fetch_array($rs);
    $rc=mysql_num_rows($rs);

    if($rc==1)
    {
        $_SESSION['login_hash']=$rw['login_hash'];
        $_SESSION['login_user']=$rw['username'];
        echo "<script>window.location='dashboard.php'</script>";
    }
    else
        echo "<script>alert('wrong username or password, try again')</script>";
}
?>
- I will explain about the script above.
- The script below is for the action of this page.
<form id="loginform" action="indexadmin.php?login_attempt=1" method="post"> - mean if the login process is successful, the user will go to another page.
- This is the part to fill in the username.
<p class=""><input type="text" id="username" name="username" placeholder="Username" /></p> - and this is for the password field section.
<p class=""><input type="password" id="password" name="password" placeholder="Password" /></p> - if conditions for login
if(isset($_GET['login_attempt'])) - and below this is the process of selecting a table for username and password, before you have to make the file connection first.
$spf=sprintf("Select * from user_login where username='%s' and password='%s'",$_POST['username'],md5($_POST['password']));
- this is object creation for some MySQL functions.
$rs=mysql_query($spf);
    $rw=mysql_fetch_array($rs);
    $rc=mysql_num_rows($rs);
- we create two sessions in this login process.
$_SESSION['login_hash']=$rw['login_hash'];
        $_SESSION['login_user']=$rw['username'];
- and this is to call the dashboard.php file
echo "<script>window.location='dashboard.php'</script>"; - and the last is the condition opposite of the if condition above, namely else
echo "<script>alert('wrong username or password, try again')</script>";
- this is the display of the login page that we created above.
- I said before that there are two types of logins, you only need to copy the script above and just change the part of the action.
- okay, the tutorial is complete now we will see the results.
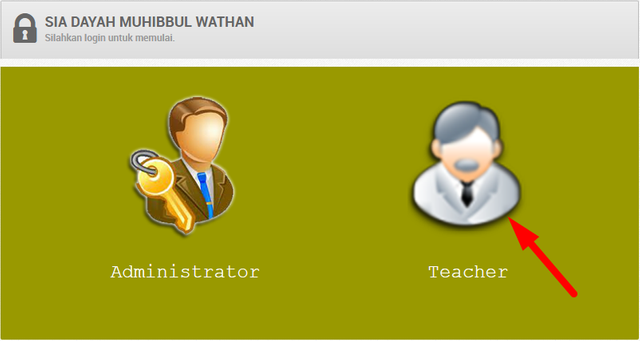
- click in the teacher icon and fill the username and password
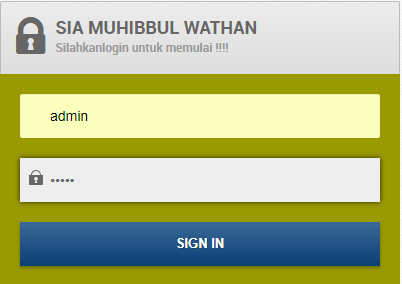
- if the password you entered is correct then it will go to the next page, and if the username or password you entered is incorrect then a notification will appear.

Proof of Work Done
https://gist.github.com/jerryalexis/edfe2e904f6a339d69dff19b7b553388
The code of your contribution has been found to be plagiarized from the following source here. Plagiarism is a serious offense. Your account has been accordingly banned from receiving utopian reviews.
Need help? Write a ticket on https://support.utopian.io/.
Chat with us on Discord.
[utopian-moderator]
Thank you for your review, @portugalcoin! Keep up the good work!
Congratulations @jerryloyal! You have received a personal award!
Click on the badge to view your Board of Honor.
Do not miss the last post from @steemitboard:
Are you in search of a way to build a dynamic website for your school? Look no further, as using PHP and MySQL can provide the perfect solution. In this article, we demonstrated how to utilize these tools to create a school web portal.
PHP is a strong programming language that can be utilized to develop intricate web applications, while MySQL is a database system ideal for storing data for your website.
By combining these technologies, you can construct a sturdy and effective website for your school.
Thanks, Andersen