Working with Navigation Controls (asp.net tutorial)
Lesson Objectives
A. Introduction to Web-Site Navigation
B. Working with Navigation Controls
C. Menu Control hierarchical data
Needs are;
A.Asp.NET
B. Visual Studio
C. C#
The difficulty level of commands we use is middle.
Introduction to Web Site Navigation
A web site has many web pages which provide information to the user. Users have to navigate across web pages easily and quickly. Navigation in a web site is essential and important. It provides a means for allowing the user to access the required information quickly in the web application. Hyperlinks act as a basic mechanism of web site navigation. The Hyperlinks act as static links. The navigation mechanisms used may be simple or complex, depending on the web site.
The Navigation Controls
ASP.NET provides a set of advanced navigational features with the help of Navigation Controls. The ASP.NET navigational controls provide rich and consistent navigational functionality. The ASP.NET navigational controls are SiteMapPath, TreeView and Menu.These controls can be used to provide navigation to the web application, without coding or little coding. However, you can also write code for these controls to manage them at run-time.
The Site Map
The Site Map provides a logical structure of the pages in a website. The Site Map information is stored in a file named Web.sitemap. The Web.sitemap file is stored in the root directory of the web application. ASP.NET has the XmlSiteMapProvider which is used to access the information from the Web.sitemap file. It automatically reads data in the Web.sitemap file present in the root folder of the web application and stores it in a SiteMap object. Let us now consider the banking scenario where Banking can be of two types, namely Personal Banking and Corporate Banking. Further more personal banking has Accounts, Loans and Insurance.Similarly, Corporate Banking has Credit and Capital Market. The Web.sitemap file can be created with the required information.
Demonstration: Creating the Web.sitemap file
Steps to create the Web.sitemap file.
1 ) Create a New Web Site named “WebSiteNavigation”.
2 ) Right-click the project in the Solution Explorer and Select Add New Item and select Site Map as shown below and click the Add button.
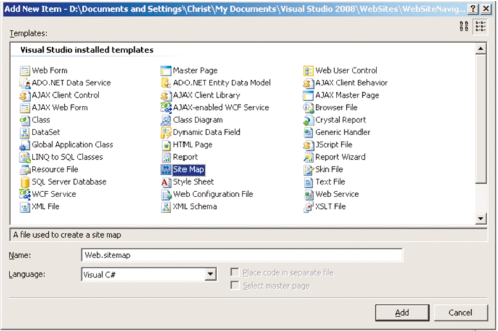
3 ) Enter the following content below in the Web.sitemap file.
< ?xml version="1.0" encoding="utf-8" ? >
< siteMap xmlns="http://schemas.microsoft.com/AspNet/SiteMap-File-1.0" >
< siteMapNode url="" title="Banking" description="Banking" >
< siteMapNode url="" title="Personal Banking" description="Personal
Banking Information" >
< siteMapNode url="Accounts.aspx" title="Accounts"
description="Accounts Information" / >
< siteMapNode url="Loans.aspx" title="Loans" description="Loans
Information" / >
< siteMapNode url="Insurance.aspx" title="Insurance"
description="Insurance Information" / >
< /siteMapNode >
< siteMapNode url="Credit.aspx" title="Credit" description="Credit
Information" > < /siteMapNode >
< siteMapNode url="CapitalMarket.aspx" title="Capital Market"
description="Capital Market Information" > < /siteMapNode >
< /siteMapNode >
< /siteMapNode >
< /siteMap >
Exploring the Web.sitemap file:
The Web.sitemap file contains < siteMap > as the root element. The < siteMap > contains a child element named < siteMapNode >. The < siteMap > element can have only one < siteMapNode > element inside it. The < siteMapNode > element inside the < siteMap > element can contain any number of < siteMapNode > elements. The < siteMapNode > contains many properties such as
title, description and url etc. The value set to the title property of the < siteMapNode > is displayed as text or links by controls such as the tree view. The value set to the description property is displayed as the Tooltip text when the mouse is placed over the node. The url property stores the url to navigate when the user clicks the node.
Note : The values set to URL property in the SiteMap should be unique.
The SiteMapDataSource Control
The SiteMapDataSource control obtains the site map information from the SiteMap object.The Navigation controls can display the data from the SiteMapDataSource control. For example, you can use a tree view control to display the information stored in the Web.sitemap file by using the SiteMapDataSource control. It is easy to use the SiteMapDataSource control.The SiteMapDataSource control can be created by dragging the control available in the Data tab of the Toolbox into the Design View of the Web Form. It can also be created by entering the code below in the Source View of the Web form.
< asp:SiteMapDataSource ID="SiteMapDataSource1" runat="server" / >
The TreeView Control
The TreeView control can be used to display a complex hierarchical structure of items. TreeView can be used fo r purposes, such as to display the Windows File System Directory Structure, or any structure with a hierarchy. The TreeView can be expanded to many levels.The TreeView is an advanced server control. It can display the details contained in the Web.sitemap file by using the SiteMapDataSource control. The DataSourceID property of the TreeView control is set to the ID of the SiteMapDataSource. Below is the tag for TreeView Control.
< asp:TreeView
ID="TreeView1"
runat="server"
DataSourceID="SiteMapDataSource1" >
< /asp:TreeView >
Demonstration: Creating a TreeView Control to display the information stored in the Web.sitemap file using the SiteMapDataSource Control.
Steps to create the Web Page.
1 ) Create a new web form named TreeViewDemo.aspx in the WebSiteNavigation Project.
2 ) Add a Label and set its Text as “Tree View Demo”
3 ) Drag a SiteMapDataSource Control from the Data Tab of the Toolbox into the Web Form.
4 ) Drag a TreeView Control from the Navigation Tab of the Toolbox into the Web Form.
5 ) Click on the Smart Tag of the TreeView Control and in the Choose Data Source Drop Down, select SiteMapDataSource1.
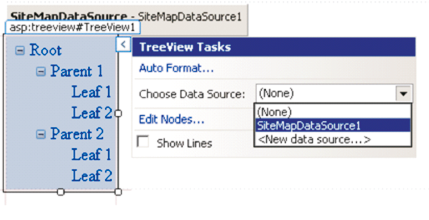
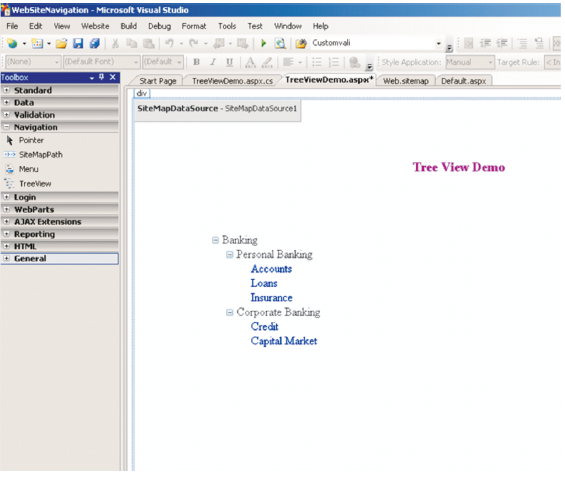
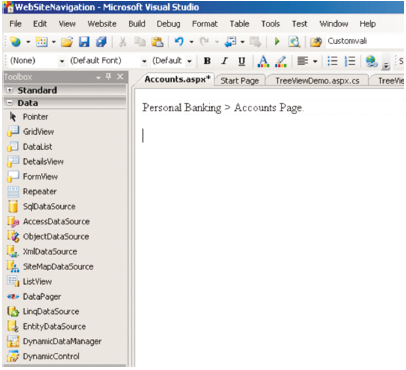
7 ) Create a New Web Form named Accounts.aspx and enter “Personal Banking > Accounts Page” inside the page. The Accounts page design should look as below:
8 ) Right-Click the TreeViewDemo.aspx file and select “Set As Start Page” and execute the project.
9 ) View the Output 1 below :
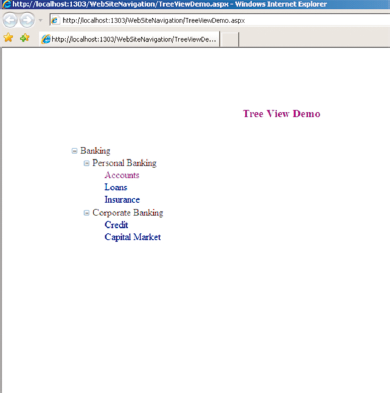
10 ) Click on the Accounts Link under Banking > Personal Banking.
11 ) View the Output 2 below :
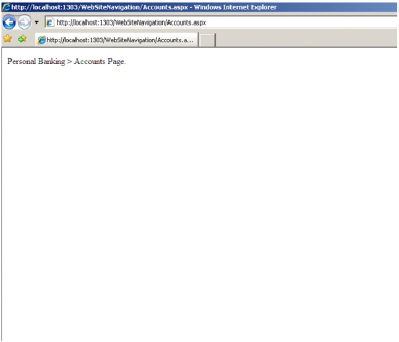
12 ) Similarly create web pages for Loans, Insurance, Credit and Capital Market.
The Menu Control
The Menu Control can be used to display hierarchical data. It is very easy to navigate through the Menu Control when there are many options in the hierarchy. Menus occupy less space in the web page. Menus can be expanded at various levels or collapsed as required by the user.The Menu control can be bound to a SiteMapDataSource to display the information available in the Web.sitemap file. The DataSourceID property of the Menu Control is set to the ID of the SiteMapDataSource control. Below is the tag for the Menu Control.
< asp:Menu ID="Menu1"
runat="server"
DataSourceID="SiteMapDataSource1" >
< /asp:Menu >
Demonstration: Creating a Menu Control to display the information stored in the Web.sitemap file using the SiteMapDataSource Control.
Steps to create the Web Page.
1 ) Create a new web form named MenuControlDemo.aspx in the WebSiteNavigation Project.
2 ) Add a Label and set its Text as “Menu Control Demo”
3 ) Drag a SiteMapDataSource Control from the Data Tab of the Toolbox into the Web Form.
4 ) Drag a Menu Control from the Navigation Tab of the Toolbox into the Web Form.
5 ) Click on the Smart Tag of the Menu Control and in the Choose Data Source Drop Down, select SiteMapDataSource1.
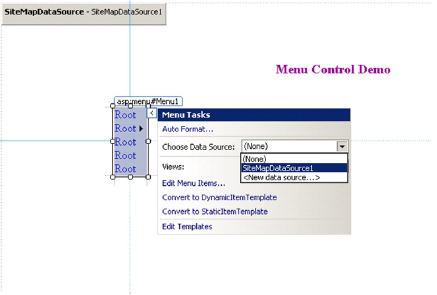
6 ) The design should look as below:
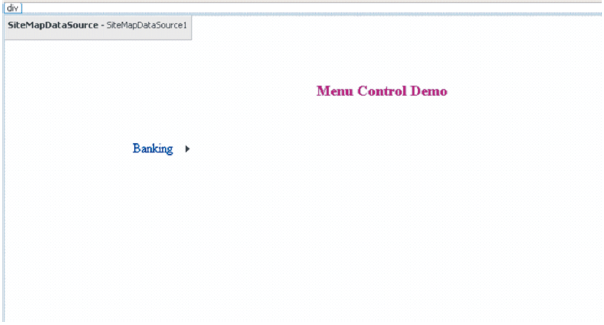
7 ) Right-Click the MenuControlDemo.aspx file and select “Set As Start Page” and execute
the project.
8 ) View the Output 1 below :
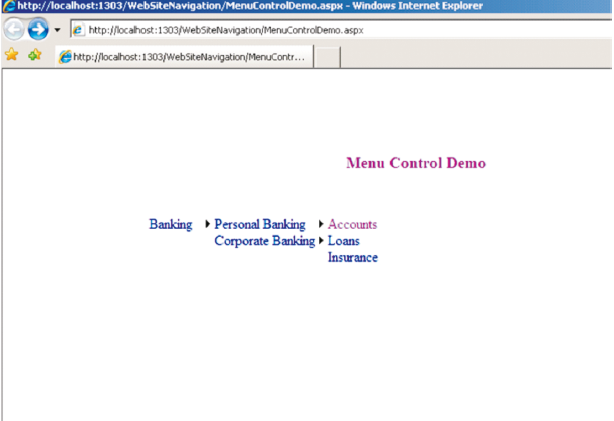
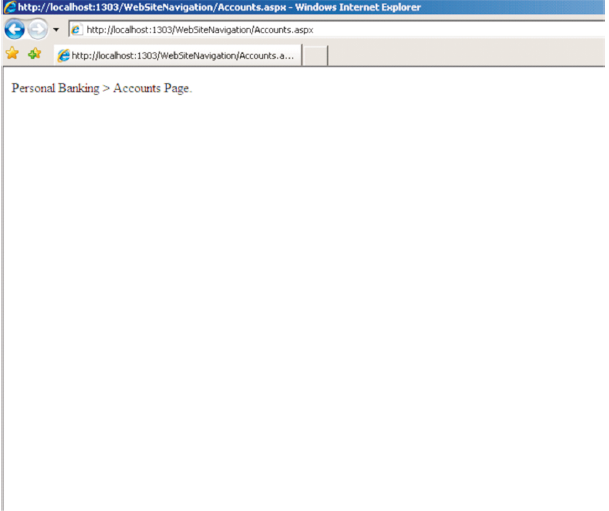
9 ) Click on the Accounts Link under Banking > Personal Banking.
10 ) View the Output 2 below :
11 ) Similarly you can navigate to the other web pages by clicking the Loans, Insurance,
Credit and Capital Market links.
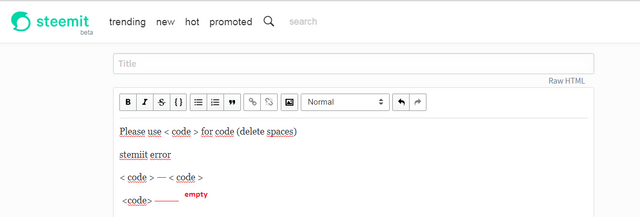
note:
part 2:lessons
Working with Data Source Controls
Working with Data-Bound Controls
Posted on Utopian.io - Rewarding Open Source Contributors
Thank you for the contribution. It has been approved.
You can contact us on Discord.
[utopian-moderator]
Hey @mrsx7 I am @utopian-io. I have just upvoted you!
Achievements
Suggestions
Get Noticed!
Community-Driven Witness!
I am the first and only Steem Community-Driven Witness. Participate on Discord. Lets GROW TOGETHER!
Up-vote this comment to grow my power and help Open Source contributions like this one. Want to chat? Join me on Discord https://discord.gg/Pc8HG9x