BUILDING PERSONALISED WEB APPLICATIONS WITH PHP & MySQL (#1) - INTRODUCTION
Repository
https://github.com/php/php-src
What will I learn?
- You will be introduced to building web applications using PHP and MySQL.
- You will learn to work with personal data.
- You will learn how to securely input data into your database.
- You will learn to create sign up form
- You will learn to create/edit a user profile page on this tutorial .
Requirements
- Basic knowledge of HTML, CSS, PHP programming language
- A web server, I will be using XAMPP
- A web browser
- Text editor
Difficulty
- Basic/Intermediate
Tutorial Contents
![]()
https://en.wikipedia.org/wiki/PHP
Creating a web application with a sense of membership (meaning that users interact with it in a personal way) might seem like a difficult task at first. If you ever wanted to do this by yourself, then this post is for you. We are going to be dealing with every aspect of creating a membership based site, with a secure members area protected by users password.
The whole process consists of two major parts: user registration and user authentication. In the first part, we are going to cover creation of the sign-up form and storing the data in a MySQL database. In the later tutorials, we will create the login/logout form and use it to allow users in and out secure areas on our web application.
Much of the websites have a registration form for your users to sign up and thus may benefit from some kind of privilege within the site. In this tutorial we will see how to create a registration form in PHP and MySQL. We are going to name our web application mywebapp that's what we will be creating through out this tutorial. Let's start;
Setting the database;
For this tutorial I will be working with a local server using xampp to access phpmyadmin , you might be using a different web server but it shouldn't be hard to keep up. We start by setting up a new database, I'm going to call mine 'mywebapp' . Once this is done we go further to create a new table on the database, this is where all the user data would go in. I'm going to call my table web_user ,you can create yours with a name of your choice. The web_user table would be made up of seven columns representing information about a user, each row of the table contains personal data for a single user. The sql code to create and set up table is written below
CREATE TABLE `web_user` (
  `user_id` INT AUTO_INCREMENT,
  `join_date` DATETIME,
  `username` VARCHAR(32),
  `email` VARCHAR(32),
  `confirmed` VARCHAR(32),
  `confirm_code` VARCHAR( 32 ) ,
  PRIMARY KEY (`user_id`)
);
Setting the index page
The indexpage of mywebapp for now would contain a link telling the user to sign up and log in .
We are going to start by connecting our indexpage to the database, since we are going to be doing this for all our pages it is better to have this code stored in a separate script to avoid duplication of codes, this also helps to solve the issue of having to make changes in several scripts when you can just do this for one, and it will affect the other scripts.
The indexpage of mywebapp will comprise of links telling users to signup and login we will be discussing the sign up process on this tutorial. The html code for the index page is
</head>
<body id = "body">
<h1>mywebapp - Let Love Lead</h1>
<?php
echo '❤ <a href="login.php">Log In</a><br />';
echo '❤ <a href="signup.php">Sign Up</a>';
?>
</body>
css/style.css - This is for stylesheet for ``index.php,signup.php` and further pages.
.error {
  font-weight: bold;
  color: #FF0000;
}


form label {
  display: inline-block;
  width: 150px;
  font-weight: bold;

}

.correct {
  font-weight: bold;
  color: 0000ff;
  font-family:'Fauna One',serif;
  text-align:center
  align: center;
}


h1{
margin-top:0;
color:#fff;

text-align:center;
width:100%;
height:50px;

}

input{
margin-top:10px;
box-shadow:0 1px 1px 0 #a9a9a9
}

input[type=submit]{

border:1px solid #fff;
font-family:'Fauna One',serif;
font-weight:700;
font-size:18px;
margin-left:60px;
margin-bottom; 20;
}

td.label {
  font-weight: bold;
}

img.profile {
  vertical-align: top;
}

#body{
    background-color:#cdcdcd;

}

#form{
background-color:#00dfdf;
color:#000000;
box-shadow:0 1px 1px 1px gray;
font-weight:400;
width:480px;
margin:70px 0 0;
justify-content: center
height:300px

}

#mainform{
width:960px;
margin:30px auto;
padding-top:20px;
font-family:'Fauna One',serif;
text-align:center
align: center;
margin-top: 20px;
margin-bottom: 20px;

}
This the image of the indexpage
.png)
Setting up the registration page
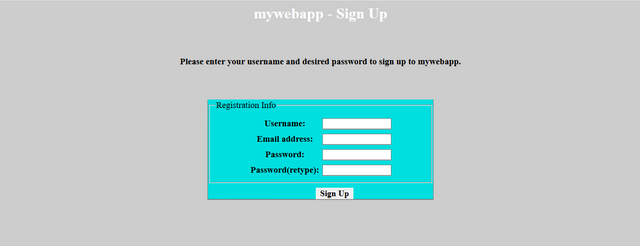
Once the index page is created,the next is to make sure users are able to signup. In order to create a user account, we need to gather a minimal amount of information from the user. We need their email address and their desired username and password. Of course, we can ask for more information at this point, but a long form is always a turn-off, the user will have the opportunity to provide addition info once they signed up . We use our HTML knowledge to create the form field in the signup.php .
 <div align = "center" id="mainform">
  <h3>Please enter your username and desired password to sign up to mywebapp.<h3>
  <form method="post" id="form" action="<?php echo $_SERVER['PHP_SELF']; ?>">
    <fieldset>
      <legend>Registration Info</legend>
      <label for="username">Username:</label>
      <input type="text" id="username" name="username" value="<?php if (!empty($username)) echo $username; ?>" /><br />
      <label for="email">Email address:</label>
      <input type="text" id="email" name="email" value="<?php if (!empty($email)) echo $email; ?>" /><br />
      <label for="password1">Password:</label>
      <input type="password" id="password1" name="password1" /><br />
      <label for="password2">Password(retype):</label>
      <input type="password" id="password2" name="password2" /><br />
    </fieldset>
    <input type="submit" value="Sign Up" name="submit" />
  </form>
  </div>
This is the image of the Sign-up page
.png)
Let's now implement the feature that will receive information submitted from the form about a user and store the information in the web_user table created in the mywebapp database. This code will be in the signup.php file.
we connect the signup.php code to our database, you can do this by using this method
mysql_connect("localhost", "root", "password") or die(mysql_error()); // Connect to database server(localhost) with username and password.
mysql_select_db("mywebapp") or die(mysql_error()); // Select registration database.;
Or you can use this other method, once you have all your database information stored in a file like connect.php. You use require_once()statement to include the php file to avoid duplication of codes.
require_once('connect.php');
Connect.php defines the database constants for mywebapp
<?php
  // database connection constants
  define('HOST', 'localhost');
  define('USER', 'root');
  define('PASSWORD', 'password');
  define('NAME', 'mywebapp');
?>
The trim() function gets rid of leading and trailing spaces in this form data. The real weakness that SQL injections capitalize on is form fields that aren't validated for dangerous characters(this are characters that could potentially change the nature of an SQL query). The mysql_real_escape_string() function escapes special characters in a string for use in an SQL statement. Putting the trim() and the mysql_real_escape_string() provides a solid line of defence in collecting users data to the database
    $username = mysqli_real_escape_string($dbc, trim($_POST['username']));
    $email = mysqli_real_escape_string($dbc, trim($_POST['email']));
    $password1 = mysqli_real_escape_string($dbc, trim($_POST['password1']));
    $password2 = mysqli_real_escape_string($dbc, trim($_POST['password2']));
    $code = mysqli_real_escape_string($dbc, trim($_POST['code']));
We go further to carry out our form validation and ensure the form is filled properly, with the right information.
We make sure none of the form filed is left empty, else the program wont run and the user would me told to enter all of the sign-up data.
    if (!empty($username) && !empty($username) && !empty($email) && !empty($email) && !empty($password1) && !empty($password2) && ($password1 == $password2)) {
       else {
      echo '<p class="error">You must enter all of the sign-up data.</p>';
    }

  }
Next we make sure someone isn't already registered using this username, so we check our table to see if the username has been used before, If yes it wont run and the user would be told to try another username. Also before the data is sent to the web_user table we encrypt the users password using the SHA() function to produce a 32 bit password ,that anyone with access to the table cant decrypt.
     if (!empty($username) && !empty($username) && !empty($email) && !empty($email) && !empty($password1) && !empty($password2) && ($password1 == $password2)) {
      // Make sure someone isn't already registered using this username
      $query = "SELECT * FROM web_user WHERE username = '$username'";

      $data = mysqli_query($dbc, $query);

      if (mysqli_num_rows($data) == 0) {
        // The username is unique, so insert the data into the database
        $query = "INSERT INTO web_user (username, password, join_date, email, confirmed, confirmcode) VALUES ('$username', SHA('$password1'), NOW(), '$email', '0', '$confirmcode')";
        mysqli_query($dbc, $query);

       else {
        // An account already exists for this username, so display an error message
        echo '<p class="error">An account already exists for this username. Please use a different address.</p>';
        $username = "";
           }
    }
Next we make sure that the email address entered is in the correct email format, in PHP this code can be used to verify that, its a small code gotten from php.net. If it doesnt meet the standard the expression returns false,and an error message pops up.
     if(eregi("^[_a-z0-9-]+(\.[_a-z0-9-]+)*@[a-z0-9-]+(\.[a-z0-9-]+)*(\.[a-z]{2,3})$", $email)) {
         else {
        echo '<p class="error">Invalid email address.</p>';
         }
    }
Email Verification for New Users
Once the submitted account details has been entered to our database, its time to generate an activation code that will be sent to the users email address.
In our table we created a column called confirmcode, this code is a string of numbers generated at random. We also send this code to the user's email address. They then can click the link (which contains the code) and we will verify if it matches up with the one in the database. Let's create a local variable called $confirmcode and generate a random code. We should also take note of the fact that once all the registration data are fine we created a query that inserts '0' into the confirmed column of the database, this shows that a user has been registered but not confirmed yet, and once the $confirmcode from the users mail matches that in the web_user table the query inserts '1' into the confirmed column in the users role.
$confirmcode = rand() ; // Generate random variable characters and assign it to a local variable.
Now that the information is in our database , we need to send an email to the user with the verification link. So we make use of the PHP 'mail' function to do that
         $message =

         "
         Confirm your email
         Click the link below to verify your account

         http://localhost/mywebapp/emailconfirm.php?username=$username&confirmcode=$confirmcode
         ";

         mail( $email,"Mywebapp confirm Email", $message,"From: [email protected]");
This the full php code below
<?php

  require_once('connect.php');

  // Connect to the database
  $dbc = mysqli_connect(DB_HOST, DB_USER, DB_PASSWORD, DB_NAME);

  if (isset($_POST['submit'])) {
    // Grab the profile data from the POST
    $username = mysqli_real_escape_string($dbc, trim($_POST['username']));
    $password1 = mysqli_real_escape_string($dbc, trim($_POST['password1']));
    $password2 = mysqli_real_escape_string($dbc, trim($_POST['password2']));
    $email = mysqli_real_escape_string($dbc, trim($_POST['email']));

     $confirmcode = rand();

     if (!empty($username) && !empty($username) && !empty($email) && !empty($email) && !empty($password1) && !empty($password2) && ($password1 == $password2)) {
      // Make sure someone isn't already registered using this username
      $query = "SELECT * FROM web_user WHERE username = '$username'";

      $data = mysqli_query($dbc, $query);

     if(eregi("^[_a-z0-9-]+(\.[_a-z0-9-]+)*@[a-z0-9-]+(\.[a-z0-9-]+)*(\.[a-z]{2,3})$", $email)) {


      if (mysqli_num_rows($data) == 0) {
        // The username is unique, so insert the data into the database
        $query = "INSERT INTO web_user (username, password, join_date, email, confirmed, confirmcode) VALUES ('$username', SHA('$password1'), NOW(), '$email', '0', '$confirmcode')";
        mysqli_query($dbc, $query);

         $message =

         "
         Confirm your email
         Click the link below to verify your account

         http://localhost/mywebapp/emailconfirm.php?username=$username&confirmcode=$confirmcode
         ";

         mail( $email,"Mywebapp confirm Email", $message,"From: [email protected]");

        // Confirm success with the user
        echo '<p class="correct">Your account has been made,<br/> please verify it by clicking the link that has been sent to your email. </p>';

        mysqli_close($dbc);
        exit();
      }


      else {
        // An account already exists for this username, so display an error message
        echo '<p class="error">An account already exists for this username. Please use a different address.</p>';
        $username = "";
      }
    }
     else {
        echo '<p class="error">Invalid email address.</p>';
      }
    }
    else {
      echo '<p class="error">You must enter all of the sign-up data.</p>';
    }

  }

  mysqli_close($dbc);
?>
The image below signifies what happens once a user clicks the submit button and all the information are filled properlly
.png)
The image below shows what the link should look like
.png)
Account Activation
The next step is to activate the account, all we need to do is to create a new link, I called mine emailconfirm.php, this basic function of this link would be to confirm the users email address and confirm their account, so they can login.
The first step would be to grab the $username and $confirmcode from the link sent to the user, once this is successful we go ahead and collect the username and confirmcode from the users row on the web_user table.
if(isset($_GET['username']) && !empty($_GET['username']) AND isset($_GET['confirmcode']) && !empty($_GET['confirmcode'])){

    $username = mysql_escape_string($_GET['username']); // Set email variable
    $confirmcode = mysql_escape_string($_GET['confirmcode']); // Set confirm variable

    $search = mysql_query("SELECT username, confirmcode, confirmed FROM web_user WHERE username='".$username."' AND confirmcode='".$confirmcode."' AND confirmed='0'") or die(mysql_error());
    $match  = mysql_num_rows($search);
}else{
    // Invalid approach
    echo '<p>Invalid approach, please use the link that has been sent to your email.</p>';
}
Once this is done we go further to match the $username & confirmcodegotten from the link with username & confirmcodethat we already have on our users table. If this code matches, the user is then confirmed and the users confirmed column on the database is changed to '1' ,this means that the user has been activated and can now login, and if its invalid an error message would be shown.
<?php

mysql_connect("localhost", "root", "") or die(mysql_error()); // Connect to database server(localhost) with username and password.
mysql_select_db("mywebapp") or die(mysql_error()); // Select registration database.;

if(isset($_GET['username']) && !empty($_GET['username']) AND isset($_GET['confirmcode']) && !empty($_GET['confirmcode'])){

    $username = mysql_escape_string($_GET['username']); // Set email variable
    $confirmcode = mysql_escape_string($_GET['confirmcode']); // Set confirm variable

    $search = mysql_query("SELECT username, confirmcode, confirmed FROM web_user WHERE username='".$username."' AND confirmcode='".$confirmcode."' AND confirmed='0'") or die(mysql_error());
    $match  = mysql_num_rows($search);

    if($match > 0){
        // We have a match, activate the account
        mysql_query("UPDATE web_user SET confirmed='1' WHERE username='".$username."' AND confirmcode='".$confirmcode."' AND confirmed='0'") or die(mysql_error());
        echo '<p class="correct">Your new account has been successfully created. You\'re now ready to <a href="login.php">log in</a>.</p>';
    }else{
        // No match -> invalid url or account has already been activated.
        echo '<p class="error">This link has already been used.</p>';
    }

}else{
    // Invalid approach
    echo '<p>Your approach was invalid, please use the link that was sent to your email.</p>';
}

?>
You can now login once the link is confirmed
.png)
CONCLUSION
In conclusion we have been able to show that we can use PHP & MySQL to develop a personalised web application which will comprise of a signup form with email verification, in our next tutorial we will be dealing with creating a login page and editing a users profile .
Thank you for your contribution.
Need help? Write a ticket on https://support.utopian.io/.
Chat with us on Discord.
[utopian-moderator]
Congratulations @mrtega! You received a personal award!
Click here to view your Board
Congratulations @mrtega! You received a personal award!
You can view your badges on your Steem Board and compare to others on the Steem Ranking
Vote for @Steemitboard as a witness to get one more award and increased upvotes!