MEAN Tutorial Part 4 - Frontend Navigation Bar

This tutorial series shows how to build web applications with the MEAN stack. The MEAN stack is MongoDB, Express.js, Angular, and Node.js. This stack allows to write applications, where Javascript can be used both for the client and the server part.
In this tutorial a simple webapplication to manage portfolios of cryptocurrencies such as Bitcoin or Ethereum will be built.
What will I learn?
In this part of the tutorial series
- you will learn to create a Angular application with Angular CLI, and
- you will learn to create basic navigation on the web frontend.
Requirements
For this part of the tutorial you need the following background knowledge:
- Previous parts of this series
- Working with the command line
- Experience in TypeScript, JavaScript, HTML, and CSS
Difficulty
Intermediate.
Tutorial contents
In this part of the tutorial we finally start with the frontend for the server code developed in the last parts of this series. We will use Angular CLI to create an Angular application and components for navigation, login, and registration.
What is Angular?
Angular is a framework for building client applications in HTML and either JavaScript or a language like TypeScript that compiles to JavaScript.
You write Angular applications by composing HTML templates with Angularized markup, writing component classes to manage those templates, adding application logic in services, and boxing components and services in modules.
(from angular.io)
Install @angular/cli
Creating an Angular frontend requires a lot of boilerplate code which is tedious to write. Fortunately there is a npm package that provides a command line interface to simplify the development of Angular applications: Angular CLI. Install it globally on your system with
npm install -g @angular/cli@1
Now you may use the ng command to create, generate, and serve the frontend.
Create and run the frontend framework
Start with creating a new Angular application. Go to the base folder of our application created in the previous lessons and enter
ng new frontend
This creates a new subfolder frontend with an independent node project with its own package.json and its own node_modules folder for its dependencies. If you already setup a git repository for your project, ng detects that and only creates a .gitignore file in the new folder, otherwise it initializes a new git repository for the frontend.
The entry point of the generated Angular application is frontend/src/main.ts, which basically only bootstraps the app module in frontend/src/app. In this folder you find the implementation of this module in app.module.ts and the component app.component. An Angular component corresponds to a web page or a part of a web page (e.g. the navigation part).
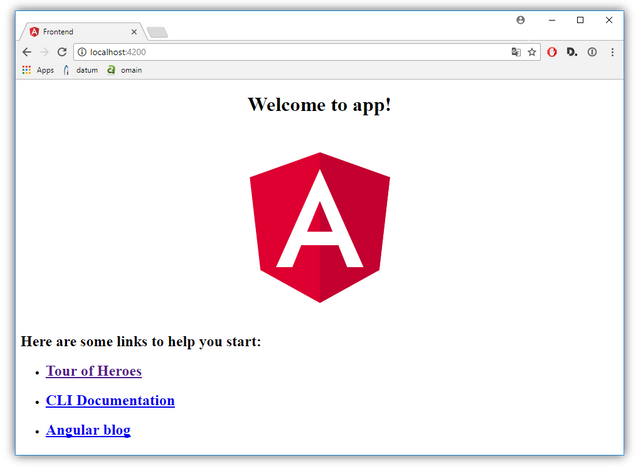
The generated application is already complete and can be run by executing ng serve in the frontend folder. On the first run some files are compiled, but after a few seconds the server should be up and running and you can access it in your browser with http://localhost:4200.
Import Bootstrap
Bootstrap is an open-source library for designing web front ends originally developed by Twitter. We use it since it provides ready-to-use CSS classes for navigation bars and for buttons. The index file in frontend/src is the main template for all sites served by Angular. Replace the contents of this file with the following modified version of the starter template code from Bootstrap:
<!doctype html>
<html lang="en">
  <head>
    <meta charset="utf-8">
    <meta name="viewport" content="width=device-width, initial-scale=1, shrink-to-fit=no">

    <link rel="stylesheet" href="https://maxcdn.bootstrapcdn.com/bootstrap/4.0.0/css/bootstrap.min.css" integrity="sha384-Gn5384xqQ1aoWXA+058RXPxPg6fy4IWvTNh0E263XmFcJlSAwiGgFAW/dAiS6JXm" crossorigin="anonymous">

    <title>MEAN Tutorial</title>
  </head>
  <body>
    <base href="/">
    <script src="https://code.jquery.com/jquery-3.2.1.slim.min.js" integrity="sha384-KJ3o2DKtIkvYIK3UENzmM7KCkRr/rE9/Qpg6aAZGJwFDMVNA/GpGFF93hXpG5KkN" crossorigin="anonymous"></script>
    <script src="https://cdnjs.cloudflare.com/ajax/libs/popper.js/1.12.9/umd/popper.min.js" integrity="sha384-ApNbgh9B+Y1QKtv3Rn7W3mgPxhU9K/ScQsAP7hUibX39j7fakFPskvXusvfa0b4Q" crossorigin="anonymous"></script>
    <script src="https://maxcdn.bootstrapcdn.com/bootstrap/4.0.0/js/bootstrap.min.js" integrity="sha384-JZR6Spejh4U02d8jOt6vLEHfe/JQGiRRSQQxSfFWpi1MquVdAyjUar5+76PVCmYl" crossorigin="anonymous"></script>
    <app-root></app-root>
  </body>
</html>
Note, that the only thing that we kept from the generated file is <app-root></app-root>, which includes the main application component. This is part of Angular's templating engine and includes the template for the app component in src/app/app.component.html.
If you kept ng serve running, you will notice that the frontend in your browser updated, as soon as you saved the changes to index.html. The contents did't change, as they are part of the app component, but the styling, due to the import of the BootStrap CSS.
Add a navigation bar
Now we will get rid of the template code displayed by the app component and replace it with a navigation bar. For the navigation bar, create a new Angular component by executing
ng g component nav-bar
in the frontend folder. g stands for generate. Since a navigation bar is pretty useless without places to navigate to, create two additional components for the registration and login pages with
ng g component register
ng g component login
Note that Angular CLI creates a subfolder in frontend/src/app for every new component with four files in it.
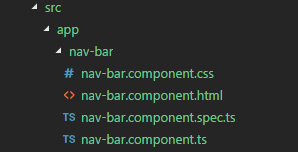
The .html file contains the HTML template for the component, the .ts the implementation of the component's class, the .spec.ts contains tests and the .css may contain additional stylesheets. We will ignore the later two for now and only work with the HTML templates and the component's class implementations.
Angular uses TypeScript (that's what the .ts stands for), which is a strict superset of JavaScript, that adds optional static typing. All JavaScript code is valid TypeScript code. Since TypeScript is not supported by browsers it is compiled to browser compatible JavaScript as soon as you run ng serve.
Open the HTML template for the nav-bar component (frontend/app/nav-bar/nav-bar.component.html) and replace its contents with
<nav class="navbar navbar-expand-sm navbar-light bg-primary">
  <a class="navbar-brand">MEAN Tutorial</a>
  <ul class="navbar-nav ml-auto">
    <li class="nav-item">
      <a class="nav-link" routerLinkActive="active" routerLink="/login">Login</a>
    </li>
    <li class="nav-item">
      <a class="nav-link" routerLinkActive="active" routerLink="/register">Register</a>
    </li>
  </ul>
</nav>
This creates a navigation bar with a brand item on the left and two login/register items at the right. All CSS classes used in this snippet are provided by Bootstrap. The login and register anchor tags use two special attributes: routerLink and routerLinkActive. These are two selectors provided by the Angular's Router module which we will use below in the app component class. With routerLink, we set the target route for the link. With routerLinkActive we specify a CSS class for the link that is currently active. This way the last selected item of the navigation bar will be highlighted.
Since we don't have instantiated a router yet, nothing will happen, if you click on Login or Register. To add the router, first import the router module in the main app module. Open frontend/src/app/app.module.ts and insert the following import below the import of NgModule:
import { RouterModule, Routes } from "@angular/router";
Now create a two element sized array of Routes with the /register and /login routes below the import statements.
const routes: Routes = [
  { path: "register", component: RegisterComponent },
  { path: "login", component: LoginComponent }
];
This links the route for /register to the RegisterComponent and the route for /login to the LoginComponent. Finally, add the router to the module's list of imports after the BrowserModule:
 imports: [
    BrowserModule,
    RouterModule.forRoot(routes)
  ],
The one thing still missing is an outlet for the router in the app component's HTML template. Therefore, we get rid of the generated boilerplate in app.component.html and replace it with the following code.
<app-nav-bar></app-nav-bar>
<div class="container">
  <router-outlet></router-outlet>
</div>
On top of every page of our app, the navigation bar should be rendered, hence the template of <app-nav-bar> is included on top. The outlet of the router is placed in a BootStrap container <div> below.
The router also needs to know, how to compose the navigation URLs. Therefore we already added a <base href="/"> in index.html above.
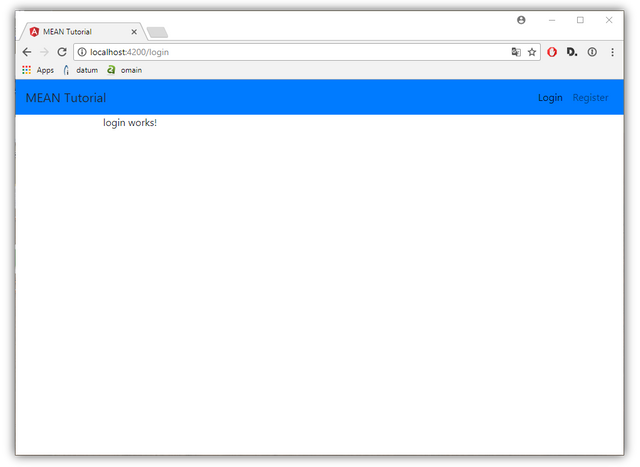
With this, you should be able to switch between the Login and Register components by clicking on the links in the navigation bar. The default template for these components should display login works and register works respectively.
This concludes the fourth part of the tutorial series on how to build a web application with the MEAN web application stack.
Example Code on Github
The code for this part of the tutorial can be found on Github.
What's next?
In the next part we will continue with implementing the registration and login components.
Curriculum
Previous parts of this series:
- Part 1 - Get started with the MEAN development stack
- Part 2 - Adding a user model
- Part 3 - Registration and Authorization
Posted on Utopian.io - Rewarding Open Source Contributors
Thank you for the contribution. It has been approved.
You can contact us on Discord.
[utopian-moderator]
Hey @nafestw I am @utopian-io. I have just upvoted you!
Achievements
Suggestions
Get Noticed!
Community-Driven Witness!
I am the first and only Steem Community-Driven Witness. Participate on Discord. Lets GROW TOGETHER!
Up-vote this comment to grow my power and help Open Source contributions like this one. Want to chat? Join me on Discord https://discord.gg/Pc8HG9x