How to Create a Professional and Eye Catching Site Banner
Hi steemians,
Today I will like to explain how to create a professional and attractive site banner.
Softwares and materials
The following materials will be needed to carry out today's project;
- Graphic Editing Software; (I am using Adobe Photoshop version CS6)
- Images
- Fonts
Design Level
- Intermediate
This design can be done by those who already have one or two experience with photoshop or any other graphics editing software.
However, people with beginner skills level can also attempt this design
Time Frame
- 25-40 mins
In as much it is pretty important to work with time, it is also important that you do not rush a design project
Outcome

Project Introduction
I was contacted to handle the graphic section of a new project #SteemCamp by @michaelcj.
#SteemCamp is a project (Still under development) focused on promoting the Steem Blockchain in underdeveloped countries like Nigeria, Ghana, Togo etc using entertainment as a bait.
I humped on this project and offered to create a professional design based on the concept briefing I received.
Let's Begin
How to Create a Professional and Attractive Site Banner on Photoshop
Step one - Download free/Buy stock Images
When making a design it is very important you go for high quality images for your work.
I personally love using FREEPIK; they offer loads of high quality images available for both free and premium users.
Step two - Download free/Buy fonts online
Apart from High Quality images, fonts are what will help create a unique design.
It is imperative that your fonts and colours selection goes with the concept of the design project at hand; Some fonts and colours look playful thus shouldn't be used for cooperate organisations rather they should be used for Youths or maybe entertainment centered designs, other fonts and colours look classic (this should be used for cooperate organisations)
You get the gist, right?
I will suggest you check up Dafont for exciting new fonts.
Step three - Start Photoshop
Launch the program and set the appropriate dimensions.
In my case, I created two tabs; one for the banner itself and the other a mini workshop where I do all my manipulation before transferring to the main banner tab.
My dimensions are:
- 1900 x 600 for the banner
- 2500 x 2500 for my mini workshop
Hold down "CTRL + N" to create a new tab
Or go to file, then click on new to create a new tab.


Step four - Set rulers
One major secret of a neat and professional design is the consideration of element placement.
If you have a good concept and your arrangement is shitty, then your work will not appear neat nor professional.
To toggle your rulers on and off just hold down "CTRL + R"

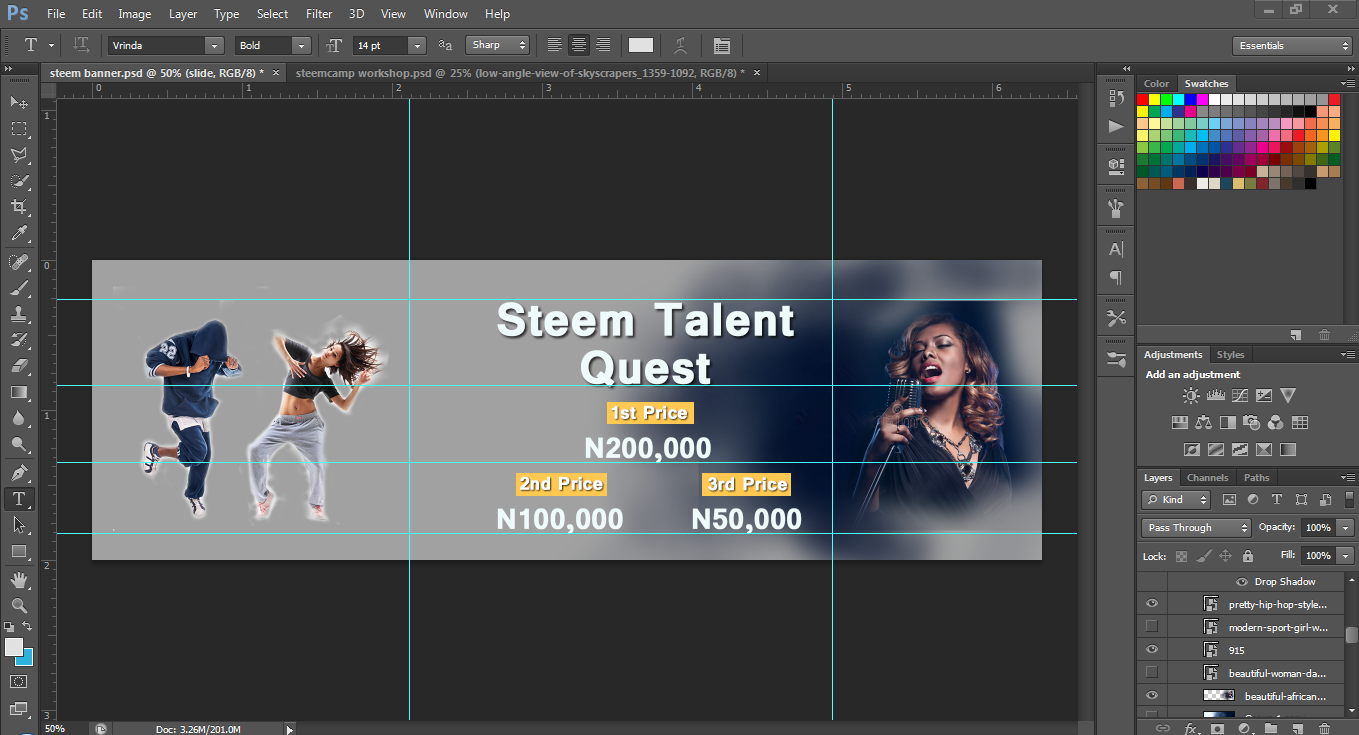
Step four - Insert text and select your Fonts
Type down all the text that will be needed in the banner and select befitting fonts which have been downloaded from Dafont or any other font sites.
To select the text tool in photoshop just hit "T" button on your keyboard.
Or simply select the text tool using your cursor
To change your text font, select your desired font from the available ones installed by clicking on the portion circled in red in the image below.

Did you noticed the shapes behind some of the texts?
The yellow boxes behind some of the text in the above image was acheived by using the rectangle shape tools and selecting yellow as its fill colour.
Step five - Importing Image elements
After working on the images to be used on the banner, we will then import them to the banner tab from your mini workshop tab.
To import an image from your computer; go to file, then click on open, lastly select the image you intend to import.
You can also use drag and drop style to load your images directly on any tab you want.

To move from your "workshop" to your banner tab, first select the layer of the image(s) you intend to move, then select your "move tool" (you can hit your "V" button to automatically select this option), lastly, now drag the images to the other tab by holding down your left mouse button and moving the images to the "banner" tab.
Step six - Text/Image Positioning
Utilize your banner workspace adequately so that your designer won't appear jam-packed on one part.
Use the move tool (CTRL + V) to move your images and texts around till you get the perfect look.
Step seven - Colour selection and blending
This is the finial stage of the banner creation.
Use the colour swatches to select colours and blend them with both eraser tool and brush tool.
To select the eraser tool just hit the "E" button. You can alsouse your mouse to select it from the tool bar.


Step eight - Save Images
Now your project should first be saved in psd in case you need to edit your design later, then saved in png
To save a new work, hold down CTRL + S while you can hold SHIFT + CTRL + S to save in new format/name
Design Tips
- To create a smooth blend between the images, reduce the hardness of your brush and eraser.
- To help create a perfect blend in colours you can decrease and increase layers opacity.
For suggestions and enquiries please leave a comment below or chat me up on discord with the i.d jacobite#1316
Latest Jacobite's Shows
Featured Posts

Posted on Utopian.io - Rewarding Open Source Contributors
DISCLAIMER: dropahead Curation Team does not necessarily share opinions expressed in this article, but find author's effort and/or contribution deserves better reward and visibility.
to maximize your curation rewards!
with SteemConnect
Do the above and we'll have more STEEM POWER to give YOU bigger rewards next time!
News from dropahead: Bye bye 25+ and 50+! Welcome 20+ 40+ and 60+!
Quality review from the dropahead Curation Team
According to our quality standards(1), your publication has reached an score of 84%.
Well said Gabriel García Marquez: "You learn to write by writing" Keep trying, you will soon achieve excellence!
(1) dropahead Witness' quality standards: - Graphic relation to the text (Choice of images according to the text)
- Order and coherence
- Style and uniqueness (Personal sence, logic, complexity, understanding, what makes it interesting for the reader)
Thanks so much for the post. Very useful stuff...
I am glad you enjoyed it.
Do visit @netwonks always as we intend to hold weekly giveaways...
Nice tutorial! :)
If you are searching for some free fonts, google has a big collection: https://fonts.google.com/
Wow, thanks alot for the feedback and contribution.
I will be checking out https://fonts.google.com/ asap.
@team-solutions has promoted your post :)
Thank you for the great content!
Wow, thanks alot.
Your welcome :) Just tag any relevant work with @team-solutions and I will re-steem.
Happy new year !!
Congratulations @netwonks, this post is the eighth most rewarded post (based on pending payouts) in the last 12 hours written by a Newbie account holder (accounts that hold between 0.01 and 0.1 Mega Vests). The total number of posts by newbie account holders during this period was 2931 and the total pending payments to posts in this category was $1802.69. To see the full list of highest paid posts across all accounts categories, click here.
If you do not wish to receive these messages in future, please reply stop to this comment.
thanks
Congratulations! This post has been upvoted from the communal account, @minnowsupport, by Jacobite from the Minnow Support Project. It's a witness project run by aggroed, ausbitbank, teamsteem, theprophet0, someguy123, neoxian, followbtcnews/crimsonclad, and netuoso. The goal is to help Steemit grow by supporting Minnows and creating a social network. Please find us in the Peace, Abundance, and Liberty Network (PALnet) Discord Channel. It's a completely public and open space to all members of the Steemit community who voluntarily choose to be there.
If you would like to delegate to the Minnow Support Project you can do so by clicking on the following links: 50SP, 100SP, 250SP, 500SP, 1000SP, 5000SP. Be sure to leave at least 50SP undelegated on your account.
This post has received a 0.39 % upvote from @drotto thanks to: @banjo.
Your contribution cannot be approved because it does not refer to or relate to an open-source repository. See here for a definition of "open-source."
You can contact us on Discord.
[utopian-moderator]
Oops OK..