Create Animation And Scene Transitions In Phaser 3(Part-1)
Repository
Create Animation And Scene Transitions In Phaser 3
What Will I Learn?
Requirements
- Have basic html5 and javascript knowledge.
- Visual Studio Code
Difficulty
- Basic
Tutorial Contents
In this article we will learn how to use different scenes with phaser 3. We will use one spritesheet and create a man moving from this spritesheet so we will create a mini game.
When we're done before creating the game I want to show you how to create a game with gif.
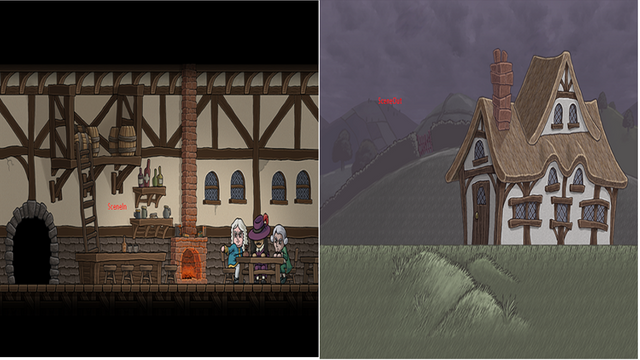
As we see, we will create a man who moves to the right and left, and this guy will be seen as moving thanks to the animation features Phaser 3 provides. Man moves out of the house in the first scene and passes into the house when he presses the W key when the house comes to the door. The interior of the house is actually a different scene and a certain trigger triggers the first scene and switches to the second scene.
With this article we will create different scenes and learn how to run other scenes if the player makes certain rules. Let's start creating this animation and scenes.
Create Game Config
Before creating the config object for the game, let's talk about the pictures we will use in the game. We'll create two scenes for this game, use images for the background of each scene, and use one spritesheet for our character.
Well, I feel like i am hearing what you're talking about in this spritesheet. What we call spritesheet is actually a merged version of multiple images. Thus, we do not store a lot of pictures in our games and animations can be done through a picture. If we are going to use a spritesheet for animation, the images in it must be linked.
In the picture below you can see the spritesheet of the character that we will use in the game.
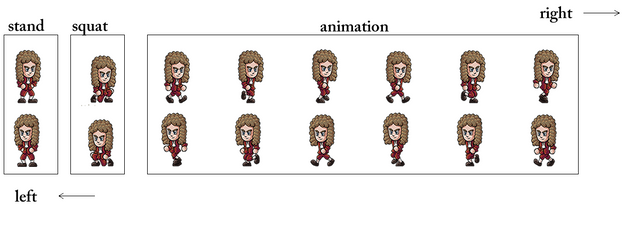
So that we can use 16 different pictures of our character together and easily create animation.
After creating index.html file to create config object, let's create script.js file.
//for game settings
var config = {
    type: Phaser.AUTO,
    width: 768,
    height: 512,
    physics: {
      default: 'arcade',
      arcade: {
          gravity: { y: 0},
          debug: false
      }
  }
};

var game = new Phaser.Game(config);
We have adjusted the height and width settings of the game according to the size of the background images, so that there will be no slippage in the background. We didn't set scene property in config because we'll use more than one scene.
We will define the scenes as a separate class because we will have developed separate games in each scene. We will create the out.js file to encode the scene for the outside of the house. We will create the in.js file to encode the scene for the inside of the house.
We haven't created the scenes yet, but we should use the scene property in the config object. To do this, let's create an object from the class of scenes and write it as an array in the scene property. The reason we write as series is because we will use more than one scene.
//Produce objects from stage classes.
var sceneOut=new SceneOut();
var sceneIn=new SceneIn();
Let's use the objects we create.
…
scene:[sceneOut,sceneIn],
…
The sequence of writing the scene objects we use in the array is important. Whichever object is written first, the game will first run that scene.
Create Scenes
With phaser, we can create scenes using classes, and we can create the functions that make up the properties of the scene as functions of the class.
We created the out.js file and even set the name of the class to use in the config object, then let's create the SceneOut class.
//Let's create the scene with the class.
class SceneOut extends Phaser.Scene {

    constructor (config) {
        super(config);
        //To use the scene in the game
        Phaser.Scene.call(this, { key: 'out'});
    }


    preload () {

    }
    create ()  {

        console.log(this);

    }
    update() {

    }
}
We can call the scene in-game using the Phaser.Scene.call() method. In the create() function, we have put this property on the console.

So we can access the properties of the scene while inside the class with this keyword.
Let's use the in.js file to create the second scene.
//Let's create the scene with the class.
class SceneIn extends Phaser.Scene {

    constructor (config) {
        super(config);
        //To use the scene in the game
        Phaser.Scene.call(this, { key: in});
    }


    preload () {

    }
    create ()  {

        console.log(this);

    }
    update() {

    }
}
Thus, we created both scenes. Since the SceneOut object is first written in the config, it will be the scene of the game when the game is started. Let's put it on the scenes in the background pictures to test.
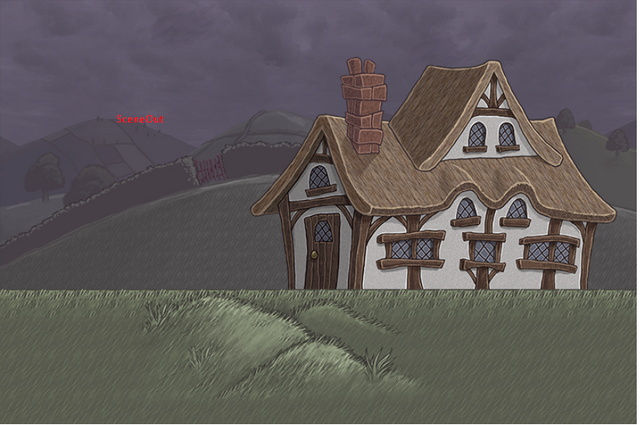
Let's load the houseout.png file into the SceneOut class first.
preload () {

   //Let's upload to use the picture.
   this.load.image('background','./assets/houseout.png');
}
create (data)  {

    //use picture
    this.add.image(384,256,'background');
}
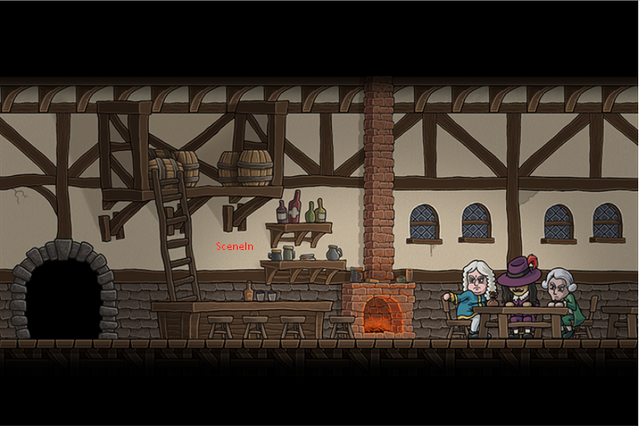
Let's use the housein.png file in SceneIn.
preload () {

   //Let's upload to use the picture.
   this.load.image('background2','./assets/housein.png');
}
create (data)  {

    //use picture
    this.add.image(384,256,'background2');
}
SceneOut is loaded when the game is opened.
If we first write the SceneIn object in the scene property in the config, SceneIn will run when the game is opened.
scene:[sceneIn,sceneOut],
Create Animation
We used spritesheet to create animation with phaser. Since spritesheet contains more than one image, we have to separate each image into frames. We use the spritesheet () function to separate the character into frames.
this.load.spritesheet('character',
'./assets/character.png',
{frameWidth:150,frameHeight:117});
We will use this frame when creating the animation and we will generate animation for frames with the anims() function.
If we take a good look at our character.png image, there are 6 possible situations for our character. For these 6 states, we must run the anims() function and set the animations of the states.
this.anims.create({
            key:'rightstop',
            frames:[{key:'character',frame:0}],
            frameRate:20
        });

        this.anims.create({
            key:'rightdown',
            frames:[{key:'character',frame:1}],
            frameRate:20
        });

        this.anims.create({
            key:'rightwalk',
            frames:this.anims.generateFrameNumbers('character',{start:2,end:7}),
            frameRate:10,
            repeat:-1
        });

        this.anims.create({
            key:'leftstop',
            frames:[{key:'character',frame:8}],
            frameRate:20
        });

        this.anims.create({
            key:'leftdown',
            frames:[{key:'character',frame:9}],
            frameRate:20
        });

        this.anims.create({
            key:'leftwalk',
            frames:this.anims.generateFrameNumbers('character',{start:10,end:15}),
            frameRate:10,
            repeat:-1
        });
There is no need to set generateFrameNumbers for animations that only host one frame. With generateFrameNumbers, we can provide frameworks in which the animation will run sequentially.
We use the play() function to play the animations. We can play any animation according to the key attributes. Let's produce the character and play the animations.
create(){
//create player
player=this.physics.add.sprite(500,300,'character');
}
update(){

        //Set movement on x axis
        player.setVelocityX(-100);
        //animation
        player.anims.play('leftwalk',true)
}
If we want the right movement, we have to run the animation with rigtwalk switch and adjust the speed accordingly.

When we want to run the moment when our character stops, we must make the speed zero.
FrameRate and Repeat
Finally, let's talk about frameRate and repeat. With frameRate, we can determine the speed of the animation.
We set the frameRate value to 10 in the animations it moves, if we set it to 50, the frame transitions will be faster and we will see our character moving faster.
this.anims.create({
 key:'leftwalk',
 frames:this.anims.generateFrameNumbers('character',{start:10,end:15}),
 frameRate:50,
 repeat:-1
});
The repeat property specifies the number of times the frame loop will continue. If set to -1, it will not repeat at all.
Proof of Work Done
https://github.com/onepicesteem/Create-Animation-And-Scene-Transitions-In-Phaser-3-Part-1
Thank you for your contribution @onepice.
After reviewing your tutorial we suggest the following points listed below:
The creation of the scene with the animation was very interesting.
Nice work on the explanations of your code, although adding a bit more comments to the code can be helpful as well.
Using GIFs to show results is definitely better than standard still images.
The structure of your tutorial went very well. Good job!
Thank you for your work in developing this tutorial.
Looking forward to your upcoming tutorials.
Your contribution has been evaluated according to Utopian policies and guidelines, as well as a predefined set of questions pertaining to the category.
To view those questions and the relevant answers related to your post, click here.
Need help? Chat with us on Discord.
[utopian-moderator]
Thank you for your review, @portugalcoin! Keep up the good work!
Congratulations @onepice! You have completed the following achievement on the Steem blockchain and have been rewarded with new badge(s) :
You can view your badges on your Steem Board and compare to others on the Steem Ranking
If you no longer want to receive notifications, reply to this comment with the word
STOPTo support your work, I also upvoted your post!
Do not miss the last post from @steemitboard:
Vote for @Steemitboard as a witness to get one more award and increased upvotes!
Hi @onepice!
Your post was upvoted by @steem-ua, new Steem dApp, using UserAuthority for algorithmic post curation!
Your post is eligible for our upvote, thanks to our collaboration with @utopian-io!
Feel free to join our @steem-ua Discord server
Hey, @onepice!
Thanks for contributing on Utopian.
We’re already looking forward to your next contribution!
Get higher incentives and support Utopian.io!
Simply set @utopian.pay as a 5% (or higher) payout beneficiary on your contribution post (via SteemPlus or Steeditor).
Want to chat? Join us on Discord https://discord.gg/h52nFrV.
Vote for Utopian Witness!
Congratulations @onepice! You received a personal award!
You can view your badges on your Steem Board and compare to others on the Steem Ranking
Vote for @Steemitboard as a witness to get one more award and increased upvotes!