Making Ping Pong Game With Phaser 3 (Part-1)

Repository
Making Ping Pong Game With Phaser 3 (Part-1)
What Will I Learn?
- You will learn how to program games using the
Phaser 3library. - You will learn how to make Phaser 3
game settings. - You will learn how to
upload and drawpictures with Phaser 3. - You will learn
keyboard controlswith phaser 3 . - You will learn to move a dynamic object.
- You will learn
createCursorKeys()function. - You will learn
setVelocityY()and , setVelocityX()` functions. - You will learn
setCollideWorldBounds(true)
Requirements
Have basic html5 and javascript knowledge.
Atom Editor
Difficulty
- Basic
Tutorial Contents
In this article I will show you how to do ping-pong game with phaser 3.
In my previous articles, I used to mention game programming using pablojs, but pablojs didn't fully meet the game development needs because it enabled the creation of svg objects.
I had to fix problems and write extra code when use pablojs.
I needed game engines to write an advanced game. I can make my games easier with a library designed for 2D games.
Here is a great library prepared for 2d games with phaser 3.
I'm here with how to do ping-pong game using phaser 3.
In order to better explain this game I've divided it into two parts and here's the first part:
- I will create the necessary settings for the game.
- I will upload pictures to be used in the game.
- I will install keyboard controls to move objects in the game.
- I'm going to set the limits of the game to prevent objects from protruding from the limits of the game.
Let’s start.
First, I would like to talk about project files.
I will use script.js to write the index.html page and javascript codes to set the html page and of course we need a library of phaser 3.
- index.html
- script.js
- phaser3.js
Let's create a folder named assets for the pictures that will be used in the game and put the pictures in the ball, ground and the two players in this folder.


Setting The index.html Page
We won't have much work with index.html when using phaser 3. It is enough upload the necessary files.
<!DOCTYPE html>
<html lang="en">
<head>
    <meta charset="UTF-8">
    <meta name="viewport" content="width=device-width, initial-scale=1.0">
    <meta http-equiv="X-UA-Compatible" content="ie=edge">
    <script src="phaser.js"></script>
    <script src="script.js"></script>
    <title>Document</title>
    <style type="text/css">
        body {
            margin: 0;
        }
    </style>
</head>
<body>

</body>
</html>
We still do the margin adjustment.
We have installed the script.js and phaser.js files.
Making Game Settings
The Phaser.Game() class is used to create a game with phaser 3. The game class takes the settings of the game as a parameter and creates the game according to these settings.
With the settings of the game you can adjust the size of the playing field and the type of the game.
In script.js
var config = {
    type: Phaser.AUTO,
    width: 800,
    height: 400
};

var game = new Phaser.Game(config);
When such a setting is made, the playground is set to have a black background and 800x400.
Screenshot 1

With the type property, we can adjust the rendering context of the game. In phaser 3 the game can be set in the form of Phaser.CANVAS and Phaser.WEBGL.
When the Phaser.AUTO property is set, it is set to the WEBGL, but the WEBGL is automatically switched to the CANVAS system when the browser does not support it.
With the scene feature in the config setting, we can define the necessary functions for the game.
These necessary functions:
With the preload setting, the function to load the pictures to be used in the game is defined.
With the create setting, the function that creates the objects to be used in the game is defined.
With the update setting, the function that defines recurring events with specific time intervals is created.
var config = {
    type: Phaser.AUTO,
    width: 800,
    height: 400,
    scene: {
        preload: preloadGame,
        create: createGame,
  update: updateGame
    }
};
function preloadGame ()
{
//function where images are loaded
}

function createGame ()
{
//function in which objects are created
}

function updateGame ()
{
//repeated events at certain time intervals
}
Image Upload Operations
I said, the background color is initially black. Let's change the background with the help of a picture.
Let's prepare the background image for the game in the preloadGame() function.
function preloadGame ()
 {
  this.load.image('ground','assets/ground.png');
 }
I set the keyword of ground.png as ground.
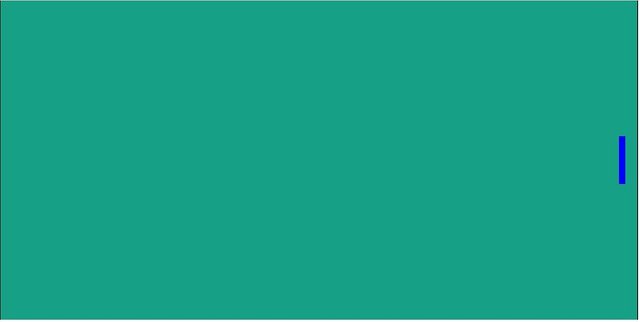
I set the background image to 800x400. After loading, let's draw in the game area within the createGame() function.
function createGame ()
{
  this.add.image(400, 200, 'ground');
}
With phaser 3, the center points are centered when pictures are drawn to the screen.
An 800x400 sized image is placed at 400x200 for a full placement on a 800x400 sized playground.
Screenshot 2

Providing Keyboard Control
For keyboard control, the createCursorKeys() function in input.keyboard api is used, but this function provides access to the keyboard's directional keys and some special keys such as space, shift.
Let's create the cursor variable and define the createCursorKeys() function.
var cursors;
function createGame ()
{

  cursors = this.input.keyboard.createCursorKeys();//keyboard Access
  console.log(cursor);
}
Screenshot 3
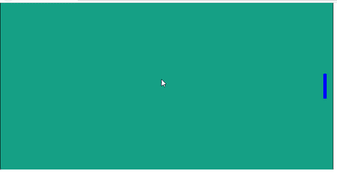
With the keyboard keys, let's create our first pile to provide movement.
function preloadGame ()
 {
  this.load.image('ground','assets/ground.png');
  this.load.image('player','assets/player.png');
 }
var player;
function createGame ()
{
    this.add.image(400, 200, 'ground');

    cursor = this.input.keyboard.createCursorKeys();
    console.log(cursor);

    player = this.physics.add.sprite(780, 200, 'player');
}
We used different methods to draw the player object and the background image on the screen.
Because the background image is a static object, we created it as add.image, but we have created physics.add.sprite because the player object will be a moving image.
To use the physics object, we need to define it in game settings.
var config = {
    type: Phaser.AUTO,
    width: 800,
    height: 400,
    physics: {
        default: 'arcade'
    },
    scene: {
        preload: preloadGame,
        create: createGame,
        update: updateGame
    }
};
Screenshot 4
Move With Keyboard
To move an object with the keyboard, we need to capture the moment the keyboard keys are pressed.
This process must be defined in the updateGame() function because it is a process that needs to be constantly checked.
function updateGame ()
{
  if(cursor.up.isDown)// move up if the up key is pressed
  {
    player.setVelocityY(-150);
  }
  else if(cursor.down.isDown)// move down if the down key is pressed
  {
    player.setVelocityY(150);
  }
  else//stop if no key is pressed.
  {
    player.setVelocityY(0);
  }

}
Using the setVelocityY() function, we can move up or down on dynamic objects. if we want to move a dynamic object to the right or left, we need to use setVelocityX().
The following shows the movement of the visual player object.
Screenshot 5
The player object passes the limits of the game world as seen. we can use setCollideWorldBounds(true) to fix this problem.
In the createGame () function, let's collide the player object with the world boundaries.
function createGame ()
{
player.setCollideWorldBounds(true);
}
So our dynamic object, as in the picture below, cannot exceed the limits.
Screenshot 6

Proof of Work Done
https://github.com/onepicesteem/Making-Ping-Pong-Game-With-Phaser-3-Part-1
Hi @onepice!
Your post was upvoted by @steem-ua, new Steem dApp, using UserAuthority for algorithmic post curation!
Your post is eligible for our upvote, thanks to our collaboration with @utopian-io!
Feel free to join our @steem-ua Discord server
This is a really nice tutorial. I am a JavaScript ionic developer and would sometime in future want to combine ionic and phaser into the same project so that it'll have a nice gui before gameplay and even an awesome and efficient gameplay provided by phaser. This nicely explains ways that I could add phaser to an ionic App. Thanks for the tutorial.
Hey, @onepice!
Thanks for contributing on Utopian.
We’re already looking forward to your next contribution!
Get higher incentives and support Utopian.io!
Simply set @utopian.pay as a 5% (or higher) payout beneficiary on your contribution post (via SteemPlus or Steeditor).
Want to chat? Join us on Discord https://discord.gg/h52nFrV.
Vote for Utopian Witness!