Build A Library Application With Graphql ExpressJs React-Apollo and MongoDB (Part 1)

Repository
React
https://github.com/facebook/react
Graphql
https://github.com/graphql/graphql-js
Apollo
https://github.com/apollographql/apollo-client
Express
https://github.com/expressjs/express
My Github Address
This Project Github Address
What Will I Learn?
- You will learn setup server use expressJs.
- You will learn setup graphql.
- You will learn listen() function in expressjs.
- You will learn use() function in expressjs.
- You will learn GraphQLObjectType,GraphQLString in graphql.
- You will learn express-graphql packages.
Requirements
- text editor (I used visual studio code editor)
- Basic javascript information
- Basic react information
Difficulty
- Basic
Tutorial Contents
Hello everyone,
We're starting a new tutorial series. In this tutorial series we will develop a library application. We will develop the library application using graphql. To fully develop the application and to use graphql fully, we will perform server and client operations together.
When developing the application we will use NodeJs and ExpressJs for server operations. We will use React and Apollo to improve the client side of the application and the application will use MongoDB and mLab for database operations.
We'll create an application using all the javascript frameworks mentioned above. We'll start with this tutorial and we'll learn how to install express and graphql.
Below are the tutorial's sections:
- Setup Server App With ExpressJs
- Graphql Setup Operations
- Create A Schema
Let’s start.
1-Setup Server App With ExpressJs
In this section we will create the server side of the library application. We will use the expressjs framework to create the server.
Expressjs is a nodejs developed for a web application and we can develop server applications using the expressjs framework. In this section we will create a simple server with expressjs this server will create the basis for the library app will create.
Since the library application consists of server and client files, we do not want these files to be intermixed. To prevent the files from mixing, We will create a folder named server into the folder in which we developed the library application.
Let's do this with the command line.
mkdir server
cd server
We need to create the package.json file in the server folder.
Let's run the npm init command to create the package.json file.
npm init
When creating the package.json file with npm init, we can give the answers as follows.
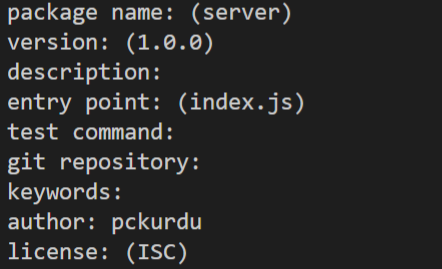
As a result of these operations, the package.json file will be generated as follows.
In package.json
{
  "name": "server",
  "version": "1.0.0",
  "description": "",
  "main": "index.js",
  "scripts": {
    "test": "echo \"Error: no test specified\" && exit 1"
  },
  "author": "pckurdu",
  "license": "ISC"
}
Now we can download expressjs packages. Let's download expressjs packages into server folder.
server>npm install express
We are now ready to create a server application. Let's start encoding by creating app.js file in server folder.
In app.js
//We use to produce express.
const express=require('express');
//We are creating applications using express.
const app=express();
//Listen 4000. port for request.
app.listen(4000,()=>{
    console.log('listening port 4000');
});
We have assigned a variable to use express. We created a server application named app using this variable. Server application has now occurred, but this server application needs to listen to the requests of the client. With the listen () function we can listen to requests.
We can use nodejs to run express app because the express application is a nodejs application.
server>node app
The console screen is as follows when we run the application.

So we have created our server application, but it is not enough to use nodejs to run the server application.
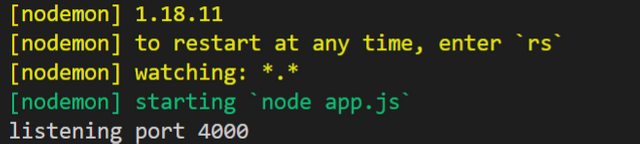
We can use nodemon packets to capture changes that occur in app.js codes and to run the app.js file automatically.
npm install nodemon -g
We can install nodemon globally with the command above. Let's run the app file again using nodemon.
server>nodemon app
The console screen is as follows when we run the application.
2- Graphql Setup Operations
In this section we will see how to install graphql for server application.
In order to use graphql in the application, we should install graphql in the server.In the previous section we used express packages to encode the server side of our application.
We need express-graphql packages in order to install graphql with express. Let's start coding by downloading these packages in server folder.
npm install graphql express-graphql
We will create a variable to use these packages.
In app.js
//for express-graphql packages
const graphqlHTTP=require('express-graphql');
We can request the server by using this package. With the app.use () function, let's create the page in which graphl is run.
//create page where graphql will run
app.use('/graphql',graphqlHTTP({

}));
So we have completed the installation of graphql.
After running the app.js file, if we type localhost: 4000/graphql in the browser, we open the page in which graphql works.
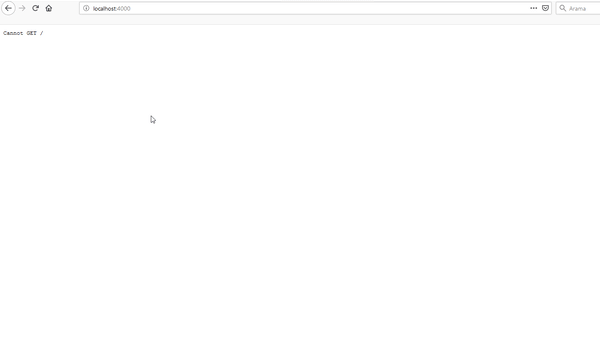
When we run the page, we encounter an error. This is because we need to have a schema for Graphql to occur.
3- Create A Schema
In this section we will perform the schema creation process for graphql.
Keeping the schemes in a separate place we can avoid complexity. Then we will create a folder named schema in the server folder and create the schema.js file into this folder named schema.
We will use graphql packages to create a schema.
In schema.js
//for schema
const graphql=require('graphql');
We need to produce the main types to be used in the schema using this graphql.
Let's create a book type using GraphQLObjectType because it is the first type of book type that is a must for library application.
//for book type and book fields
const {GraphQLObjectType,GraphQLString}=graphql;

//create a book type
const bookType=new GraphQLObjectType({

})
We need to add the name property to indicate this book type. To keep the information of the book type, we need to create the field property, and in this field property, we have to create the schema of the properties of the book.
//create a book type
const bookType=new GraphQLObjectType({
    name:'Book',
    fields:()=>({
        id:{type:GraphQLString},
        name:{type:GraphQLString},
        type:{type:GraphQLString}
    })
})
In this way, we created our first type for the schema.
We've created the schema, but yet the server application has no idea of this scheme. To inform the server, we should assign this schema to the schema of the app.use () function.
In app.js
//import schema.js
const schema=require('./schema/schema');

app.use('/graphql',graphqlHTTP({
    schema:schema
}));
Server will no longer want the schema for the graphql application.
Thank you for your contribution @pckurdu.
After reviewing your tutorial we suggest the following points listed below:
Very interesting and well structured tutorial. It is good to have MongoDB as an application for database operations.
Thanks for following our suggestions in your previous tutorials. Your contributions are getting better.
Thank you for your work in developing this tutorial.
We are waiting for more functionality in your Blog with React.
Your contribution has been evaluated according to Utopian policies and guidelines, as well as a predefined set of questions pertaining to the category.
To view those questions and the relevant answers related to your post, click here.
Need help? Chat with us on Discord.
[utopian-moderator]
Thank you for your review, @portugalcoin! Keep up the good work!
Congratulations @pckurdu! You have completed the following achievement on the Steem blockchain and have been rewarded with new badge(s) :
You can view your badges on your Steem Board and compare to others on the Steem Ranking
If you no longer want to receive notifications, reply to this comment with the word
STOPVote for @Steemitboard as a witness to get one more award and increased upvotes!
Hi @pckurdu!
Your post was upvoted by @steem-ua, new Steem dApp, using UserAuthority for algorithmic post curation!
Your post is eligible for our upvote, thanks to our collaboration with @utopian-io!
Feel free to join our @steem-ua Discord server
Hey, @pckurdu!
Thanks for contributing on Utopian.
We’re already looking forward to your next contribution!
Get higher incentives and support Utopian.io!
Simply set @utopian.pay as a 5% (or higher) payout beneficiary on your contribution post (via SteemPlus or Steeditor).
Want to chat? Join us on Discord https://discord.gg/h52nFrV.
Vote for Utopian Witness!