SETTING UP TRACKS' MIDI SOURCES: a tutorial for the open-source project The Amanuensis: Automated Songwriting and Recording
Repository
https://github.com/to-the-sun/amanuensis
What Will I Learn?
- You will learn how MIDI is handled in each track of The Amanuensis.
- You will learn how to change the MIDI sources associated with each track.
- You will learn what MIDI sources can be used.
- You will learn how to generate MIDI from unconventional sources using The Singing Stream.
- You will learn how to choose appropriate MIDI for each recording source.
Requirements
- Windows - If you'd like to help get a Mac version up and running, please reply to this post! The necessary changes are actually very minimal.
- Max/MSP - If you don't have it you can get a free 30 day trial at cycling74.com or just reply to this post and I will compile a standalone version of The Amanuensis for you to use.
Difficulty
- Basic - This tutorial is designed with musicians in mind primarily; no programming knowledge required. If you're into Max and want to get involved that is only a plus!
Tutorial Contents
MIDI in The Amanuensis
MIDI is essential to the operation of The Amanuensis, as it is what runs the rhythmic analysis; nothing will be recorded without it. There are two dynamics that can be mixed and matched in The Amanuensis: any given source of MIDI can be seen as the "instrument" you are playing, while the recording source in a given track can be seen as the "sound" it is producing. Tracks set to record samples or synths will use the MIDI they receive to play the specified source as well as run the analysis that decides what to record. By contrast, MIDI entering a track set to record an audio input will not be audible in itself, but is still necessary (more on setting up appropriate MIDI sources in cases like this below).
When you start The Amanuensis you will see that each track states that it is  . This will change as soon as any MIDI reaches the program. All you have to do is play some and you will see one of the tracks change to something like
  . The Amanuensis automatically recognizes all viable MIDI sources on your computer.
MIDI from conventional sources such as keyboards, MPCs and e-drum modules will come in on a specific channel and you will see this stated as part of the source name. If you were to play MIDI on a second channel using the same device, it would be treated as a separate source and as such could simultaneously be associated with any other track (or the same as the first).
Changing MIDI/track associations
If the MIDI is coming in on a specific channel it will initially associate itself with the same numbered track, otherwise it will find the first available track and appear on that one. To change these track associations hotkeys are used. The + and - keys will move a source up or down one track and the number keys can be used to move a source to a specific track. The source to be moved is always the one to most recently send MIDI to the system. Once The Amanuensis has seen a specific source of MIDI that source will remain associated with the same track after closing the program and opening it again.
These hotkeys allow the player to quickly jump to a different aspect of the song they are creating without their instrument leaving their hands and without having to alter any recording sources (which can cause issues if done in the middle of things). So for example, you could quickly begin a new synth track with a completely different sound, layering over what you've already recorded, or could go from playing guitar to laying down a beat with drum samples, which would challenge you to play your guitar in an entirely different manner. To further integrate the possibility of these transitions, MIDI notes with pitch 3 and 4 can also be used to move their source down or up one track, respectively, same as the hotkeys themselves do.
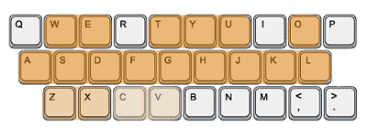
The computer keyboard
If you don't have an instrument with you, there is one instrument that can always be used by default: your computer's keyboard. There are 15 keys that will play MIDI, giving you a little over an octave to work with. These keys and the pitches they generate are arranged in emulation of a piano keyboard (exactly the same as in Ableton Live) as you can see in the following image.
The Singing Stream
Just about anything can potentially be used to play music and The Amanuensis aims to enable as many unconventional instruments as possible. In the digital domain, anything that produces a stream of numbers can have its movement analyzed for moments of activity, which can then be converted to MIDI. This is what The Singing Stream works to achieve. Currently it can handle input streams from external game controllers (think Guitar Hero, Rock Band, Dance Dance Revolution, etc.), the Microsoft Kinect and audio sources themselves.
When The Singing Stream detects input on a new source, it will need to load some code to handle the analysis of that stream, but first it will give you a chance to show it any additional sources you would like to use, so it can load them all at once.
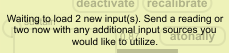
The individual buttons on external controllers must have their data streams analyzed separately, so to save on resources, only those you intend to utilize will be enabled. Once you've hit every button you want to use, wait for the message on the screen to change, notifying you that the loading process has begun. This can take a few moments, especially for a large number of streams.
Stream calibration
Once it's finished, a three-second calibration period will begin for every input that has not previously been calibrated.
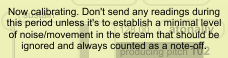
The Singing Stream is designed to be as general-purpose as possible, so a datastream consisting of numbers in any range is okay. The purpose of calibration is to establish where in this range the "off" state should lie. Any readings that fall within the range witnessed during this period will always trigger a note-off in the MIDI generated. Generally this means that you should not send any readings for these three seconds, but if there's some minimal movement in the stream you would like it to ignore then this would be the time to show it that. So for example, you could sway slightly in front of a Kinect or talk quietly in the background of a microphone.
By its nature, a stream of numbers is a linear sort of thing, meaning it can vary in two different directions. So in some cases you'll want a MIDI note to be triggered from movement in either of these and not just one. The Singing Stream automatically accommodates this. A note-on will be generated upon crossing a threshold on either side of the established note-off range, so joysticks (or the movement of your hand in front of a Kinect, etc.) will trigger in both directions.
These calibration readings will be remembered, but if you need to adjust them you can hit  and a new three-second window will begin for the selected stream.
Individual stream options
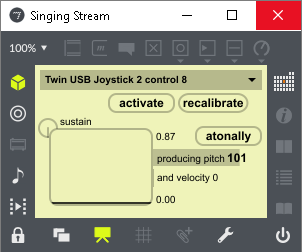
Every stream that's been loaded will appear listed in the drop-down menu at the top.
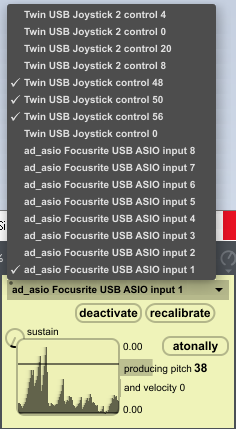
Those with checkmarks next to them are "active" and will generate MIDI. You can  or
or  the selected stream by clicking the button.
If a stream is active it will be visualized in real-time in the window on the left. You will notice a dark horizontal bar across this window (two actually, although one is often buried at the very bottom). These are the note-on thresholds. If a stream crosses one of these bars in either direction it will generate a note-on. These are not exactly the same boundaries as the note-off range. The bars automatically adjust, moving gradually with the average of the readings they receive, to position themselves in continually optimal locations. Generally you will see them collapse with less input, but they will never go within the noise threshold designated during calibration.
If you adjust the  you can see its effect on the stream in the window. Turn the knob up if you would like to have the notes generated linger in the note-on range longer.
Streams set to generate MIDI  will have a large bold pitch number (and sliding bar behind it) that can be adjusted up and down by dragging with the mouse. Every note created by the selected stream will be at this pitch, which is chosen randomly at first. Since every control (on an external controller for example) has its own stream, the scale played in by the instrument as a whole can be specified in this way.
Velocity is calculated based on the literal velocity with which the stream reaches the note-on threshold. Sharper, more staccato movements will generate higher values and be louder; lazier movements will be quieter. There is a grey bar behind the velocity text which will flash up to its level with each note-on and back down to 0 at note-off, so you can easily tell when MIDI notes have been created.
All of these settings will be remembered the next time you use The Amanuensis, so you will not have to set them twice.
Generating MIDI from audio input
One essential function of The Singing Stream is the ability to generate MIDI from audio, given that The Amanuensis runs on MIDI at the same time it records audio. All of your audio driver's inputs will appear as individual streams and can be managed in the ways already described. By default, these streams are a 1-ms smoothing of the absolute amplitude of the actual signal. In practice this is usually the most useful interpretation of a digital audio stream for the purpose of running the rhythmic analysis. One use case would be plugging drum triggers or electronic drum pads directly into the inputs of your interface and letting The Singing Stream create MIDI notes for you, bypassing the need of even having a module/brain on your e-kit.
However, there are times when you would like to have the tonality of the audio determine the pitch generated rather than relying on a predetermined one, for example if you'd like to use your voice to play a synth. In this case you can change the pitch from being produced to being produced by  . The manual setting of pitch will be disabled and you will be able to see the pitches generated by MIDIguitar stated with the bar changing size behind them in the same manner as velocity.
MIDIguitar is proprietary third-party software and you will actually have to own a copy of it for this functionality to work. If you do, simply place MIDIguitar64.dll in the Amanuensis folder so the program can find it.
Choosing the best MIDI for your audio
In the cases of playing synths and samples the best MIDI to run the analysis for that track is obvious: the same MIDI used to play them, and it will be taken care of for you implicitly. When dealing with more traditional instruments however, such as guitar or drums, there is more of a gray area. The primary purpose of the MIDI is to drive the analysis of its rhythm, so finding a source where the MIDI notes coincide with the most important beats in the audio (and is not necessarily even present for the less important ones) is your goal. One way of erasing less consequential beats is by raising the sustain in The Singing Stream.
Reducing any latency in the MIDI generation can be important. Therefore atonal analysis should be used whenever possible over the tonal analysis performed by MIDIguitar, as this takes extra time to calculate. In general, getting as close to the physical source of the sound as possible is ideal as well. So for example using MIDIguitar to analyze your guitar playing once it's already been brought into the computer is inferior to using something like the Fishman TriplePlay, which creates MIDI with six individual pickups placed directly over the strings of your guitar.
Conclusion
Once you have all of your tracks set up as you desire, with recording sources as well as MIDI sources, all that's left to do is play! As soon as The Amanuensis likes what it hears it will jump in, challenging you to play along with whatever it offers, just like another participant in the jam session.
Curriculum
- Tutorial #1 - Getting Up and Running
- Tutorial #2 - Setting Up Tracks' Recording Sources
- Feature #1 - The Projects Menu
- Feature #2 - God Mode
- Feature #3 - Track Mixing Controls
Thank you for your contribution.
Glad to see someone who's creating his own music application also writing a tutorial about it :)
Although we normally are not happy with tutorials focused on on-screen instructions, yet since this is new work and is not documented elsewhere, having such tutorials would make sense.
Your contribution has been evaluated according to Utopian policies and guidelines, as well as a predefined set of questions pertaining to the category.
To view those questions and the relevant answers related to your post, click here.
Need help? Write a ticket on https://support.utopian.io/.
Chat with us on Discord.
[utopian-moderator]
Hey thanks, I was going to publish it regardless, since it definitely needs to be covered for the sake of new users, but any support from Utopian is much appreciated!
Hey @to-the-sun
Thanks for contributing on Utopian.
We’re already looking forward to your next contribution!
Contributing on Utopian
Learn how to contribute on our website or by watching this tutorial on Youtube.
Want to chat? Join us on Discord https://discord.gg/h52nFrV.
Vote for Utopian Witness!
Nice to see you and I Upvoted you :) !
:
“Culture is a symbolic veil with which we hide our animal nature from ourselves … and other animals.” ====> Mokokoma Mokhonoana
Thanks dude. Want to try it out at all?
God bless you. https://steemit.com/@biblegateway