Create Valuable Blog Posts on Steemit in 9 Steps - Complete Tutorial
Steemit is the best social media platform available in the world right now. But it isn't only a social media platform. It is a blogging platform too and we all have our blog here. A blog is powered by content and despite all the modernization and technological advances, content remains the most important and integral part of any successful blog.

What is content? Content is what you post on your blog; the blog posts. Creating blog posts is a process that you must understand and excel at. Creating good blog posts is synonymous to creating great content. Great blog posts add value to the community and are rewarded more.
Combining my knowledge, analysis, and experience, I'm going to explain to you the process of creating high-quality blog posts on Steemit.
Talking about my knowledge and expertise, here's a certificate from the University of Pennsylvania that I acquired through Coursera. This course certificate indicates that I know a thing or two about creating viral content. The experience of blogging goes hand in hand with the certificate as well.

Why is Writing Good Content Important?
Since your Steemit success (reputation, upvotes, and rewards) depends on creating good content, you must be interested in knowing how to create a blog post. Well, it's easy if you follow this 9 step checklist to create your first, as well as every upcoming blog post.
Let's begin with the process and learn how to write a blog post, but before moving to the checklist let's have a feel of the editor that comes up when you hit Submit A Story button!
Understanding The Steemit Editor
If you're familiar with MS Word or any other word editor, Steemit editor is nothing new for you; not much at least. But since we're addressing problems of absolute beginners as well, here's a detailed introduction to the editor options and how to use them while creating or editing blog posts.
Look at the picture below. I've indicated the functionality of icons present in the editor inside the image. Icons/options are explained from left to right.

Take some time familiarizing yourself with the available tools.
Basic Structure of a Blog Post
Detailed step by step procedure of how to write a blog post is given in detail later in the article, but I'm going to layout the basic structure of a blog post for the purpose of fundamental understanding.
Look at the following infographic to understand it.

Note: The infographic image can be used by fellow Steemians with credits to me.
Step By Step Guide To Creating High-Quality Blog Posts
Always go for high quality. Don't compromise on the quality of your blog posts if you want your blog posts to succeed. No matter how much time and effort it takes; do it! Do not use shortcuts. Shortcuts like plagiarism never bring long-term success. Steemit has a system that values quality and originality.
Bookmark this post for future use or write a checklist to use when you create blog posts. After writing your first few articles, you will become accustomed to the whole procedure automatically.
Remember: The white space between two paragraphs is good for readers. Keep 3-5 sentence paragraphs and hit enter to create white space and start the next paragraph. See this post for example.
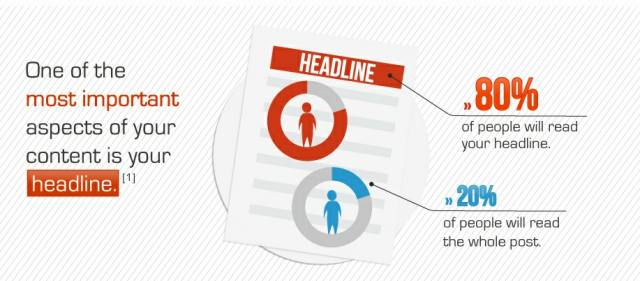
Step 1: Write An Attractive Title
80 percent of the readers read just the headline/title, and only 20 percent read rest of the article. Do you see the connection between headlines and readers?
What makes a reader remain interested in reading your blog post or leave the without reading it?
It's the headline; the title. If your visitors are converting to readers, you've most probably done an excellent job in making your headline. If the New section of the website is sending great numbers to your post, your headline has a great part in it.
However, if the things are not as bright, your headline is the first culprit. You must understand that a decent headline followed by an excellent introduction and high-quality content inside your blog post will never disappoint your readers.
They'll not only read that particular post but also check your other posts, and probably upvote and resteem as well.
Headline Tips
Visit Steemians with great reputation and engagment and see how they create a headline and how they announce their topic in the title. The analysis will help you understand what works and what doesn't.
- Do make sure that your headline holistically represents what your blog post contains.
- If your headline indicates that the article is about A but the article, in reality, is about B, then you're not only going to lose readers but also receive no rewards or support for your posts.
- Headlines should contain your topic. Research your topic well before posting about it.
- Word your title such that it convinces readers to click. Avoid unethical clickbait though.
- Introduce a number in the title. It increases the performance of the blog post. Odd numbers work better than even ones.
- It's not compulsory but writing titles with the first-word capitalization is recommended.
Keep these guidelines in mind while creating your blog post's title.
Step 2: Write An Engaging Introduction
Suppose you've written a great headline that makes the reader interested. But what happens is that your first lines suck? The visitor loses all his interest and leaves your post. What a shame!
Writing engaging and attention-grabbing introductory paragraphs is absolutely critical in keeping the reader on your blog. You can use following techniques advised by Neil Patel to write an engaging opening paragraph.
- Include a question. It ignites the thought process and increases engagement.
- Show stats. When talking about headlines, I wrote the 80-20 statistic. Did it make a buzz? Showing exact stats, with or without source, attracts attention.
- Compare two or more things. For example, Steemit vs. Facebook can be a hot comparison.
- Mention a debatable point. We all know what debate can do for engagement. Be logical and respectable while doing that.
- Explain a situation. Using the problem mentioned in the headline, tell what the problem is and why you're writing about it.
- Discuss background of the topic. For example, if choosing a smartphone is the problem, describe why it 's hard to choose a smartphone and what the factors are.
- Quote an expert or authority. It can be a quote. It can be a line from his or her speech. Quoting experts builds interest.
- Describe a typical example. It can be something related to your topic that people are most commonly familiar with.
Again, looking at blog posts written by experts on any subject will help you gather enough ideas. A great place to do that is the "Trending" section of Steemit. You will find great posts there.
Step 3: Write Main Content
If you have done everything right to grab the attention of your reader, it is critical that the user becomes satisfied with the heart of your content. After all, your content is what he's come to your blog for.Keep the context of your headline in mind while writing the main part of your blog post.
Your goal is to deliver the value which the reader expects from you after reading catchy headline and introduction. Solve his problem!The main content should contain the following elements.
Headings
Headings play a superb role in organizing content beautifully. Use of appropriate headings can generate keen interest which will result in reader staying for more duration on your blog. He or she may become a follower and may support you in so many ways.
Write relevant headings which clearly indicate the content covered under them. Headings can be changed from the options available in the editor. Here's a look at the editor again.

Subheadings
When main headings include a vast subject which requires further explanation, subheadings can be used. In this case, treat headings as title and subheadings as its headings. It's like a mini blog post within a blog post.
Medium and small headings are subheadings. Use them accordingly.
Lists
If you have some points that need to be highlighted prominently, making bulleted or numbered lists is a smart thing to do.
- Lists work because they are noticeable.
- Summing up points in bulleted or numbered form is incredibly easy.
- They are easy to read and enhance user experience.
I made this bulleted list ⇑ as an example.
Media
It includes images, videos, gifs, or anything audio-visual that appears in your blog posts. Media rich posts are more engaging and deliver more value.
Adding Images and Gifs
The image you add will be placed at the position of your cursor. Make sure you add the image at the appropriate place in the blog post. Here's the tutorial to add images from online sources.
- Go to Pixabay.com or any other source of free images. For gifs, you can go to Giphy.com or any other site.
- Open/View image in a separate post.
- Copy the URL in the address bar (ending with .jpg, .gif etc)
- Click the Image icon in Steemit editor.
- Paste the link and tick. The image will be added.
To add images from your device (like the ones downloaded from Canva or the screenshots etc.), adopt the procedure mentioned in this post. If Img Safe doesn't work in that procedure, you can use SteemIMG or CTRLQ.

I just added a gif. That's how you can too.
Warning: - Do not violate copyright while uploading media to your blog. Copyright violation is unauthorized use of someone else's property. Use royalty free images from Pixabay.com and other similar free sites or just go to Canva.com and create your beautiful pictures. I use Canva.
Follow the points below to use images appropriately in your posts.
- Add images that are user-friendly and increase their interest.
- Choose images with the appropriate size. Too big or too small images are not recommended.
- Visual breaks help readers stay on your blog posts. Add images wherever you can and don not let the text be too dominant across the post.
Adding Videos
To add videos, simply follow these tiny steps.
- Open the youtube video you wish to add.
- Click share.
- Copy the link.
- Paste it in the post. That's it.
If you want to add your own videos (which is a good idea if you can), upload them to your YouTube channel. Then add them in your posts following the steps above.
That's how I added a video. You deserved some rest and a good laugh!
Links
Links add value to your blog post. Linking to high-value content out of your blog is a good practice. Accept that there is better content out there and link to it. You will not lose credibility; you will gain trust and provide value to the community.
You can link to your own content too like I did in the images part.You can link to your own content too like I did in the images part. When linking, use the use post title (of the post you want to link to) as anchor text.
Step 4: Write A Conclusion
Your main content is decent. It's time to wrap things up nicely in a well-written conclusion. Give it a heading named conclusion or anything you consider good. Remember, these are the final few seconds of the reader on your post.
He's already preparing to leave your blog once he's done reading. Holding onto his attention is the best thing you can do at that moment. Write a fitting conclusion which sums things up in an excellent manner.
Some people scroll down, see the headings and directly go to concluding part. Write it so well that these people go back to the top and start reading your blog post.
Step 5: Call To Action
Call to Action (CTA) is something you want your reader to do. Now that your reader has completed reading something that solved the problem he was facing, you're in a great position to ask him for something that would want him to do. Below are some CTAs.
- Asking the reader to give feedback. Invite him to leave comments. (My favorite because it builds a community and relationship)
- Asking for connecting as follower.
- Support some cause.
- Requesting to resteem and/or upvote.
There must be a call to action, and it should be convincing. Unleash your inner communication expert to make things happen the way you want them to.
Step 6: Select A Category and Add Tags
This is important for your blog. Categorizing your content into categories helps you make it visible in those tags on Steemit. Remember some points.
- The first tag you write is the main category of your blog post.
- Write tags in small letters only.
- Add space to separate two tags. Comma is not needed.
- Choose the most relevant tags and if you can, write 5 tags.
Create new tag if your new blog post does not fall under existing ones. Five tags means your post will immediately appear in 5 different tags in the New section; making it more discover-able.
Step 7: Add A Thumbnail Image
After creating your blog post, add a thumbnail image that attracts the attention of your visitors. It must be related to your content and must not violate copyright laws. Create beautiful blog title images on Canva.com for free.
The first image (or video or gif) you add to your blog post will act as the thumbnail of your post on Steemit and social media sites when the post is share. The thumbnail image should be part or at the end of the introduction.
Here's what a featured image looks like in a published blog post.

Step 8: Recheck & Preview The Blog Post
Once done writing your blog post as per above steps, recheck for small grammatical errors, typos, and improvements. Once done, hit the Raw HTML button (between title bar and editor).Doing this will generate a preview of your post below the editor. See if everything looks fine. Do not hurry or you'll lose all your hard work. When everything is ok...
Step 9: Publish The Blog Post
Hit the Post button (the blue button on the left bottom). You're done!
Recap: Creating Valuable Blog Posts
That's it for another value driven blog post; this time on how to create valuable blog posts. Knowing how to write a blog post is synonymous to knowing about creating quality content. Let's summarize the whole process. To produce a great blog post, you should: -
- Create an attractive headline containing your keyword.
- Write an attention-grabbing introduction
- Create engaging content which is well organized and media rich.
- Write a conclusion which roughly sums up the post.
- Call your readers to some action of your preference.
- Select the main category and add relevant tags
- Set a good looking but relevant thumbnail image.
- Recheck, preview for any mistakes or improvements.
- Publish the blog post.
I hope this blog post helped you learn how to create amazing blog posts on Steemit. Following these guidelines will ensure more engagement on your posts and your Steemit journey will become more beautiful.
If you liked this tutorial and found it useful, please resteem and upvote to help it spread. I know and I hope you agree too that this post can benefit a lot of new as well as existing users and can make Steemit a place with better content. Thanks for your support in form of feedback, resteems and upvotes.
Hi steem mate's I am vinclace and I am really new to steem I have one pressing questions for anyone who can help me how do I get to put the money into my real pockets please can you help me?
Hi @vinclace33
I have been thinking of sharing a tutorial about it. There has been some delay but I will post a tutorial soon. Meanwhile, you can check my tutorial on buying Steem because in that it is explained how to get Bitcoin through your Steemit earnings. Once you have Bitcoin, you can sell it for fiat currency (cash) in many ways.
thank you !!!
very good article. lots of good advice.
upvoted!
book marked. and I will try and remember to give you some space in my post,that I plan to create!
namaste!
Thanks a lot @jesse2you
Your appreciation means a lot.
Thanks for the tips. I'm trying to get back into blogging myself.
Really very useful post, thanks for sharing.
Thank you for your feedback.
Thank you very much for this tutorial, really very useful! An excellent day.
I follow u, follow me back if u want lot of fun and amazing picture every day.
You didn't read it. :)
No one can read so fast.
I did not read all of them but I noticed the quality of your article.
Thank you for your appreciation.
Another helpfull blog from for beginners.thanks a lot.
Welcome and thank you very much.
An amazing article really i was looking for something like that.
Thanks a lot.
Excellent information! Thank you!
Most welcome and thanks for your feedback.
Interesting and productive. Thank you. X
Most welcome and thanks for the feedback.
Your post was great. I always comment on posts I read, only fair. I like your post and hope you don't mind if I add the link to it when I comment on Newbie posts? X
I don't mind that at all and thanks.
Thank you. Do not use this site as it has been stolen by @jennswall @finleyexp ! If I get it back I will contact you. Previous support most appreciated. A friend is posting this for me. X
This is a lie. The @get-baking account has not been stolen.
Absolute joke. These two recon I have asked them to do work of 5,500 Euros in 3 months. Not likely when I needed every penny to buy my house. I even sold my Audi Q7 car to do this. I am also an ex Applied Computer Science teacher and Head of Department. Why would I pay them to do this amount of work on Steemit development? I can and have done it myself. It really is so pathetic just to try and scare me into not persuing the fraud committed against myself which I am involving the police here in Spain. A full history will be my first post on my new site. I will forward it to all my followers. Please view this pathetic attempt to explain their actions. My replies below might interest you. https://steemit.com/scam/@finleyexp/warning-a-serial-slanderer-and-con-artist-is-spamming-steemit-with-lies#@nannyjoan/re-finleyexp-warning-a-serial-slanderer-and-con-artist-is-spamming-steemit-with-lies-20170626t191027239z . X
@ilyastarar The @get-baking account is being held in lieu of payment for services rendered from March 2017 to present. The outstanding debt falls just under 4000 euros.
I do not make it a policy to speak against others. I had continued to help this person even after the initial slander was introduced to the community of Steemit, but in this case I feel the need to defend these accusations with the proof that I have at hand.
Here is the link to the outstanding bill: https://docs.google.com/spreadsheets/d/1-jkKuiB-6vmR4I_UVDGijb3960dUrL37qjbtA8ZVZcw/edit?usp=sharing
Absolute joke. These two recon I have asked them to do work of 5,500 Euros in 3 months. Not likely when I needed every penny to buy my house. I even sold my Audi Q7 car to do this. I am also an ex Applied Computer Science teacher and Head of Department. Why would I pay them to do this amount of work on Steemit development? I can and have done it myself. It really is so pathetic just to try and scare me into not persuing the fraud committed against myself which I am involving the police here in Spain. A full history will be my first post on my new site. I will forward it to all my followers. Please view this pathetic attempt to explain their actions. My replies below might interest you. https://steemit.com/scam/@finleyexp/warning-a-serial-slanderer-and-con-artist-is-spamming-steemit-with-lies#@nannyjoan/re-finleyexp-warning-a-serial-slanderer-and-con-artist-is-spamming-steemit-with-lies-20170626t191027239z . X
Great article! Resteemed
Thanks a lot