How to create an Alphabetical Index for your book using OpenOffice (Free)
Apache OpenOffice 'How To': Create an Alphabetical Index For Your Book.
After wasting a day and having to delete the entire index from my soon to be published paperback, I figured I would put this instruction post together so I could follow it next time and maybe help a brother, or sister, out.
OOo as we used to call it, though now apparently called AOO, is a free software similar to MS Office. It's pretty good and works much the same way as Office, and best of all it's free ! Link here
The first thing you need to do is work in it's native format using *.odt files and not be tempted to save it as *.doc out of familiarity. This way you have the best chance of not having errors and you can export it out as anything you like when you are done.
Need The Official Manual?:
If after reading this article you still need more info, then check Chapter 12 Tables of Contents, Indexes, and Bibliographies of the manual which can be found here - https://wiki.openoffice.org or more precisely, though this link may change in time, here -https://wiki.openoffice.org/wiki/Documentation/OOo3_User_Guides/OOo3.3_User_Guide_Chapters
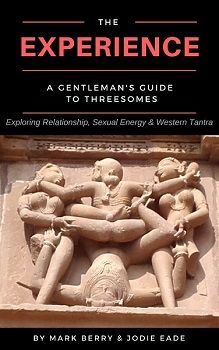
And this is the eBook I am currently indexing ready for paperback publication...
So...how to make an Alphabetical Index for YOUR book...lets get started
1. PREPPING
1. Go through your book and make a note of all the words you want in the index.
There really is no getting around this long boring bit any way that you approach it, but if you get those words saved into a seperate document, I used notepad, then the next stage is pretty straightforward for building the index. If you have made a massive balls-up as I did, then this is also the way to go because you can cut and paste your erroneous index and fix that up, in this way you can plan it a bit.
The alternative would be to start searching your book for key index words and enter them as you find them, but that's how I got in a mess, so for our example I am working from the messed up text doco that I rescued from my old index just before I nuked it.
1.1 Next decide on what is capitalized and what isnt
For an index, Names and Places get a capital first letter, all other words don't. Confirm this depending on your book and publishers requirements, but that is what I am working to in this example. You could always check your bookshelf and see what others did.
Also you will be adding phrases not just words, so how do you want them to be capitalised or ordered. And what about plurals or versions of the word that differ slightly. meditation, meditated, meditate or meditating? are you going to add them all or is it getting a bit diluted and bulky and can you tweak it all to be under just the one word meditation and get away with it?
1.2 Is it to be: The Word, Word, or Word, The
What to do with word order. For example, I have "The Debrief " as a two word term that I need included because it is a thing in my book. In my first attempt I ended up with "debrief" and "the debrief" and also "debrief, the" as my index entries. Trust me, fixing this later is a pain in the AOO that you don't need. Get it right from the start. And for the eggheads out there reading this, I also learnt that editing the XML in a 1.5 million character xml file is not the way to go either, so forget that. (I later learnt I could, but it fought me on it and kept reseting my edits back, the solution I will share in a later article)
2. BUILDING THE INDEX
2.1 Display the things you will need to see in your doco.
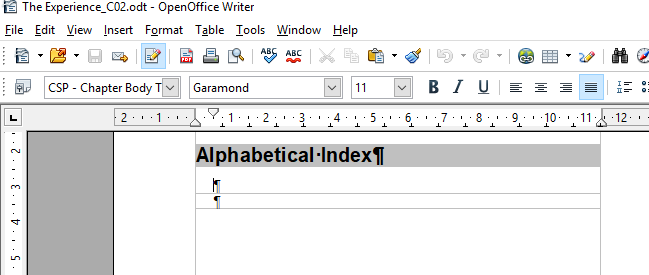
You need the invisibles to be showing, so select the Pilcrow symbol on the formatting bar. (Fig 1)
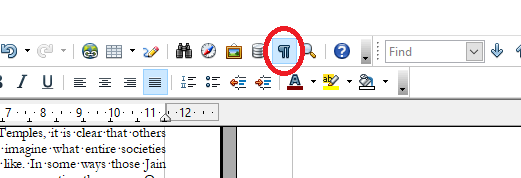
{fig 1}
You also need to make sure you can see which words have been entered for indexing. To do this, check "Field Shadings" (Fig 2 below) which can be found under Tools menu, Options, Appearance. This will grey the words out once they are added to the index, but bear in mind when you change the reference word for an index entry, it then sticks the field shade marker to the left of the word instead of shading behind the word, and it is actually hard to spot them. (Fig 13 later on shows an example of this)
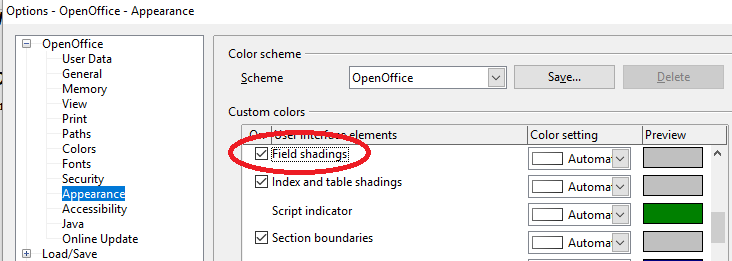
{fig 2}
2.2 Getting the Index started
Choose where the index will be. Usually the back of the book of course. Put the cursor in there. And then choose the index from the menu Insert, Indexes and Tables, Indexes and Tables. It should popup with a screen as you see in the below image. (Fig 3)
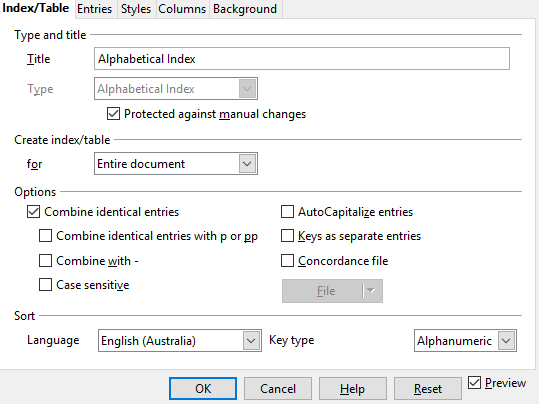
{fig 3}
Choose type: Alphebetical Index.
Make sure Protected against manual changes is checked.
Uncheck Case sensitive unless you need it, but I sure didnt.
Uncheck Combine identical entries with p or pp. unless you need it, but I sure didnt.
The rest probably default to unchecked, as you see in the picture (Fig 3), if not then set them to what I have here would be my suggestion.
You can close it at this point by clicking OK, and you will see it appear in your book like this (see Fig4)...
{fig 4}
OK so you have an index woohoo ! Now you need to make some entries for it.
Incidently if it refuses to add the index at first it may because you need an entry for it to get started. In that case follow the next section 3 Adding Entries to Index, and stick a single entry in, then come back.
2.3 Set Index Fonts and Wotnot
Right clicking on the Index anywhere in the grey area that you can see in Fig 4 above, will give you some options to update, edit or delete the index. If you delete the index it doesnt delete the entries so dont worry, but if you add entries, they wont show until you update the index.
What we need here is to get back in to edit it, so right-click index in your document and choose edit. Then select the Styles tab (see Fig 5)
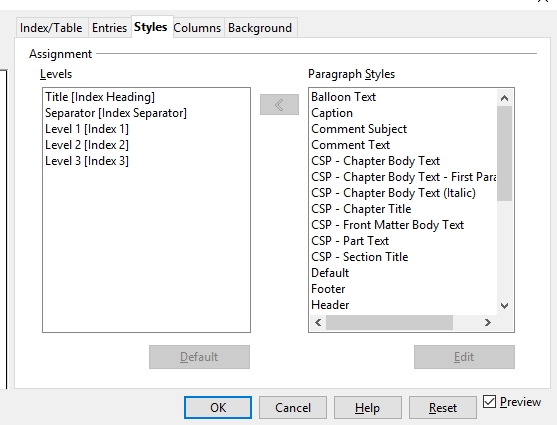
{Fig 5}
I'll be honest, I dont really know what Entry and the other tabs do yet, so I didnt mess with them, but for my purposes I just needed to adjust the fonts to that of my book, and to get the index looking like it belongs in it, and to do that I went to Styles tab as per the picture above (Fig 5), and then chose my preferred styles from the right window pane, then I click the arrow between the panes and it will swop Title (Index Heading) out for your selected font style instead. I also did the same for Level 1 and the other levels too. I left the Seperator alone, again I am not actually sure what it does tbh. My end result was as per fig 6.
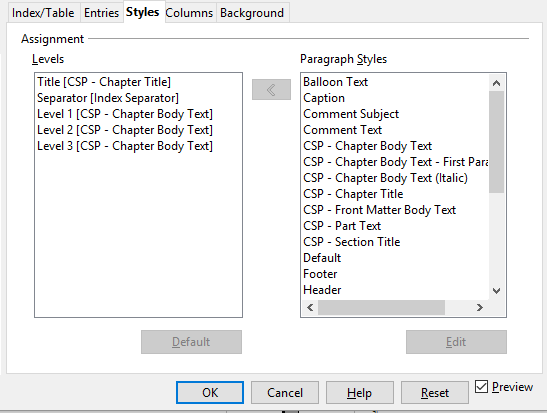
{Fig 6}
As you can see my font styles from the right pane are now listed in the brackets on the left pane window. If you want to see what it looks like click OK or check the preview, though I didnt find the preview all that helpful. Clicking OK and bailing back to the document let me see it in full effect.
That should be all you need for settings (unless you need to change the page styling for headers and footers but that is a whole other subject I wont deal with here). You can always come back and tweak this bit later.
3. ADDING ENTRIES TO THE INDEX
Time to get started on adding Entries to the Index. Remember if you want to see them appear in the index you need to right click on the index itself and Update it.
WARNING: This is the first tricky bit !
As you start to enter words into the index, you can go back and delete them and change them one by one, but to do this job properly you really want to put an entry word in just once, and have all instances of it added to the index in one go and not keep coming back to find the same word and add it in. The trouble comes if you make a mistake, then you have to delete each entry one by one and that is tiresome, trust me.
*** Hot Tip 1:
Save version copies of your document as you go. _A01, _A02, _A03 is the format I use and it means I can reverse my edits by opening a previous copy , without having to delete the entire index again. I had to do it once or twice and that saved me.
*** Hot Tip 2:
Make sure you have really decided on your word structure already and wont be changing your mind, remember that doco I suggested back in Part 1 Prepping. Worth it !
Personally I think there must be an easier way for all this but I havent found one anywhere yet so until then, this is my Best Practice Method for doing this and it is a bit fiddly so pay attention.
3.1 Adding Entries to the Index.
(Your first entries in an Alphabetical index will be numbers, but for the ease of working with the alphabet lets assume my first entry is the word "agenda". In truth it doesnt matter what order you enter them, the index will sort it out, but for keeping track of where I am in my list of words, I chose to work alphabetically.)
So, I have decided I will include the singular and the plural of the word "agenda" together, maybe this is an issue with some publishers but I dont care. I want "agenda" to also include "agendas" (Plural). I dont want them seperate in my index because it gets messy and I will be doing this with all sorts of other words too.
So to do this for "agenda" (but include "agendas" )I need to search the document twice: once for each version of that word, but when I add them to the index I will tell it to use only the word "agenda" as an index label.
Go it? haha. Probably not, but try to follow because this is where it can get messy if you dont follow a standard plan or if you keep changing your method.
SAVE A NEW COPY OF YOUR FILE !!!! (Remember this will be happening a lot, so use a file saving tracking system like _A01, _A02, _A03 and keep doing it.
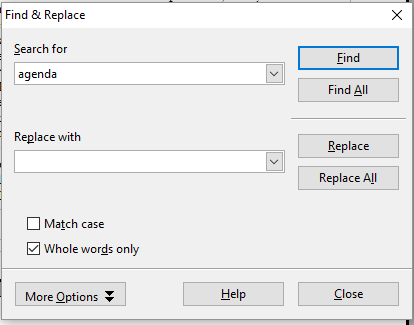
Let's start with the first search..."agenda"
Search the document using CTRL-F to find the word "agenda" (Fig 7) make sure you have Whole Words only checked too in the search. And it should find one and highlight it, dont worry where in the doco it is, it wont matter at this stage, so long as it is in the main part that you want indexed and not somewhere else in the document like the back matter. Fig 7 is what your search box will look like.
{Fig 7}
Fig 7 is the standard document search box. Click Find and away you go. It should then select the word and take you to it. To turn your selected word into an Index entry, while the word is selected, choose from the menu shown in Fig 8 : Insert. Indexes and Tables, Entry.
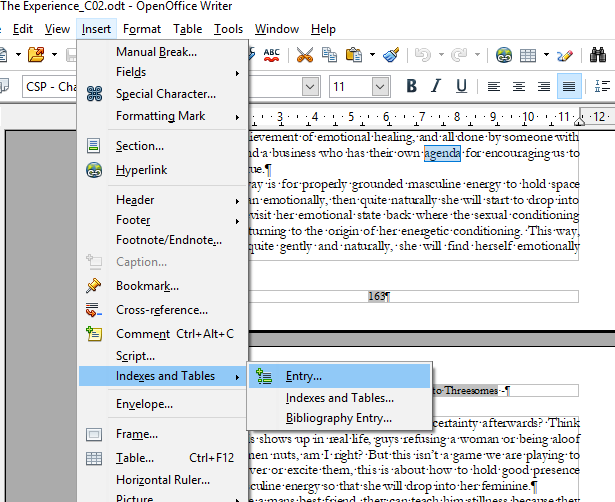
{Fig 8}
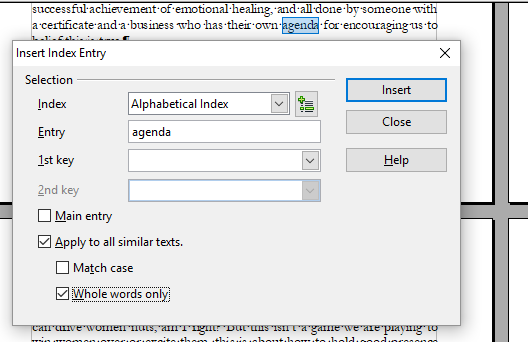
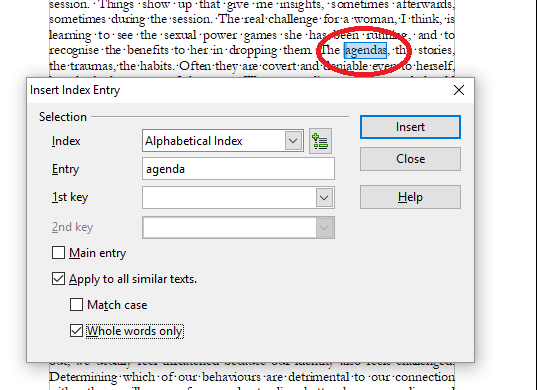
When you chose Entry as per Fig 8, You will next see some Insert Index Entry options (in fig 9) and it is here that you need to make some choices.
{Fig 9}
WARNING: What you choose here is important and it can mess up your index if you get something wrong. So follow it closely and be sure you know exactly what you want your index to end up like. (You saved a copy of your file before doing this bit right? Just dont hit Insert until you have. )
Whatever word you have selected for entry, in our case it is "agenda" (singular) you can put whatever you want in to the Entry field here, at least in theory, but what you put here is exactly what will be used in the Index itself as reference visually. In this case it is the singular of "agenda" so that is the same as the word we have selected, as you can see above the entry box in Fig 9.
Check Apply to all similar texts (This will search the document for every example of the word and add the page number to the index entry for that word. It finds the matches based on the selected word and not the word that you enter in the Entry field but it used the word in the Entry field to set the word in the Index. Got it?
Check Whole Words only. (if you dont, then for some words you will have problems. For example the word Chi will appear in others words, so if you dont check the whole words only option they will all be used for entry to the index, and it is hard to remove those later as there will be hundreds of them. (achieve, Chinese, chin, chimney etc...) Guess how I found that out!
Uncheck Match Case unless you are only wanting to include matched cases for such things as Titles or Names specifically, while ignoring all other cases. Now you need to understand something here: It is matching the case of the selected word in the document, NOT the word in the Entry field. For instance, if your Entry field word is capitalized, then it will capitalize the index word regardless of this option setting but choose words based on this setting. So, if Match Case is checked then it will ignore entries that are not using exactly the same case in the document as your selected word, i.e. it will not include them in the index, unless they match. The index word will always look like the Entry field you have entered, and NOT the actual word you are searching through the document for.
Got it! hahaha. Oh how I laugh, but I remember trying to work this out without help.
aaaaarrrrgh. yes that is how I felt too. re-read this bit a few times and have a go and get it wrong and then restore your old document saved as a backup.
Complex init ! yea. Well, this is why it gets messy because editing it later is not the answer.
What about the other check box? (By the way I have no idea what the 1st key and 2nd key is for at this stage.)
You wont use Main Entry option until later (see next section) when everything is completed and you plan which is going to be your main entry page number for the word "agenda", assuming you have one. What main entry does is it bolds the page number associated to the word in the index list.
One of the problems I had was that I over did this feature. It will bold every example you have it checked in, but I assumed it would only do that to one entry per index word and over-write the previous one. How wrong I was.
WARNING: Every time you click INSERT, it does not overwrite the old index entries, it just adds another set of entries over the top, and this can cause problems later when you are trying to edit back through mistakes one by one only to discover you have 10 or more entry examples of each word throughout the entire book !!!!This wont mess up the index, the index will look fine, it will mess up your trying to navigate through the entries and tidy them up later so be careful!!!!! ONLY CLICK INSERT ONCE EVER !!!!!! per word, that is.
OK so when you feel confident, make sure the right things are checked and then press INSERT (ONLY PRESS IT ONCE !!!!!!) and then CLOSE.
(Note: There is sometimes a refusal to close the window after pressing insert, this I believe is because it is busy updating index data but it doesnt tell you this. If it wont close, just wait a bit.)
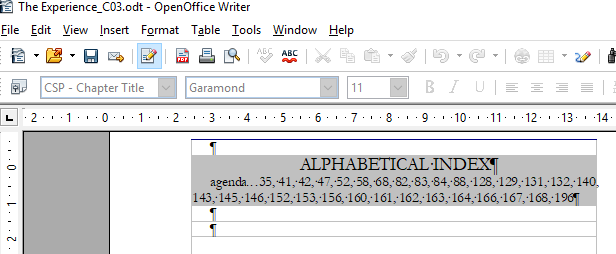
Now go to your index and right click on it and you should see something like this after you update it. (Notice in Fig 10 I am already up to _C03 in my file saves at this stage and I have only put one word in !)
{Fig 10}
So next you need to add the plural of "agenda" but keep it in the same index word as singular "agenda" and not make another index like "agendaS" , in this case I have actually already added them both (in Fig 10), but I will tell you how to do that now.
Go through the same process as before...
SAVE A COPY OF YOUR FILE FIRST !!!!!!
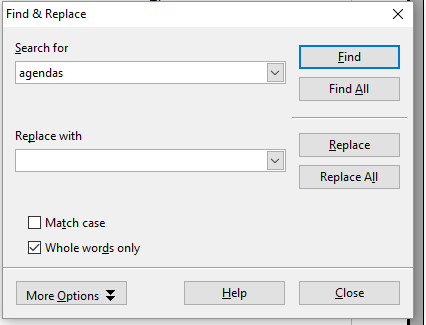
Then search the documents for "agendas", the plural of it this time. (Fig 11)
{Fig 11}
Again search for whole words only and when you find one, confirm that it is selected, and choose the menu option from Insert, Index and Tables, Entry as per Fig 8 previously.
The difference this time is that even though you searched for the word "agendas" (plural) this time, you actually want it to be added to the word "agenda" in the index (like I have in Fig 10). so to do that you just change the entry field to "agenda" (see Fig 12 below) , and when you save it, instead of creating a new word in the index, it will use what is already there if it matches the one in the Entry Field you put in.
{Fig 12}
You can see from Fig 12 that I searched for the plural of the word "agendas" but I am going to add it to the index entry for the singular of the word "agenda" and to do this I changed the Entry field taking off the extra 's'.
Again be careful here !!!! make sure you have saved a backup file before you do this. And when you press INSERT only press it once. Every time you press Insert, it will create entries layered over the top of existing ones, which will be a pain if you have to scan through the book entry by entry later to fix something.
When you are done go and check the Index itself and right-click to update it, if you search the document afterwards for the word agendas plural it will look like Fig 13. Which has the selection to the left of the word and hard to spot but it is there.
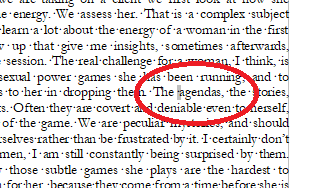
{Fig 13}
As you can see in fig 13, the entry field is not all that clear if you had to search through to delete any entries. This happens like this when the word in the index is different to the word in the document. To let you know this, it shows up differently in the field highlighting. For "agenda" singular, the whole word is greyed out in the document entry because it exactly matches the index entry, but for agendas, you get the less obvious grey mark you see in the image above.
Done? Save your work and save it as a new name!!!!
Repeat the process until you have all your words added to the Index.
4 Main Entry Check Box
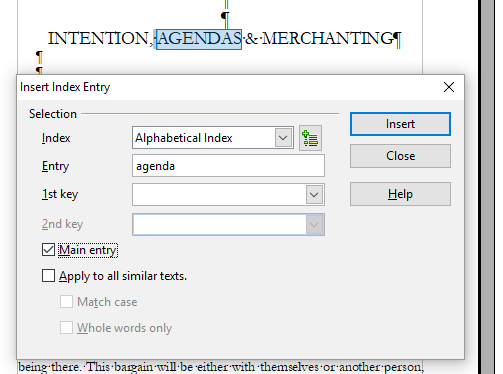
Once you have finished adding all your entries to the index and are happy, then it is time to go back and add Main Entry word examples, assuming you want them. What this does is highlight the page number for that word with Bold in the index, which implies that is where you will find the best description for that word.
So in my example I decided to use the main chapter on "Agendas" as the main entry example of "agenda", and I want that page number to be the bolded one, and I only need that page bolded, no others. So I will be making one main entry to do that.
{Fig 14}
As you can see in Fig 14. I have selected the chapter heading AGENDAS and I am about to add it to the index (You can see from the shaded selection to the left of the selected word that it is actually already in the index, but we are about to add the main entry of it too and the effect will be to bold the page number that this word is on).
This time I have unchecked everything except Main Entry because I only want one additional entry added and not every version of "agendas" in the doco to be added to the index in the way that we were doing before. (If you make that mistake you need to rewind to a previous document version save. Glad you trusted me now right !)
I also have changed the Entry field to the singular word "agenda" again, because I want it added in to that in the index that you saw back in Fig 10.
Rememeber only press Insert once, otherwise you will start adding multiple layers of entries!!!!
The end result is in Fig 15 and you should be able to spot the bolded page number which is my choice for main entry. You can have multiple main entries and bold the lot if you want, but the big problem is to reverse that process later, you have to go through each entry one by one and delete them. Painfully boring, believe me.

{Fig 15}
You should be able to see in Fig 15 that page 41 is now bolded. (If you can't see anything did you remember to right-click your index in the document and chose update ?)
Do the Main Entry for each word that needs it in your index. Then we are done.
5. Editing Later
Editing Entries and mistakes? I will leave you to figure out, it shouldn't be too hard if you followed a good process to get there, but bear in mind it is done one-by-one and though there is plenty on the internet for how to do it, you really don't want to have too many muck ups to try to fix since you have to hunt through the entire document to fix the words that go wrong on entry.
Need the manual for something? check it here https://wiki.openoffice.org/wiki/Documentation/OOo3_User_Guides/OOo3.3_User_Guide_Chapters
My problem even after writing all this up was that a couple of the entries added Capital letters in where I didn't want them. I decided to investigate how to hack the XML code and I will be writing a blog on that shortly so check my other blogs if you need that.
Meanwhile, this article should help you through the worst of Index nightmares with AOO (OpenOffice) and get you working to a Best Practice method (at least as good as I could get it working for now, it probably ain't the official way but they have a good Forum if you need help so go check that out too).
I now have to go and finish the indexing for the paperback version of my and Jodie's book "The Experience" which is about Tantra and Relationships. You can check it out below by clicking on the image you see there.
Hope this article helped you out. Adios, and dont forget to up vote this article if you feel inspired.
or better still buy my eBook, just click on the picture below to find out more about it, or go direct to Amazon to purchase Link Here
Well, I’m sure this is useful if you’re epublishing a book, but it wasn’t nearly as interesting to me as your last post on the CONTENT of the book. 😂 I like you though and I’m glad to cross paths here on steemit. 🤝
need the one to do the other
True :)
need the one to do the other