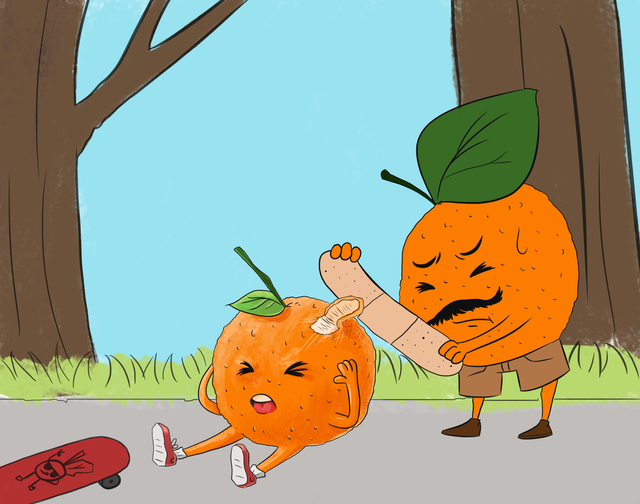
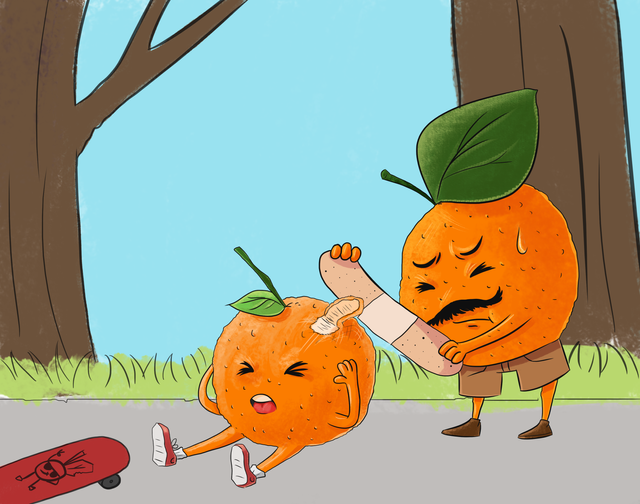
Orange trouble! Digital illustration with step process
Hi there friends! Today I have something special made for you. This cute orange illustration was something I have been working on for a few weeks and finally it’s ready! I had so much fun while making this drawing mainly because for a few weeks this is really silly illustration idea helped me relax from work and my studies. Really! Tell me a better way to relax than drawing cartoony oranges haha :D

And as promised steps!
Step 1. Create your own silly drawing idea! I have no idea how I came up with mine so no comment here ^^
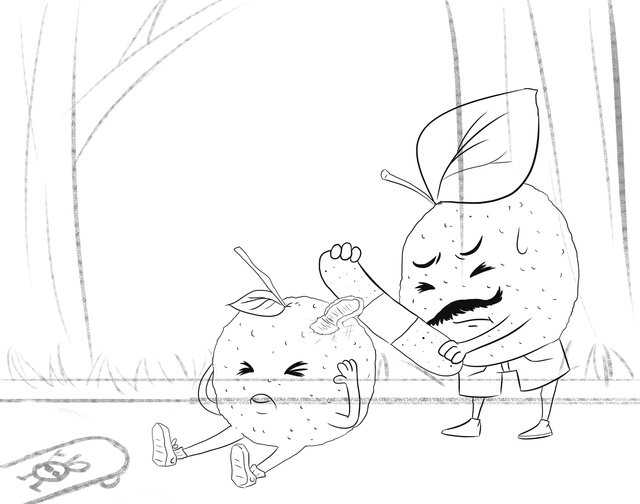
Step 2. Sketch out your basic idea. It should be rough and messy. This is the part where you will erase everything if it doesn’t look right. Keeping it simple is the best thing here. As you can see mine is very very simple. If I had to erase everything it would be no big deal. I also like to keep my lines ‘blocky’ because it doesn’t take as much time as drawing smooth lines. For example my little orange is rather smooth, the big one is not and it took me way less time to draw him, even though he has way more details than the little orange.
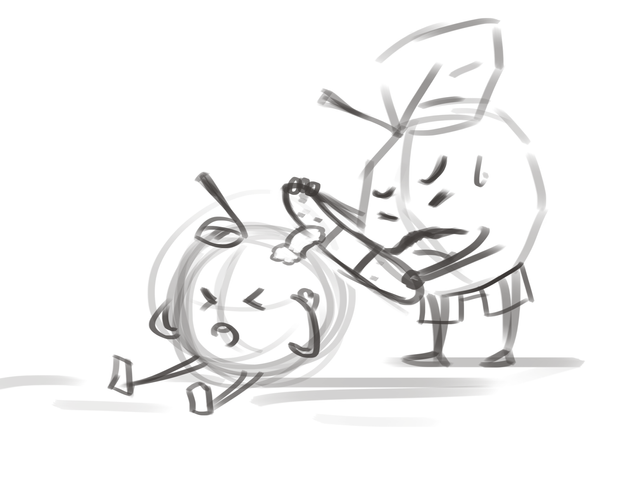
Step 3. Again, nothing too difficult here, I liked my design idea so I started defining my lines and also further adding details, like the little sneakers and socks.
Step 4. Did the same to the big orange!
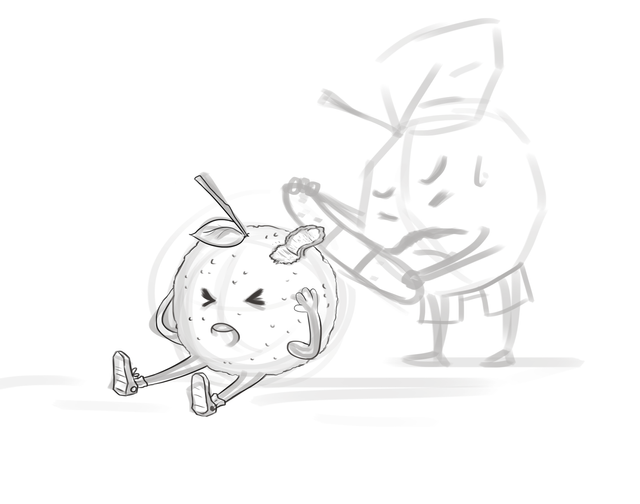
Step 5. I did a little mistake. The brush I used on the little orange was a little bit smooth, so some of my lines didn’t look as strong as I wanted. Not a big deal of course, I just redid the whole linework of little orange haha :D
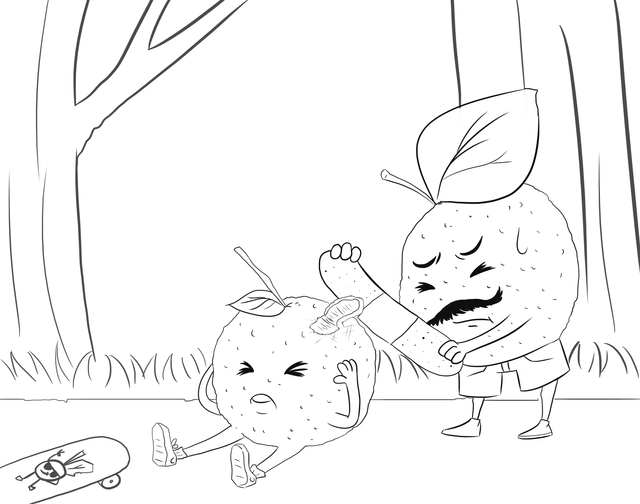
Step 6. Now at first I only wanted for this to be a cute character design and nothing more. But the I thought to myself how can I draw an orange with his head peeled open and not explain to the viewer what happened? Then I decided to add a very basic and very simple background to all this. And I wanted to draw a bicycle instead of the skateboard….but man, bicycles are hard to draw. And once again I used a brush that’s very simple, that won’t allow many details to be made, once I made a background I was happy with I moved on.
Step 7. Did the linework of the background with the same strong brush as I used on the oranges.
Step 8. Now I added the base colors to the background. I used very basic colors, because I want this illustration to be very simple and also because I am not the greatest at color theory. And also I would like to point out that I chose the background colors first, I did this because the environment colors mean a lot to the characters in it, having the background colors done first make the job easier when picking colors for the characters!
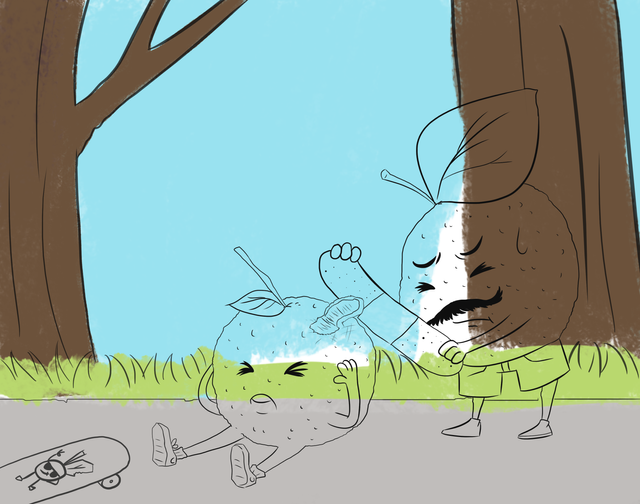
Step 9. I lay the base colors of the character and try to make sure these colors don’t ‘fight’ too much with the colors of the background.
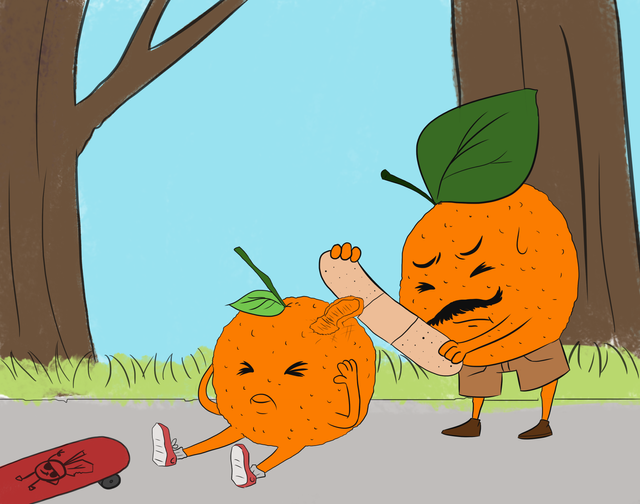
Step 10. I start making details. This might look like a lot but truly it’s not. First of course I had to decide from where the sun is coming from. I decided top left corner , that’s why you see the top left side of the little orange is lighter. Now about the color picking…
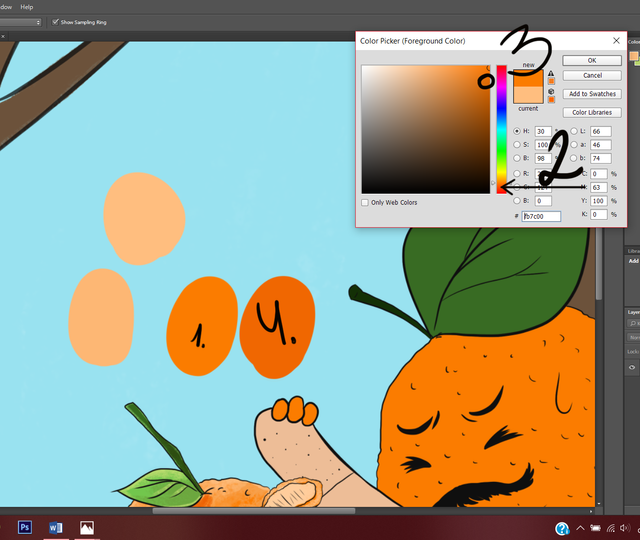
We have 3 colors at this point which are these :
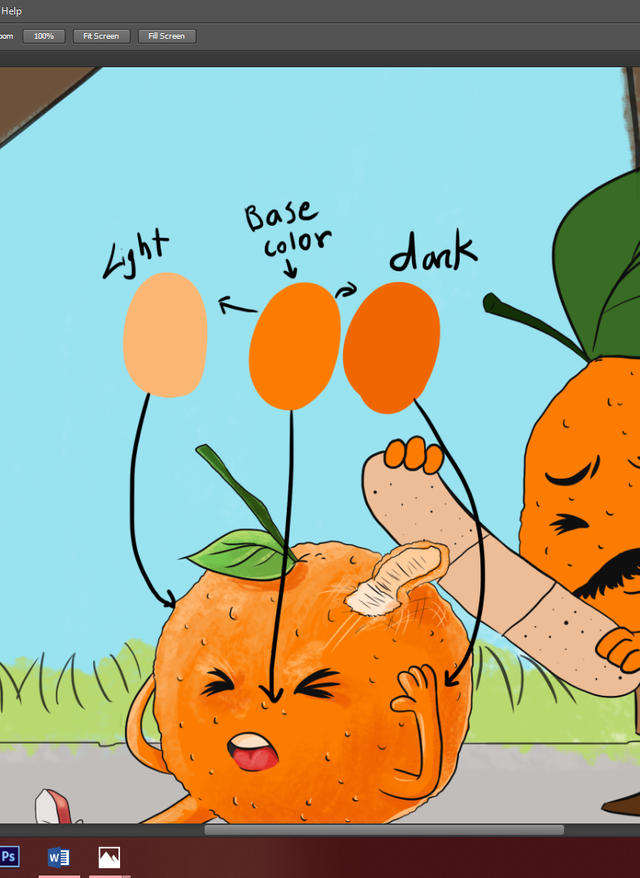
But how do we get them?
For the light color I simply pick base color and open up color picker. Then slide half way to the lightest color somewhere around where number 2 is showing. This is simple, with the darkest color it is a bit more complex.
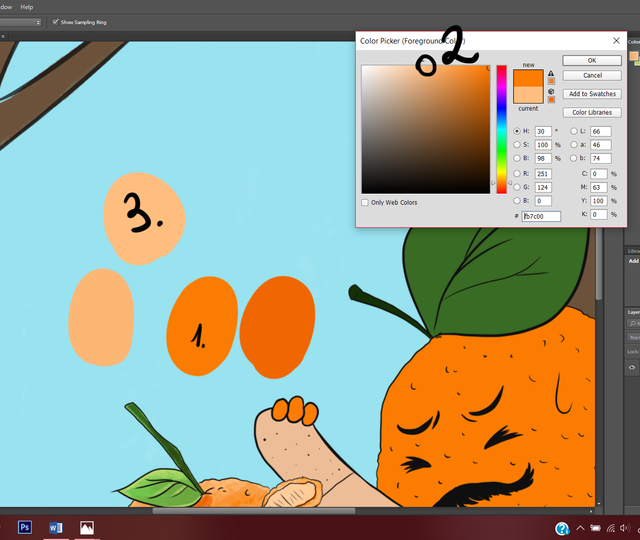
Now because the base color was the strongest orange color available we have to do something different. I pick the base color just like I did last time, but now I slide a little bit lower on the color spectrum just like number 2 is showing. And then after that I pick my color somewhere from around where number 3 is showing. This way I got a nice darker color color without it getting ‘ muddy’. And this is all I have done to the colors and I have used this ‘technique’ thorough all the illustration.
Step 11. I did the same thing to the big orange using the same color picking technique as previously explained.
Step 12. As the oranges are pretty much done, we move on to the background once again. Here I have added a little bit of light color to the tress so they don’t look too flat.
Step 13. Here I added some more color to the grass. Also made some clouds, once again picking the base color of the sky, going a bit darker then adding little clouds then going light and adding bright light clounds on top of the dark ones. Next thing I did is I added some shadows under the oranges, this way everything looks more realistic.
Step 14. And now using the power of photoshop I edited the colors a little bit. Used a bit of color dodge to make some bright colors pop just a tiny bit more.
Step 15 And now finally it’s the last step! The last one but still very important one! Here I used some color dodge to give bright colors a bigger ‘pop’ than they had before. And as a nice touch I added 15% noise to the whole image. It kind gives the image an ‘old colored tv’ look and I personally love it. Try it out sometime! It’s great!
Whoah, 15 steps! That definitely took sometime huh? Thank you so much for taking your time to look and appreciate my work and also read all this! I really hope you learned something from this or got some inspiration to create art.
I had a great time creating and writing all this so if you also enjoyed this content let me know! I will definitely make more if so!
And now, go create something silly, it really is fun! ^^
I love these drawing tutorials you do. This is what Steemit is all about, original great content.
I have resteemed this, and hope the curation people notice you and what you are doing. Great stuff and please keep it up.
Thank you very much for all the support!
I feel sorry for this poor little baby orange. BUT if you can't skate, don't do it :D At least he has his daddy coming to help him. But daddy doesn't really look happy about the whole situation. It's a pity that we don't have a mommy there and don't know what she things :)
I haven't seen such a detailed colors instructions yet. I personally like it as I always wondered how people pick their colors. Now I see how it works.
15 steps are perfectly fitting into this image. Each time you showed something different and I like your intention of telling us how you do things using normal language that everyone can understand :)
The colors are very nice and I think that oranges look real. I also like those clouds..
Thank you for sharing! It's a very nice illustration :)
Thank you very much! While creating this turorial the whole time I wasn't sure if people will understand what I'm trying to explain hahaha :D English is not my first language, but I guess I did a good enough job on this :)
Thank you really much for this nice comment! It put a smile on my face :)
You absolutely did :) It was clear to me ;)
I'm glad I made you smile :)
Hahaha...loved the way you started the fantastic drawing by simply a silly idea. And the attractiveness of orange make it more elegant.
Very appreciative work and thanks for sharing all silly steps that ends with a master class art.....👍
Posted using Partiko Android
Thank you very much! :)
Poor orange...
Lovely colors! Thanks for sharing the steps!
Hahah yes he is :D Thank you! :)
I enjoyed the tutorial. Easy to understand and replicate. Have you considered trying out Elegance or Artisteem platform for posting your works? those platforms really suit your content.
Thank you! I am still figuring out where it's the best to post my content, but I am actually thinking of getting it on artisteem. I haven't heard that much about Elegance, so I really appreciate your comment, will definately check it out!
Congratulations @wilnonis! You have completed the following achievement on the Steem blockchain and have been rewarded with new badge(s) :
Click here to view your Board of Honor
If you no longer want to receive notifications, reply to this comment with the word
STOPHi wilnonis,
Visit curiesteem.com or join the Curie Discord community to learn more.
Thank you so much! It's a great honor to be chosen and upvoted by you!
I do not think it's a silly idea because it's super cool, I loved it, the idea you had was super great and original, I loved the way you were writing the process, you have an incredible talent for illustration, those colors that you used are very beautiful, bright and warm, everything in genaral is wonderful, a big hug @wilnonis
Awww thank you very much! I was really going for that happy, bright colored look in this illiustration, I'm really glad you liked it! :)
this was the first thing came to mind when I saw the illustration DD:
It was difficult to see the step by step with this image in mind hahaha.
In any case I read it till the end. great way you explain the step by step. and I don't think it's something silly. looks awesome... also reminded me of the talking orange of cartoonnetwork xD
hahah now that you showed me this I cannot unsee it :D Also thank you! :)
Awww what a cute and adorable drawing. I hope kid orange will feel better soon ^^.
Congratulations for your curie vote =).
Thank you so much! :)