Lift SteemMonsters cards properly from their backgrounds
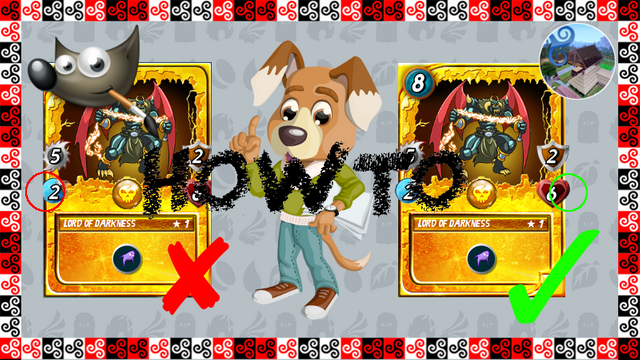
As an Aspie, I can be a bit fussy about things sometimes. One thing that really gets to me is when I see #SteemMonsters card images that have been mutilated. I mean, if these were physical cards rather than digital assets, would you take the scissors to them and straighten the edges off, just to make them fit into a display pocket? No, you'd go out and buy bigger display pockets, so that the cards fit properly, right? So why cut the edges off these beautiful digital cards then?
I guess for many people, it is simply a matter of not knowing any better way of doing it. I'm going to show you a better way, which doesn't take too long, and which can be achieved with free software! I use and recommend GIMP as my main graphics program, and it is available for free on Windows, Mac, and GNU/Linux systems. My screnshots here are from my GNU/Linux system, which is currently running an older version of GIMP (v2.8.16).
❶ First, take your screenshot.
Whatever you do to take your screenshot on your computer, make sure to include plenty of the surrounding green/blue background around the card, and if you can select with a marquee selection before taking the screenshot, try to avoid any of the writing (such as the card ID number) below or to the side of the card, and avoid the leather background above the card. For this reason, I find it better to take a screenshot of a card in the Monster Market rather than in My Collection, so that I don't need to worry about the card ID number.
❷ Paste it into GIMP.
There is a little trick to this step. When you paste the screenshot into GIMP, it can sometimes end up with a white layer underneath, which makes the next step more difficult. To avoid this, what I do is to PASTE twice. The first time I just PASTE the image from the clipboard as is, into GIMP. Then I use SELECT ⇨ ALL and COPY the image back from GIMP, then PASTE it again as another new image. Doing it this way will ensure that the screenshot ends up on a transparent background properly, not white.
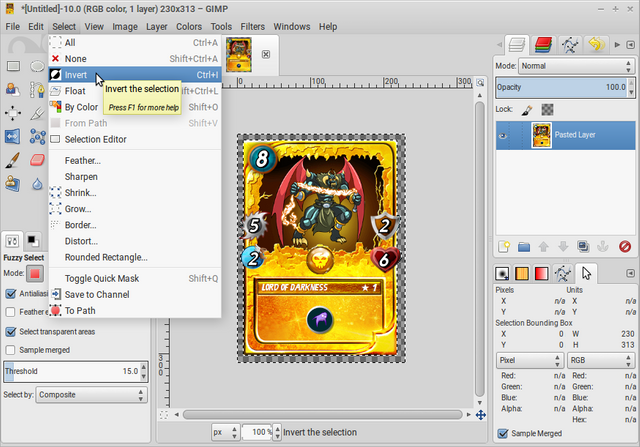
❸ The Fuzzy Select tool.
This is where the magic happens. We're going to use the Fuzzy Select tool which, according to the GIMP manual, will...
...𝒔𝒆𝒍𝒆𝒄𝒕 𝒂𝒓𝒆𝒂𝒔 𝒐𝒇 𝒕𝒉𝒆 𝒄𝒖𝒓𝒓𝒆𝒏𝒕 𝒍𝒂𝒚𝒆𝒓 𝒐𝒓 𝒊𝒎𝒂𝒈𝒆 𝒃𝒂𝒔𝒆𝒅 𝒐𝒏 𝒄𝒐𝒍𝒐𝒓 𝒔𝒊𝒎𝒊𝒍𝒂𝒓𝒊𝒕𝒚...
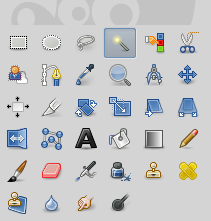
The Fuzzy Select tool is found in your main toolbox, fourth from the left on the top row, and is shaped like a  magic wand. It is one of my favourite tools in GIMP, and is even more powerful than the Select by Color tool, in my humble opinion. However, it is important to note the warning in the GIMP manual for this tool, that "when using this tool, it is very important to pick the right starting point. If you select the wrong spot, you might get something very different from what you want, or even the opposite." Also, as always with selection tools in GIMP, make sure that you have first chosen the appropriate Mode for your selection, which is normally Replace (example
  ).
).
❹ Remove the background.
Now we simply go around the outside of the card and select all of the blue/green background and delete with the DEL key. Keep on going around the outside edge of the card until the Fuzzy Select selection box of "marching ants" extends all the way around the outside edge of the card. Watch out for the thin strip of unselected colour at the very top of the image, which sometimes can fool you, and those "fiddly bits" around the protruding Stat Icons. Once that is done, you could export the image at that point, but I have one more step which makes it even better.
❺ Lift the card off its background.
In the final step, I like to lift the card entirely off its background. To do this, I invert the selection with SELECT ⇨ INVERT and then COPY the image once more, and PASTE it again as another new image. This time it will essentially be cropped to the very edge of the card and the protruding Stat Icons, without any extraneous transparent space, only that which is needed for the protrusions. This then can be exported as a Portable Network Graphics (*.png) file, to retain the transparency, and you're done!
I hope this tutorial proves useful, and I hope it means that I see a lot less mutilated SteemMonsters cards in the future!


(NOTE: This post is best viewed using SteemPeak.com)
I can see your point and I know I'm bad for it so I'll speak up for myself here. I use my mobile device and I've purchased a few paid apps at the moment so I will check out the magic wand feature if it has it.
Although it's a learning curve for myself from starting at steem monsters messing around with digital design and another gif app I'm currently experimenting with my Android device. It's good ethics practising the right editing and citation for everyone involved, we are all co-creating on steem and we are all unique I'm striving for quality over quantity in my posts now and working with other monster fans building an empire
Hoo roo from the bush ranger down under
Such is life - Ned Kelly
Posted using Partiko Android
I've always thought I'd like my image editing software to better support Creative Commons and other licensing and citation issues. Even the Steem blockchain here seems to be very stringent on textual plagiarism but not so much on image plagiarism. I've asked the SteemCleaners and Cheetah bot team about this, and they readily admit that they don't check for image plagiarism here at all.
I like to attribute the images that I use, to give credit to the original artist. I also like to credit the original artists of the individual component parts of an image that I create as a remix. I think it is only right and fair to acknowledge their talents.
!popcorn
Yeah good response. Was just testing the popcorn flavoured bot. It's not related with your previous comment. Cheers
Posted using Partiko Android
Guess I'm the only one @TrisquelWhare
Posted using Partiko Android
Good tutorial. I wish my Gimp skills were much better. Sometimes it takes too long to produce quality results.
I think it comes down to whatever you use normally. I used to use CorelDraw back in the old days, and I could do just about anything with it. These days though, I wouldn't know where to begin with the latest Corel products. I use GIMP on a daily basis, and am constantly pushing its boundaries and learning new ways to do things with it. I've never really been a Photoshop user.
Hello @trisquelwhare, thank you for sharing this creative work! We just stopped by to say that you've been upvoted by the @creativecrypto magazine. The Creative Crypto is all about art on the blockchain and learning from creatives like you. Looking forward to crossing paths again soon. Steem on!