Creating a water drop photograph timer - DIY Project.
Hey all.
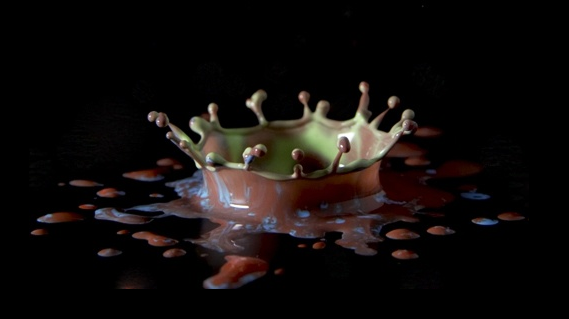
I love water drop photographs but it's been a few years now (probably more like 15) since I attempted anything like that. The results back then were average so I think it's about time to build something new and give it another go. I'll be doing this over a few posts, starting with some of the concepts in this post and then moving on to prototyping, building and testing and then, of course, getting some results (hopefully)
Concepts
The basics concept around taking photographs of fast moving objects such as a water drop in motion is to use a flash to expose the scene as opposed to the camera shutter. Once you get your head around this concept then things start to make sense....
Imagine yourself in a pitch black room with a camera on a tripod. You open the shutter on the camera for 30 seconds and the image you get out of that exposure is totally black - of course; there are no lights. Now imagine you do the same but this time, at some point during the 30 seconds you fire off a flashgun to illuminate the scene. It is the flashgun doing the exposure, not the camera. The amount of time the flash is on for, or the power of the flash is what determines how the scene is exposed
This is the fundamental concept behind pretty much all flash photography and the reason why cameras have a flash sync speed. This is the quickest that your camera can synchronise to a flashgun and is normally around 1/250th of a second. The process of opening the shutter, firing the flash and then closing the shutter is done during this period. If you close the shutter before this, you might find that part of your image is dark as the shutter was half closed while the flash was going off.
So hopefully now you can grasp the concept here.
- Drop fluid using some kind of device
- Open the camera shutter
- Fire flash with lowish power at precisely the right time to freeze the motion
- Close the shutter
Getting the timing right on this is imperative. We are talking in the realm of milliseconds each way is the difference between getting the image you want and missing it completely.
As you can imagine, not only do you need to have a consistent timing between shutter and flash, you need to produce drops consistently. There's no point setting up a system where the drops fall at different rates each time.
So, I am going to use a trusty Arduino Uno to do all the timings and hardware control
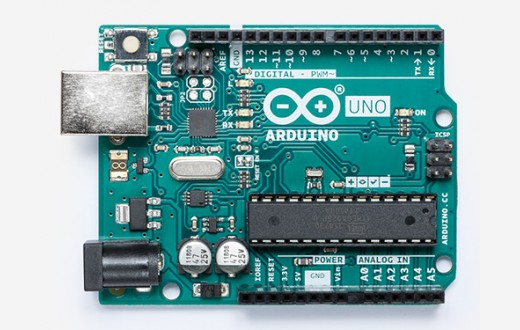
An Arduino Uno
I am going to need to control the following.
- Something to drop the water in a controlled manner - I have seen some people using a peristaltic pump (the kind they use to deliver fluids in hospitals), but I prefer the cheaper alternative of a small fluid/gas solenoid valve. This is basically a valve that you can open with a 12-volt current to allow liquid to come through. That removes the need for a pump of any kind and allows the system to be gravity fed.
One thing to note about a solenoid is that it is driven by 12 volts. Arduino only outputs 5v, so on its own it will not be able to drive the solenoid. That means that the solenoid will have to be on its own 12v circuit and then the Arduino will have to switch it with something like a TIP110 transistor (which basically is a switch that uses a low power on-off function to switch on a high power appliance) - Something to fire the camera shutter.
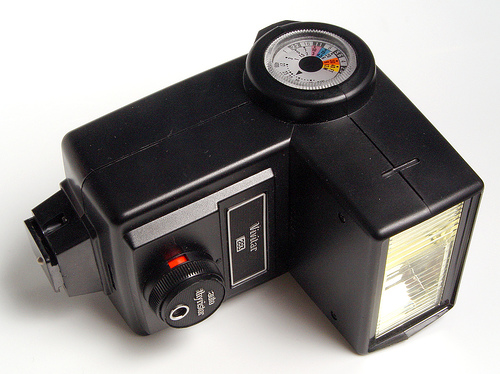
- Something to fire the flash.
Both firing the shutter and firing the flash require the "shorting" of a cable. In the case of the shutter, I will modify a cheap Canon cable release. For the flashgun, a modified sync cable should do the job. In both cases, however, there is a problem. Neither of these mechanisms will accept a voltage applied across the terminals. They are both passive and just need a "switch" to close the circuit to fire them, just as a shutter button is a button that completes a circuit.

I have the solenoid and some of the cables on order so can't get things fully built yet, but I do have most of the other parts available. I should be able to create a prototype using LEDs to signify the drip happening, the shutter firing and the flash firing while I wait for parts to arrive. That will allow me to get to work on the code.
Initially i'll be putting the timing values directly into the code, but eventually I will have a 16x2 LCD screen and some menu buttons which will allow me to configure the settings without having to recompile and upload the code every time. Most of that code and the parts will be repurposed from my time-lapse rail project.
For this post, that is all I am going to go into, the next will hopefully contain a basic prototype using LEDs to show the code works and that the concept is sound. There are a number of Arduino libraries that you can use to improve the responsiveness of the Arduino when it comes to time-sensitive applications so I'm looking forward to giving them a try.
Thanks for reading and stay tuned for the next instalment.
Mark
Your posts sometimes makes me feel simultaneously smarter and dumber at once. It's amazing.
Great post, Mark! Love your stuff <3
This post has been voted on by the SteemSTEM curation team and voting trail in collaboration with @utopian-io and @curie.
If you appreciate the work we are doing then consider voting all three projects for witness by selecting stem.witness, utopian-io and curie!
For additional information please join us on the SteemSTEM discord and to get to know the rest of the community!
😍Looks like a chocolate crown!👑 I love how that fraction of moment can be captured frozen in time, thanks for sharing a detailed and useful explanation for professional photography purposes.
Posted using Partiko Android
Hi @markangeltrueman!
Your post was upvoted by Utopian.io in cooperation with @steemstem - supporting knowledge, innovation and technological advancement on the Steem Blockchain.
Contribute to Open Source with utopian.io
Learn how to contribute on our website and join the new open source economy.
Want to chat? Join the Utopian Community on Discord https://discord.gg/h52nFrV
Wow, i wasn't expecting that at all. Thanks guys, you made my day!
Wow, the results look really neat! I have checked the other post and I definitely have no time to invest in building such a thing. However, I would be actually really happy to do so. Maybe one day with my kids, if they force me to take this time (I have carefully bookmarked both your posts) ;)
That's great to hear. Today I did some work on the LCD and menu system. It's probably the trickiest part of the build and will come with quite a detailed post at some point in the next week or so.
Cool! I am just wondering about the capabilities of my camera... maybe not good enough...
The two things you need are a bulb setting on the camera so that you can hold the shutter open for as long as you want, and a cable release port so that the aduino can control the shutter.
And an arduino :D
Anyways, this is definitely something I would like to try one day :)
Ack, it is using a camera. I wonder if there's a way to do something like this for mobile phones? Haha. Oh my. I might need a new phone anyway to take better pics or maybe it's just me. :P