Developing a Developmental Biology Lab – Placenta Anatomy and Analysis
Welcome to my new series documenting my trials and
tribulations as I foray into academia.
I’ve recently been put in charge of creating and managing a series of
labs for a college-level course in developmental biology. The description of the course is below:
“This is a study of the principles of development and their application to animal and plant embryos, regeneration, metamorphosis, cancer and related processes. The laboratory includes observation and experimentation with living animal and plant material, plant tissue culture, and examination of prepared slides.”
I do have a colleague handling the corresponding lecture, but ultimately the responsibility for the labs falls on me. Labs are three hours long and are held once a week for 13 weeks total.
Designing this course has been fun, but it’s also a hell of a challenge. The course hasn’t really been run before and most of the labs have to either be created from scratch or modified from protocols found within the Bio department or by searching the internet. It's also hard to think of an appropriate lab that’s specific to developmental biology, but doesn't overlap with typical labs in a molecular biology, genetics, or anatomy course and also fits within three hours. I haven't been able to find many resources online for creating this type of course so I thought I'd post my labs on Steemit after I make them.
The first lab is a bit unusual in that it features a developmental organ that’s rarely used in a college-level training lab.
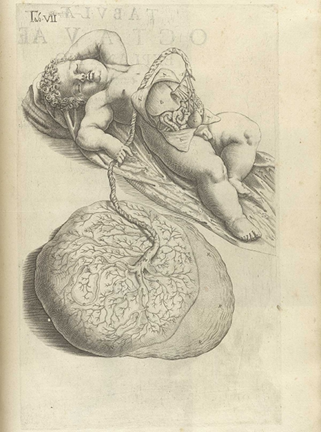
From De humani corporis fabrica libri decem
Placental Tissue Preparation and Analysis
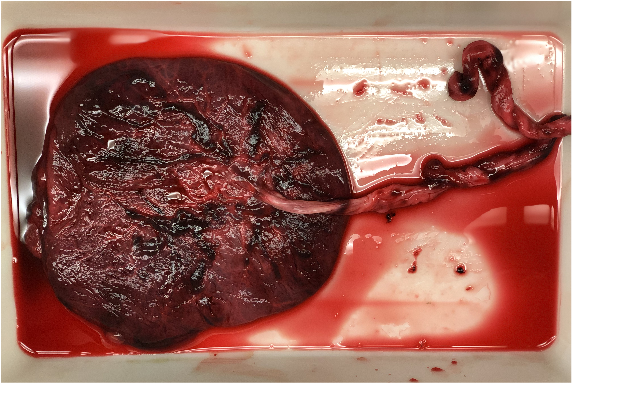
A placenta. Source: my child :)
That’s right, I brought in a placenta. I wanted students to gain experience with real human tissue that hadn’t been preserved in formaldehyde. The fact that the placenta is a keystone organ in human developmental biology was an added benefit. Pictured above is the fetal side with attached umbilical cord.
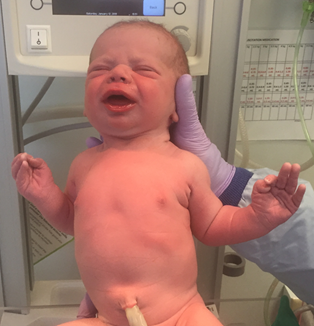
Placentas, and unpreserved human tissue in general, can be difficult to obtain for a training lab. They’re either too expensive or too time sensitive to work with for teaching purposes. Fortunately, my wife produced a specimen just 2 weeks before the first lab. She also produced my first child, pictured below at the ripe age of five minutes old :P
Getting this placenta was rather easy. Once I explained to the doctors and midwifes why I wanted it, they got really excited. Most people do weird things with the placenta like eat it so using it for academic purposes was a nice change of pace. Once they gave it to me, they even wanted to show me the anatomy and explain what they would look for in placentas to judge fetal health. Once I had the thing, I stored it in my car and it immediately froze in the hard cold of Buffalo’s Winter. I thawed it for lab use and it looked fine, aside from some clotting. Still, I had to wash away a lot of excess blood to ensure everything was easy to see.
Now showing off a fresh placenta gives this lab a nice wow factor, but I still needed an actual experiment to go with it. I decided to have students cut off small portions of the placenta and preserve some parts in formamide while extracting DNA from other segments. Simple stuff, but it lets the students get some experience handling this tissue and understanding what might be done with it in a typical clinical lab.
Below, I’m going to provide a teacher’s guide and a protocol handout for students. The teacher’s guide is intended to be a resource for instructors to present this lab and the protocol is a hand-out to give to students so they know what to do.
Teacher’s guide
Most instructors will probably not have a fresh placenta to work with. However, you can buy animal reproductive organs, like this beautiful cow uterus I found online (http://biologyproducts.com/cow-uterus-pregnant/ - it has a bonus fetus inside!) and run a similar lab.
In this level course, most students should be familiar with the placenta. The assigned readings are actual published papers that give in-depth information on this organ. However, I did provide a brief introduction powerpoint with some slides to explain normal placenta function. For a flashy title screen, I included a somewhat disturbing illustration of the placenta from the 1627 medical textbook De humani corporis fabrica libri decem (pictured at the top of this article). I also provided an image that shows placenta implantation
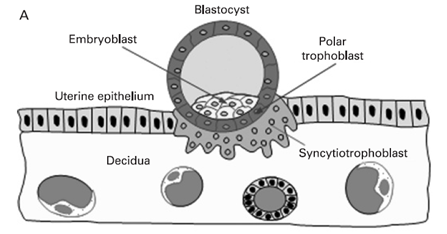
From The anatomy of a normal Placenta Huppertz B, J Clin Pathol. 2008, and a diagram of a mature placenta
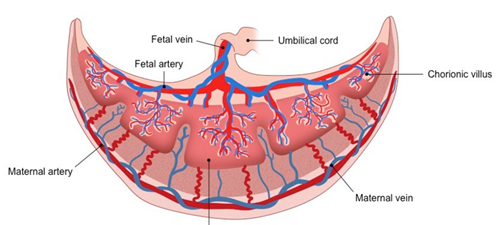
I used both images to give a brief recap on how the placenta forms, and what structures we'd be looking at on the real thing.
Finally, I did an anatomy lesson with the placenta itself. The nurses, doctors, and midwifes that delivered my baby told me what to point out, and I’ve listed prominent features below.
Cord insertion site
– should be center, but off-center is fine
Number of vessels in cord
– Should be three, 2 has increased risk of birth defects
– Can be detected with ultrasound
Fully intact
– Pieces left behind can cause infection or hemmorage
Calcifications
– occur if baby is past due date
Signs of decay
– white/dead cells, necrotic tissue
– Often caused by smoking
Once this anatomy lesson is done, students can perform the lab.
Assigned Reading:
The anatomy of a normal Placenta Huppertz B, J Clin Pathol. 2008.
This paper is a succinct overview of the placenta on a macroscopic and microscopic level. It’s a great reading to ensure all students are on the same page before starting the lab.
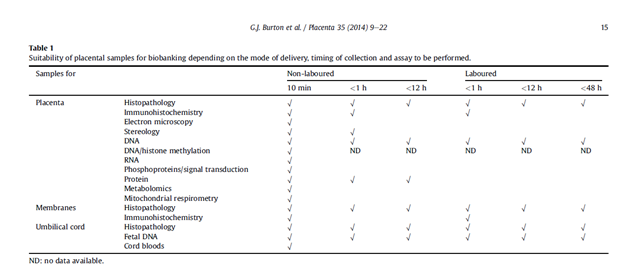
Optimising sample collection for placental research, Burton et al. Placenta, 2014 (https://www.ncbi.nlm.nih.gov/pubmed/24290528).
This 2014 paper provides an excellent explanation of what we can learn from a placenta and the nuances involved in analyzing it. The table they provide is also an excellent overview of the types of analysis one can perform on this organ.
Protocol Handout
Materials Needed
Dissecting kit
Mortar and Pestle (kept in freezer at -20 oC)
Eppendorf tubes (1.5 mL) and Specimen tubes (15 mL or 50 mL)
Scale accurate to milligrams
Pipettemen (P1000 and P200)
10% formalin
5% Bleach solution (for sterilization)
Observing Placenta Anatomy
(html comment removed: [if !supportLists])1.) (html comment removed: [endif])Record approximate size and thickness. Note the color. Look for any irregularities or missing pieces. Identify the the amnionic sac, the maternal/fetal sides, and individual cotyledon. If possible, count the number of visible cotyledon.
(html comment removed: [if !supportLists])2.) (html comment removed: [endif])Identify the umbillical cord, record the number of blood vessels within the cord and the length of the cord.
(html comment removed: [if !supportLists])3.) (html comment removed: [endif])Take a photo for your lab notebook.
Obtaining placental samples
1.) Using a scalpel, razor blades, or scissors, cut
off a grape-sized section of the placenta and a 2 cm section of the umbilical
cord. Make sure to record where on the
organ you removed the pieces.
2.) For each sample, remove all extraneous liquid
and any attached membrane. Record total
weight, size, and appearance.
3.) Cut each sample into 4 equal pieces. Each piece should be about 50 mg and fit
inside an Eppendorf tube. At least one
piece should be less than 3 mm in thickness.
Record the mass of each piece.
4.) Freeze 3 samples and keep the thinnest at room
temperature for formalin fixation.
Fixing Placental tissue
1.) Add 1 mL 10% formalin to the tissue and incubate for 5 minutes at room temperature.
2.) Calculate the volume of formalin needed to mix a
50:1 formalin:tissue ratio. Add that
volume to a Falcon tube.
3.) Transfer the tissue to the Specimen Tube. Make sure the tissue is completely
submersed. These will be incubated at
room temperature for a minimum of 72 hours to “fix” them.
Isolating Placental DNA
1.) Ensure the mortar and pestle are below 0 oC.
2.) Remove one frozen tissue sample (the other two
samples are backups) and grind into an icy powder with the mortar and pestle.
3.) Transfer as much ground tissue to an Eppendorf
tube as possible. Use 200 uL H2O to
transfer remaining tissue. Put the
mortar and pestle in the bleach bath in the sink.
4.) Incubate the Tube for 5 minutes at 95 oC.
5.) Vortex the tube for 1 minute at high speeds,
then incubate for 5 minutes at 95 oC again.
6.) Centrifuge at max speed for 1 minute. A pellet of cell lysate should form at the
bottom and the supernatant should contain DNA (it may be viscous).
7.) Transfer the Supernatant to a sterile tube and
store in the freezer.
Cleanup
(html comment removed: [if !supportLists])1.) (html comment removed: [endif])Put any equipment that’s touched organic material into the bleach bath for at least 15 minutes. Once sterilized, they can be washed and dried.
(html comment removed: [if !supportLists])2.) (html comment removed: [endif])Excess formalin should be dumped in the liquid waste container.
(html comment removed: [if !supportLists])3.) (html comment removed: [endif])All other materials (pipette tips, tubes) need to be disposed of in waste bins.
Final Thoughts
All in all, there were minimal issues with this lab. It’s kind of a safe lab in that the star of the show, the placenta, just has to sit there. It lasted the full three hours and students were fairly intrigued to be working with an unpreserved specimen. However, it’s hard to conclusively determine that DNA was successfully extracted or that the formalin fixation was successful. Future labs will continue to work with this material and I will update on what we do with them.
One other thing I should mention is that I submitted this post on steemstem.io. I found the process a lot easier than normal posts through Steemit. My only challenge was implementing pictures, but otherwise I could copy-paste from word with most of my formatting intact. I imagine a set of references might be a bit tricky, but only if I put the links in the body of the article.

This post has been voted on by the SteemSTEM curation team and voting trail in collaboration with @utopian-io and @curie.
If you appreciate the work we are doing then consider voting all three projects for witness by selecting stem.witness, utopian-io and curie!
For additional information please join us on the SteemSTEM discord and to get to know the rest of the community!
Now a real comment, after spamming all the comments to your post (having discovered the placenta-eating 'trend' (or name this as you want) on Steem... I had too ;)
Thanks a lot for sharing this kind of material on steemstem. This is the kind of stuff that will make us different from any other platform on the web! On top of being very cool for your student. Being able to manipulate and do experiments going beyond the books (which seems to be the case here) is how we will attract students into science and hopefully create vocation.
PS: I assume you will have to find a placenta for every year now :p
Thanks for the positive response. I'll try to get my other labs up here as long as they contain enough original material to warrant a post.
As for getting another placenta, my wife has already told me not to expect one for next year so I'll have to search elsewhere :P
You never know with babies (congrats by the way. For some reason I forgot to say that! Shame on me).
Thanks!
It's a different way of tackling what I already knew about Placentas in general. We frequently have this handed to us for inspection after delivering the baby (medical intern here). We don't examine the thing as in depth like what a laboratory study would do. Most of what we know are based on textbooks and what we personally handled on the actual birthing process. Histopath specimens would only be relevant if we suspected exisiting pathology on it.
Yeah, the doctors/midwives I talked to said that they just give it a once-over for signs of disease or abnormalities. A lot of the problems with a placenta will also show up on an ultrasound well before the baby is delivered.
Yeah, the doctors/midwives I talked to said that they just give it a once-over for signs of disease or abnormalities. A lot of the problems with a placenta will also show up on an ultrasound well before the baby is delivered.
People eating placenta? 🤔
Btw great article! 😃
My mother fed me a piece of my middle brothers placenta when I was 7. I cringe when I hear the word. Reading this piece was difficult, hahahahaha.
Yeah, the doctors told me a good portion of people keep the placenta and presumably eat or do something weird with it. I was the first person to have an actual use that made sense to them .
I must tag @scienceangel and @egotheist here. This was a thing at the steemstem-meetup #2 :)
Oh is it??
Yeah, we had some fun on this :D
Hahahaha
Formats are fighting :(
Good catch. I'll try to fix on my end, but leave one or two up for @lemouth to see.
The only way to kill the bugs is to test it again and again :D
I actually introduced this bug by fixing another one ... :D
This is already on my list. I notice it fails :)
To listen to the audio version of this article click on the play image.

Brought to you by @tts. If you find it useful please consider upvoting this reply.
Hi @tking77798!
Your post was upvoted by Utopian.io in cooperation with @steemstem - supporting knowledge, innovation and technological advancement on the Steem Blockchain.
Contribute to Open Source with utopian.io
Learn how to contribute on our website and join the new open source economy.
Want to chat? Join the Utopian Community on Discord https://discord.gg/h52nFrV
Hello @tking77798! This is a friendly reminder that you have 3000 Partiko Points unclaimed in your Partiko account!
Partiko is a fast and beautiful mobile app for Steem, and it’s the most popular Steem mobile app out there! Download Partiko using the link below and login using SteemConnect to claim your 3000 Partiko points! You can easily convert them into Steem token!
https://partiko.app/referral/partiko