Developing a Developmental Biology Lab – Roundabout Sex Determination
Welcome to my series documenting my trials and
tribulations as I foray into academia.
I’ve recently been put in charge of creating and managing a series of
labs for a college-level course in developmental biology. The description of the course is below:
“This is a study of the principles of development and their application to animal and plant embryos, regeneration, metamorphosis, cancer and related processes. The laboratory includes observation and experimentation with living animal and plant material, plant tissue culture, and examination of prepared slides.”
I do have a colleague handling the corresponding lecture, but ultimately the responsibility for the labs falls on me. Labs are three hours long and are held once a week for 13 weeks total.
Designing this course has been fun, but it’s also a hell of a challenge. The course hasn’t really been run before and most of the labs have to either be created from scratch or modified from protocols found within the Bio department or by searching the internet. It's also hard to think of an appropriate lab that’s specific to developmental biology, but doesn't overlap with typical labs in a molecular biology, genetics, or anatomy course and also fits within three hours. I haven't been able to find many resources online for creating this type of course so I thought I'd post my labs on SteemSTEM after I make them.
This week's lab continue's the last labs work on the human placenta.
PCR screening placenta tissue for the Y-chromosome
In the last lab, students analyzed my child's placenta. We had a anatomy lesson and students learned to both fix tissue and extract DNA from that tissue. Although I told the students that the placenta was my kid's, I never told them the sex of my child. This week the student's task was to use a PCR screen to tell me whether I had a boy or a girl.
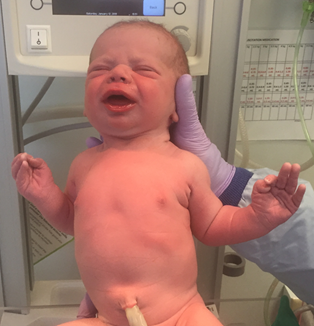
The image I gave them of my kid was specifically cropped at the waist so they couldn't tell if it was a boy or a girl.
They're specifically screening for a gene called SRY, short for sex-determining region Y, which is needed for the initiation of male sex determination in humans (https://en.wikipedia.org/wiki/Testis-determining_factor). This gene is only located on the Y chromosome so if the students see this gene in their screen, they can conclude that I had a boy.
Below is the protocol I handed out to them prior to the lab.
Protocol
Overview
In the last placenta lab, we began isolating DNA from placenta tissue samples. Today we will finish the DNA isolation and run a simple PCR screen to determine the sex of the baby.
Although few labs would ever bother genotyping a fully developed placenta, this screen is surprisingly similar to the use of cell free fetal DNA (cffDNA) for early non-invasive sex determination1. cffDNA refers to fetal DNA present in the mother’s bloodstream released by the placenta. It’s continuously present in small amounts throughout the majority of a pregnancy. Scientists have been aware of this phenomenon for a long time, but only recently have modern advances in genomic sequencing and PCR techniques made it possible to analyze this type of DNA.
1 https://www.ncbi.nlm.nih.gov/pmc/articles/PMC4526182/
Reading
If you haven’t, read last week’s assigned paper on sample collection for placental research (https://www.ncbi.nlm.nih.gov/pubmed/24290528).
If you are not familiar with cffDNA, check out the Wikipedia page to gain a passing knowledge (https://en.wikipedia.org/wiki/Cell-free_fetal_DNA). This field of study has been skyrocketing in recent years due to advances in DNA technology.
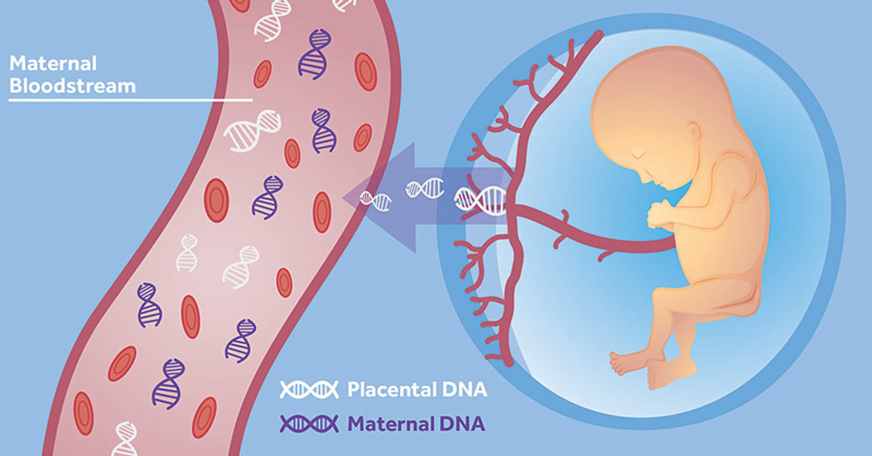
Diagram showing cffDNA entering the bloodstream (https://embryoplus.gr/en/cell-free-dna-nipt/)
Materials
Taq 2X Master Mix
SRY primers (5 uM each)
dH2O
Thermocycler
PCR tubes (200 uL volume)
Preparing Template DNA:
Last week, we used SDS to isolate DNA from placental tissue. This process yields plenty of DNA, but SDS can inhibit polymerases used in PCR reactions. SDS can be purified from these samples, but the process takes time. Depending on the time and reagents available, we will either perform a precipitation, column purification, or simple dilution to prepare this DNA sample for PCR analysis.
In addition to using SDS-derived placenta DNA, we’re going to grind a frozen placenta with a mortar and pestle, heat to promote cell lysis, and centrifuge to pellet cell debris. This will result in a dirtier sample with lower DNA yield, but should still work for our purposes. PCRs require very little amounts of input DNA and Taq is a robust polymerase so low levels of cell debris are not expected to interfere with the PCR reaction.
Every PCR reaction requires a positive and negative control. Our controls will be cheek cells from male and female students.
1. Put 50-100 mg of ground placenta in a sterile Eppendorf tube. Add 100 uL dH2O.
2. To obtain control DNA, gently scrape the inside of a student’s cheek with the tip of a sterile P200 pipette tip. Twirl the tip in 50 uL H2O in an Eppendorf tube. Do this to get cells for both a male control and a female control.
3. Incubate all tubes at 95 oC for 5 minutes, vortex for at least 15 seconds, then centrifuge at max speed for a minute.
4. Transfer the supernatants to fresh Eppendorf
tubes. They should all contain DNA
suitable for PCR purposes.
Preparing PCR reaction:
The PCR reaction uses 2 primers designed to amplify a 254 bp segment of the SRY gene. This gene is only found on the human Y chromosome. Incidentally, an intact SRY gene is needed for the testes to develop.
SRY_fwd: CAT GAA CGC ATT CAT CGT GTG GTC
SRY_rev: CTG CGG GAA GCA AAC TGC AAT TCT T
Standard PCR reactions using taq will usually follow the temperature changes below.
|
STEP |
TEMP |
TIME |
|
Initial Denaturation |
95°C |
5 minutes |
|
30 Cycles |
Denaturation: 95°C |
15 seconds |
|
Final Extension |
68°C |
5 minutes |
|
Hold |
4-10°C |
|
The major variables for any PCR are the annealing temperature and the elongation time.
(html comment removed: [if !supportLists])1.) (html comment removed: [endif])Go to https://tmcalculator.neb.com and calculate the appropriate annealing temperature.
Annealing Temperature: _____
(html comment removed: [if !supportLists])2.) (html comment removed: [endif]) Determine the elongation time based on the size of the fragment and the speed of the polymerase.
Elongation Time: ______
Next, we need to create the PCR reaction mix. We need mix for 4 reactions (both placenta DNA preparations plus the male and female control DNA samples), but we will create enough mix for 5 reactions to avoid running out of master mix. Fill in the table below for the recipe.
|
|
1X |
5X |
|
Hot Start Taq 2X MM |
12.5 uL |
|
|
SRY primers |
1 uL |
|
|
dH2O |
|
|
|
Template DNA |
2 uL |
NA |
|
Total |
25 uL |
|
When you finish, double check these values with your instructor. Once approved, you can take the Taq and primers from the front of the classroom and create the mix.
Add 23 uL PCR mix to 4 PCR tubes. In each tube, add 2 uL of a template DNA. Once complete, cap the tubes and store them in the refrigerator until everyone has finished. We will start the PCR reaction as a group.
Final Thoughts and Results
This lab was easy for students to follow. No step was too demanding and they easily fit everything within the 3 hour timeframe. However, success was never guaranteed with this lab because I used a hackneyed approach to DNA isolation. I should have used a kit designed to isolate DNA from tissue, but I didn't have one available. Instead I used detergents and heat to break open cells and hoped that was good enough to obtain DNA. In fact, I had some students further purify DNA extracted using SDS with plasmid miniprep columns. They're not designed for genomic DNA isolation, but they were the only columns I had in lab.
This turned out to be a good idea. Because most of the PCR reactions failed, yet one of the placenta DNA samples purified with the column succeeded (P2 on the image below)
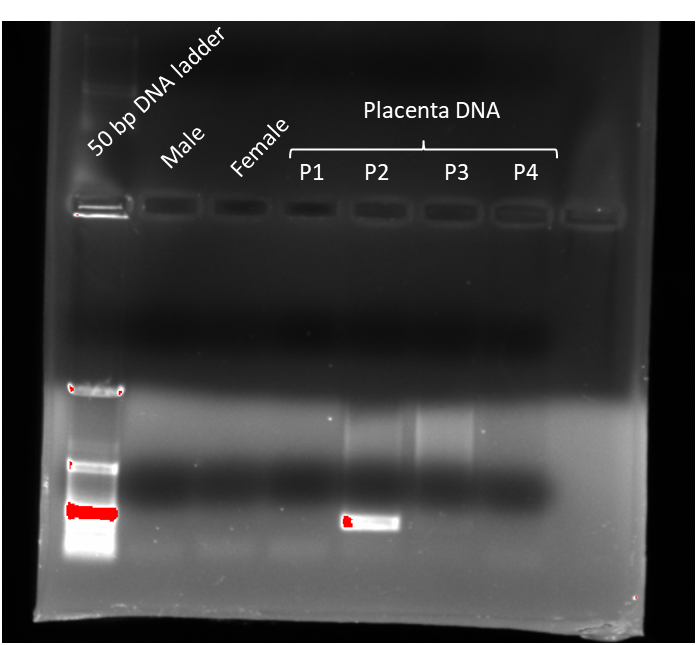
The only visible band is from a placental DNA extract. This band is at about the expected size (~250 bps). Just the fact that we have a band at this size at all tells us that the primers and polymerase worked fine. Since my child is a boy, the results align with what we expect so we can call this screen a success. PCR screens of the other DNA samples probably failed because the method for extracting DNA either didn’t yield enough DNA or contained significant contaminants that interfered with the PCR reaction.
Still a single success is pretty good considering we cobbled this experiment together from scratch.
This post has been voted on by the SteemSTEM curation team and voting trail in collaboration with @utopian-io and @curie.
If you appreciate the work we are doing then consider voting all three projects for witness by selecting stem.witness, utopian-io and curie!
For additional information please join us on the SteemSTEM discord and to get to know the rest of the community!
Sounds like a fun lab!
I predicted it was a boy from the pic! I wonder how hard it is to make that prediction. Would most humans make the correct prediction? If yes, then an app that shows pics of children and asks the user to sort them as a kind of game, would be an effective and cheap and safe sex-determination app!
Most of my class guessed boy too based on the pic. I kinda assumed it'd be harder to guess, but there must just be something about the features of him that make him look like a boy.
Thanks for reading!
Although there is exactly zero change I would attend such a lab class, reading the note was very interesting. I didn't know we could get the sex of the child from placenta remnants in the mother (I don't remember this has ever been used for my two kids; we only relied the good old echography method ;) ).
I hope putting this kind of material online will be useful for other lecturers in the future! And thanks (again; I think I told you on the first release) for choosing SteemSTEM for that! :)
Thanks. It’s an easy platform for putting this stuff up and I’d Be psyched if one other professor used something I wrote here.
For this, we will need to wait and see... ;)
Congratulations @tking77798! You have completed the following achievement on the Steem blockchain and have been rewarded with new badge(s) :
Click here to view your Board
If you no longer want to receive notifications, reply to this comment with the word
STOPVote for @Steemitboard as a witness and get one more award and increased upvotes!