Mosaic creation - a challenging yet gratifying journey
First and foremost, I would like to dedicate this post to Ruth, better known as @natureofbeing, for these 2 reasons:
The first one being that thanks to her nomination, I was selected to be a part of the @sndbox fellowship. I am so honored and excited to be a part of this project and look forward to the future now more than ever. Thank you for the opportunity Ruth!
I'm also incredibly grateful to @meanmommy33, whom I met at Steemfest and instantly bonded with - partly for her crazy personality and love of languages but mostly for her enthusiasm and drive... She has the type of energy I cling onto, and has just recently brought together an eclectic group of Steemit women (including @natureofbeing) to create @steemsugars. If you're interested in learning more about this project, click on the banner at the bottom of this post.
The second reason and the topic of what is to follow, is that for a while now, I've been wanting to share one of my creations with you and most importantly @natureofbeing.
Intrigued, I asked my mom what their plans were for this massive new floor.
"Not much for now... maybe turn it into a cozy summer hangout" she replied.
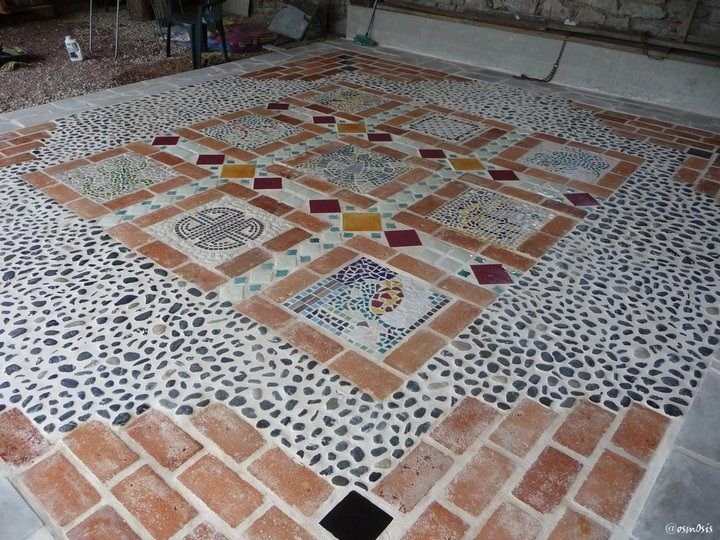
This is when it hit me - why not make a mosaic? So here I went, embarking on an artistic journey filled with its ups and downs, that would take me 3 months from beginning to end...

- SURFACE: 6m x 5.5m = approximately 33 m2 (108 square feet)
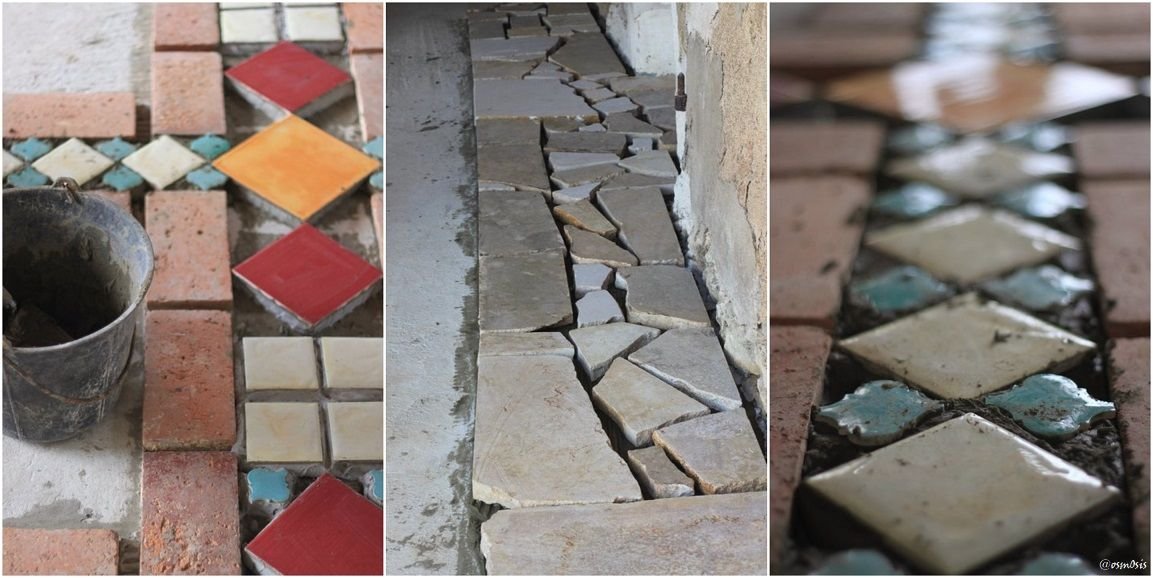
- MATERIALS: mainly recycled/reused tiles from unfinished batches leftover from previous house renovations, broken plates from my great grandma, old bricks, broken mirror, leftover tiles from hardware stores and secondhand markets, rocks of various shapes and sizes found in craft stores
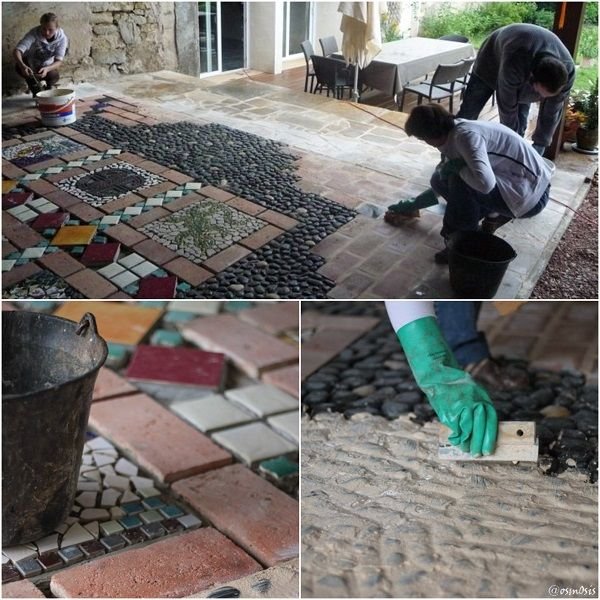
- TOOLS: buckets, cement, sponges, spirit level, metal mesh, and whatever tools we could find in my dad's workshop.


I started by placing the tiles, bricks, and various ceramics in the shapes I had envisioned would make an interesting geometric design. Geometry and symmetry - as I would find out later on - were going to be a key element to the overall success of this massive venture... they were my allies in helping me fill in the gaps. You see, the area is far too big for me to even consider doing some freestyle mosaics and letting out my "inner Pompeii", considering my drawing skills are next to zero.
All I had at the time was the passion, the drive, and the need to make something beautiful with my hands, which would hopefully be admired by a few handful of friends and family members for decades to come.

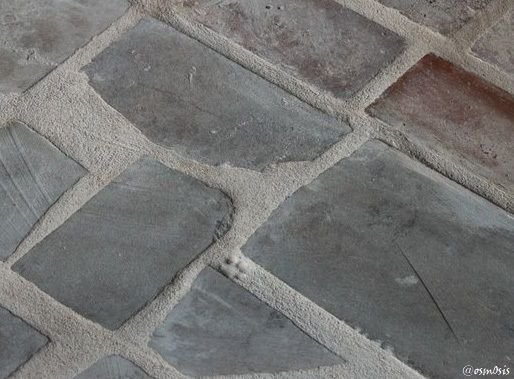
As you may begin to notice, the thickness of each material used varies greatly from one piece to another. This is problematic if you want to create a "walkable" floor piece where chairs and tables can be placed.
One thing that helped a lot was finding a giant roll of metal mesh in my dad's workshop. I cut 9 pieces to perfectly fit inside the brick enclosures and cemented my mosaics directly on top.
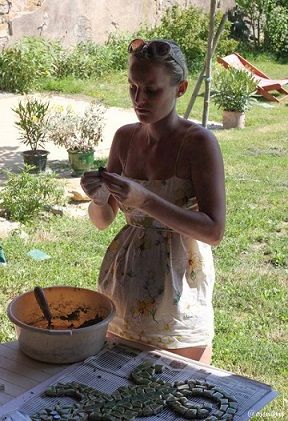
Here, I am creating a little creature which is often found roaming around the house in the hot summer months - a lizard.

This creation is to honor my great-grandfather who lived in this house from 1947 to 1979 before passing it on to my mom. He often used this Chinese symbol as a signature in his writings (poems, observations, essays...). If I am not mistaken, I believe it represents wealth (cái 財), one of the 4 blessings in Taoism (the 3 others being happiness (fú 福),professional success or prosperity (lù 禄), and longevity (shòu 寿)).
"Ruris Amor" was his motto - translated from Latin meaning "love of the countryside", which is what represented him best: a great lover of nature and farm life.
) The main "frames" were cemented on next | ) Then the individual mosaics |
|---|

It turns out they were removed from an old kitchen floor in this same house. They had quite possibly been reused a few times and were made in the 19th century. Perfect addition to my creation!


And also, we are French, we like froggies :)

Of course somebody you may now know as Boudinette, my cat, had to leave her signature in there somewhere. Can you see her little paw print?
) Compass pointing to Magnetic North | .jpg) Flowers and lizard |
|---|
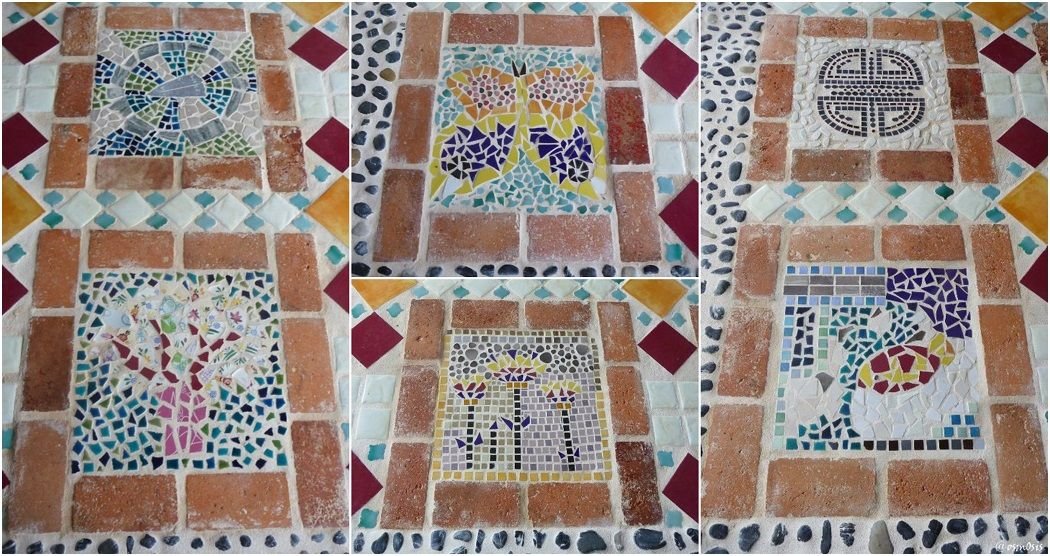

I believe that professionals apply a sealant over the top of the finished mosaic in order to waterproof and stainproof the final piece. Needless to say, after 3 months of sweat and back pains, we decided to just kick our feet back and relax (!) - the mere thought of having to continue on and put 2 more coatings of sealant was enough to make us go into a nervous breakdown.
The amount of patience, endurance, creativity, and back muscles needed to do such work is so unbelievably intense. I have not yet had the courage to create another big piece (but did do a smaller version as a communal art project with the children in my class). Before undertaking another similar project, I would definitely look into learning a bit more about the different techniques and tools to use, as well as making sure I have a team of brave helpers by my side (Thanks mom! ---> I know you're reading this)
If you like mosaics and wish to learn more about them, please go check out @natureofbeing's amazing work. She is truly an inspiration.
Have you ever started an artistic project and realized mid-way it is way more work than you had initially imagined?
Have you ever created something not having an idea of the outcome, improvised your way through it and ended up being super proud of it?

Please don't hesitate to leave comments, share ideas, upvote/resteem.
To check out some of my previous posts, click on the links below:
 Ferocious SteemCat |  Heads up in Borneo |
|---|---|
 Impressions of HONG KONG 6 |  Face and Places - NEPAL |
“Learning is not a race for information, it is a walk of discovery” - Jane Healy


Holy Moly @osm0sis, this is AMAZING!!! What a hugely ambitious piece and such an incredibly beautiful outcome, I'm so impressed. I really love how you made 9 intimate sections within the larger geometric design, you have an excellent eye. And, it can be so tricky to work with such varied materials but you've done it in a way that looks perfect.
I had to chuckle when you said that you just couldn't face one more step of sealing...I know that feeling so well when it's all you can manage just to finish something that is so much more work than imagined.
And thank you for all of the mentions and dedications...it's a huge honor and gives me a big smile :))))). You've inspired me to see if I can find old photos of my very first mosaics at age 20 which were with mixed old left over tiles and I'll make a post for you about those. xoox
Also, my fav detail is the section for your grandfather with the symbol. Such a sweet thing to honor him and the house coming through him and I like hearing about the 4 symbols he felt a connection with.
Thank you so much Ruth! I'm so happy to have met you here and hope to learn a few mosaic tricks thanks to your posts.
I'd be interested in making a wall mosaic one day but don't know if that's even possible... with gravity adding an extra element of difficulty I presume.
Can't wait to see your very first mosaic piece!!!
@osm0sis, this is truly wonderful. I almost never upvote for 100%, but now I did. Amazing work and so very beautiful. As a historian, I like the Roman mosaics very much. There are also beautiful ones in Autun, in Musee Rolin, (I go there every year also to see Eve!). I think the Romans would be jealous if they could see your work!!
When you are ever in the neighborhood, go to Herculaneum (also destroyed by the Vesuvius) and Ostia, the mosaics there are great!
Thank you so much for the upvote and lovely comments @clio. This mosaic was my Everest!!!
I don't recall ever visiting the Musee Rolin which is strange considering how close my parents live. I hope it's open next week as I will be there for the holidays.
I think my mom showed me photos of her visit to Herculaneum. It looked beautiful! And is added to the bucket list :) Great suggestions.
Ok, first of....AMAZING POST !!!!
Then, welcome to @sndbox once more! :D I cannot believe @natureofbeing is the one who nominated us both!!! :D Thank uuu!!!
But I see too much coziness between you too -hey! You're my cherie, don't ever forget that! :P Haha! I bet she'll LOVE this post, her of all people!
You're 2 of my favorites Steemians seriously <3 And I appreciate it so much that you're part of @steemsugars!
100% + resteem -uhm...obviously !!!
Hello you! Love you lady and yes I DO LOVE THIS POST!!!
Haha! Thanks for the love sweets 😍 Good fun building our community so far!
You had a fantastic vision for the space. It looks like an epic project but you achieved a remarkable work art with the result.
It sure was epic! Thanks @eroche, glad you like it :)
Wow. On one hand, that looks like a crazy amount of work. On the other - so relaxing and therapeutic!!! Amazing work!
Very true. Relaxing and therapeutic not just through the process, but also when chilling out on the finished product. Thanks @techslut!
Looks fabulous! As I was admiring the frogs, flowers, trees, and lizards, I started to imagine how cool a steemit logo would look in turquoise blue or green, or even QR codes done the same way. Not sure my pokey HK flat's the right place for such an endeavour though ;)
Try it. I dare you. Then submit the photo of your landlord's face when he sees it. #portraitphotography future winner!
Haha - But will the look on his face be from the restructural disaster or the artistic abomination? 🤔
My guess is a bit of both? But you never know... there's a small chance of him being pleasantly surprised. Worth taking the risk 😜
Hehe - Yes, the risk to reward ratio would be glorious, with the added bonus of seeing a landlord's 😱 on a blockchain for eternity!
But saying all that..how awesome would it be to have an enornmous steemit qr code visable from up high (even space)? Kinda like this fantastic green qr some people did in China with hedges 🤗
Know any free-thinking libertarian vineyard owners in your region?....hint hint 😜
That is unbelievably cool! I just stared at it for 5 minutes.
Vineyards from up top would definitely not have the same effect, but there are quite a few castle owners who have nothing better to do with their acres of land.
I'd hate to be the gardener though... I can just imagine the conversations: "little more to the left", "no right", "up, move up, UUUUP!", "Oh crap"
But OMG!!! What a PR coup it would be for steemit :) You heard it here first! ;) Could easily do it with thousands of bricks.
Haha! Don't know about "easily" but definitely do-able. You're onto something here Scotty :)
Wow! Such amazing work, they are all so beautiful. i loved to look at all these patterns, wonderful artwork:-)
Many thanks @kerlund74. Happy you like it!
Wow that is very impressive and I love the fact that you have used a lot of recycled material . It makes it look even more unique as essentially mosaics are a way of reforming something fractured :)
Thanks Dan. The recycled materials were my favorite part. Not only because a few of them have a story to tell, but also because it helped me cut down the costs quite a bit!
A pretty amazing effort and fantastic result.
It's too nice to stand on, is what I thought when I saw it in person!
What an achievement and addition to the family home. Well done you!
Thank you 💓. You are one of the rare to have had the privilege!
Niiice !
Super beau, et vraiment une bonne inspiration, ça me donne envie d'essayer tient :D
Genial! Par contre tu choisis une surface plus petite parce que franchement, cette taille, c'est la galere!!!